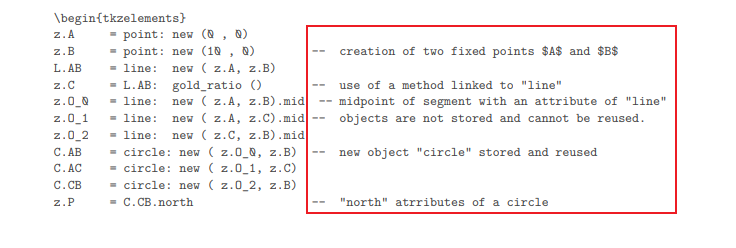
使用一个宏包之前请认真阅读一下宏包手册.
tkzelements
环境内是 lua
代码, 所以注释符应该使用 lua
的注释符 --
.
实际上在宏包手册中也有很多注释, 只是你从来没有认真看过.
使用一个宏包之前请认真阅读一下宏包手册.
tkzelements
环境内是 lua
代码, 所以注释符应该使用 lua
的注释符 --
.
实际上在宏包手册中也有很多注释, 只是你从来没有认真看过.
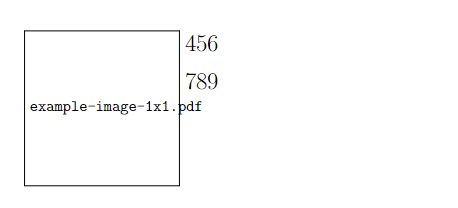
试试 \string
\newwrite\out
\immediate\openout\out=out.tex
\immediate\write\out{%
\string\pageref{myref:\mynum}
}
\immediate\closeout\out
得到
\pageref{myref:1}
\newlength{\leftmarkwidth}
\renewcommand{\headrule}{%
\settowidth{\leftmarkwidth}{\leftmark}%
\vspace*{-.5\baselineskip}%
\vrule width \leftmarkwidth height .5pt\relax%
}
\documentclass[12pt]{ctexart}
\usepackage{amsmath}
\usepackage{fancyhdr}
\usepackage{lastpage}
\usepackage{lipsum}
\pagestyle{fancy}
\fancyhf{}
\renewcommand{\thepage}{\roman{page}}
\newlength{\leftmarkwidth}
\renewcommand{\headrule}{%
\settowidth{\leftmarkwidth}{\leftmark}%
\vspace*{-.5\baselineskip}%
\vrule width \leftmarkwidth height .5pt\relax%
}
\fancyhead[L]{\leftmark}
\fancyfoot[C]{第 \thepage 页,共 \pageref{LastPage} 页}
\begin{document}
\section{如何入门\LaTeX{}}
\lipsum[2-6]
\section{如何进一步学习\LaTeX{}Long Long Long Long Long Long}
\lipsum[2-6]
\section{如何系统性学习\LaTeX{}}
\lipsum[2-6]
\section{如何入坑\LaTeX{}}
\lipsum[2-6]
\section{如何放弃\LaTeX{}Long Long Long Long}
\lipsum[2-6]
\end{document}
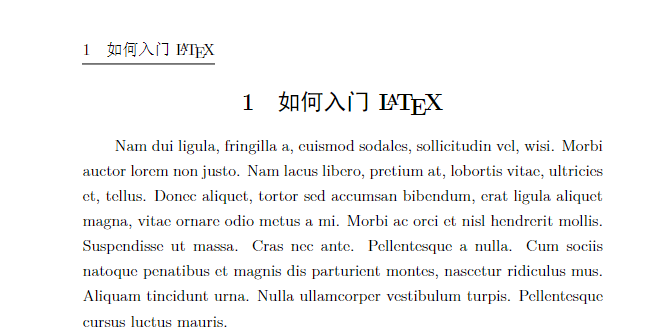
ctexart
修改了默认行距, 所以才会出现这个问题,可以尝试修改行距
\documentclass[12pt]{ctexart}
\usepackage{amsmath}
\usepackage{longdivision}
\linespread{1}\selectfont
\begin{document}
\[
\longdivision{1024}{8}
\quad
\longdivision[4]{114514}{233}
\quad
\longdivision[2]{666.666}{88}
\quad
\longdivision[repeating decimal style = dots ]{5.3}{37}
\]
\end{document}
注意报错信息 You must invoke LaTeX with the -shell-escape flag.
因为 minted
包是借助 python 的 pygments 库完成代码高亮渲染的, 需要和外部程序完成交互,所以需要开启 -shell-escape
编译参数.
鉴于你使用的 texstudio
编辑器, 可以参考下图配置编辑器以开启 -shell-escape
.
上图来源于某 qq 群,图中以 lualatex 为例,如果您习惯使用 xelatex 或者 pdflatex, 请修改对应的编译参数即可.
只需以 description
节点为基点做平移即可
\documentclass{book}
\usepackage[explicit]{titlesec}
\usepackage[margin = 2cm]{geometry}
\usepackage{enumitem}
\usepackage{tikz}
\usepackage{graphbox} % provide align = c
\makeatletter
\def\@chapter@description{}
\def\@chapter@objectives{}
\titleformat{name = \chapter}{}{}{0em}
{%
\begin{tikzpicture}[remember picture, overlay, every node/.style={inner sep = 0pt, outer sep = 0pt}]
\node[anchor = north west] at ([shift = {(2cm, -2cm)}]current page.north west) {\includegraphics[width = .2\textwidth, height = \textheight]{example-image}};
\fill[gray!40] ([shift = {(2cm + .2\textwidth, -2.5cm)}]current page.north west) rectangle ++ (.8\textwidth, -4cm);
\node[anchor = south west, inner sep = 10pt, scale = 2, font = \bfseries] at ([shift = {(2cm + .2\textwidth, -6.5cm)}]current page.north west) {#1};
\fill[gray!70] ([shift = {(-2, -2.5)}]current page.north east) rectangle ++ (-1.5, -4);
\node[rotate = 90, font=\bfseries\Large] at ([shift = {(-2.75, -4.5)}]current page.north east) {\chaptername\ \thechapter};
\node[anchor = north west, inner sep = 10pt] (description) at ([shift = {(2cm + .2\textwidth, -6.5cm)}]current page.north west) {
\begin{minipage}{\dimexpr .8\textwidth - 10pt\relax}
\parindent=2em
\@chapter@description
\end{minipage}
};
\fill[shading=radial, left color=startcolor, right color=stopcolor] ([shift = {(1, -.5cm)}]description.south west) rectangle ++ (.7\textwidth, -0.8cm);
\node[anchor = west, inner sep = 10pt, scale = 1, font = \bfseries] at ([shift = {(1, -.9cm)}]description.south west) {Objectives};
\node[anchor = north west, inner sep = 10pt] at ([shift = {(1, -1.9cm)}]description.south west) {
\begin{minipage}{\dimexpr .8\textwidth - 10pt\relax}
\parindent=2em
\@chapter@objectives
\end{minipage}
};
\end{tikzpicture}
}
\newcommand{\icon}[1]{\includegraphics[height=1em, align = c]{#1}}
\NewDocumentEnvironment{fancychapter}{m+m+b}{%
\def\@chapter@objectives{#3}
\def\@chapter@description{#2}
\chapter{#1}
\newpage
}{}
\makeatother
\usetikzlibrary{calc, intersections}
\begin{document}
\setlist[itemize]{noitemsep, leftmargin=*, label=}
% 定义渐变色
\definecolor{startcolor}{RGB}{128,128,128} % 起始颜色为黑色
\definecolor{stopcolor}{RGB}{245,245,245} % 结束颜色为白色
\begin{fancychapter}{Introduction \LaTeX}{
The principles of object-oriented programming, such asmodularity and reusability, are quite popular as they helpin reducing the complexity of programs. In order toimplement such principles in real world applications, suchas library management and nventory management, youneed to make use of an object-oriented language, such asJava.
This chapter focuses on the fundamentals and buildingblocks of the Java programming language. In addition, itexplains how to access the class members.
}
{
\begin{itemize}
\item \icon{example-image} Some test text.
\item\icon{example-image} Some test text.
\end{itemize}
}
\end{fancychapter}
\end{document}
贴一下代码,看不懂的下面评论吧
\documentclass{book}
\usepackage[explicit]{titlesec}
\usepackage[margin = 2cm]{geometry}
\usepackage{tikz}
\makeatletter
\def\@chapter@description{}
\titleformat{name = \chapter}{}{}{0em}
{%
\begin{tikzpicture}[remember picture, overlay, every node/.style={inner sep = 0pt, outer sep = 0pt}]
\node[anchor = north west] at ([shift = {(2cm, -2cm)}]current page.north west) {\includegraphics[width = .2\textwidth, height = \textheight]{example-image-a}};
\fill[gray!40] ([shift = {(2cm + .2\textwidth, -2.5cm)}]current page.north west) rectangle ++ (.8\textwidth, -4cm);
\node[anchor = south west, inner sep = 10pt, scale = 2, font = \bfseries] at ([shift = {(2cm + .2\textwidth, -6.5cm)}]current page.north west) {#1};
\fill[gray!70] ([shift = {(-2, -2.5)}]current page.north east) rectangle ++ (-1.5, -4);
\node[rotate = 90, font=\bfseries\Large] at ([shift = {(-2.75, -4.5)}]current page.north east) {\chaptername\ \thechapter};
\node[anchor = north west, inner sep = 10pt] at ([shift = {(2cm + .2\textwidth, -6.5cm)}]current page.north west) {
\begin{minipage}{\dimexpr .8\textwidth - 10pt\relax}
\parindent=2em
\@chapter@description
\end{minipage}
};
\end{tikzpicture}
}
\NewDocumentEnvironment{fancychapter}{m+b}{%
\def\@chapter@description{#2}
\chapter{#1}
\newpage
}{}
\makeatother
\begin{document}
\begin{fancychapter}{Introduction \LaTeX}
\foreach \x in {1, ..., 100} {Some test text. }
\begin{itemize}
\item Some test text.
\end{itemize}
\end{fancychapter}
\end{document}
你能提供一个 mwe 吗
可以尝试先画出这些多面体,然后拿表格对齐
你这个没有 mwe 解决不了的
提供 MWE 吧,这样看不出来.
% 定义一个新的背景模板
\defbeamertemplate{background}{overlay}{
\begin{tikzpicture}[remember picture,overlay]
\pgfmathtruncatemacro{\colorindex}{mod(\insertframenumber,10)}
% 设置纯色背景
\fill[bgcolor] (current page.south west) rectangle (current page.north east);
% 计算要绘制圆角矩形的位置
\coordinate (SW) at ($(current page.south west) + (0.275cm,0.275cm)$);
\coordinate (NE) at ($(current page.north east) + (-0.275cm,-0.275cm)$);
% 添加一个圆角矩形
\filldraw[fill=incolor\colorindex, rounded corners=0.64cm, draw=bdcolor, line width=0.6pt]
(SW) rectangle (NE);
\end{tikzpicture}
}
\mode<beamer>{%
\setbeamertemplate{background}[overlay]
}
article.cls
中
\DeclareOption{a4paper}
{\setlength\paperheight{297mm}%
\setlength\paperwidth{210mm}%
}
可以通过判断 \paperwidth
和 \paperheight
'恢复回来',其实并不是一个好的解决办法,毕竟没有人知道你原来是什么样的格式. 在 \LaTeX
中有 分组(group)
这个概念,在分组内做一些操作不会对分组外的内容有影响(前提是你没有用 \global
),请看如下场景
\centering
first paragraph ...
second paragraph ...
那么 第一段第二段都会具有 \centering
居中效果,如果是
{\centering
first paragraph ...}
second paragraph ...
只是第一段居中,第二段按原来的方式正常显示,不受 \centering
的影响. 这里的 {...}
用花括号包裹的代码块其实就是一个分组,能够有效的避免后面的内容也受到影响.
首先是你的提问不是很规范,建议熟悉 md 语法,代码使用
```tex
LaTeX
...
```
接下来说说问题,在 TeX
中 "<number>
表示 16 进制, 也即是 "3900
转换为 10 进制是 14592
可以更改你的代码为
\foreach \y in {3900,3901,...,4000}{\char "\y \quad}
问 tkzelements环境中为什么不能用%添加注释