使用 `l3coffins` 将 `amsthm` 环境与一张图片横向拼接后,整个 `coffin` 上方和下方会附带额外的空隙,如何解决?
发布于 2024-11-14 22:31:05
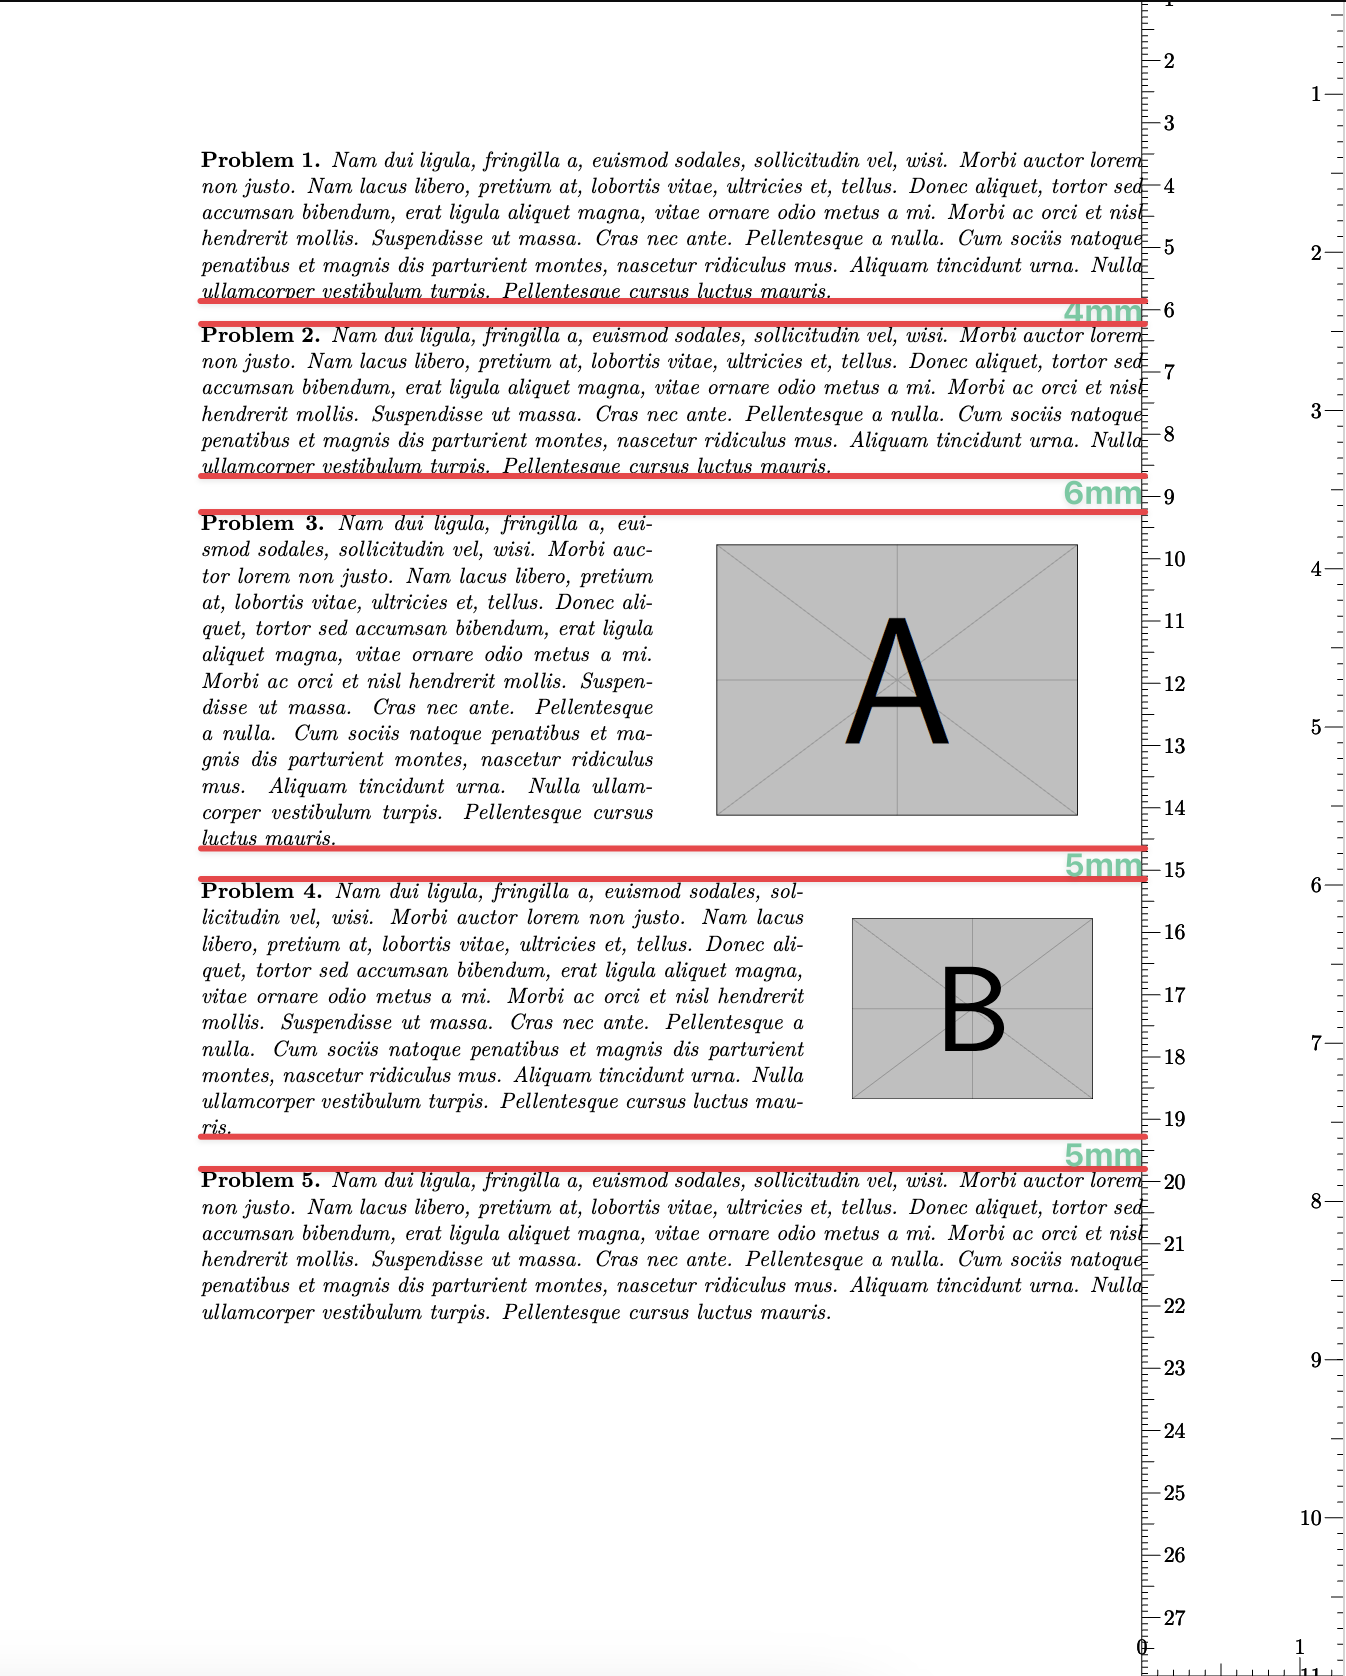
如题,我用 l3coffins 定义了个环境,该环境可将 amsthm 环境与一张图片横向拼接,但是拼接后整个 coffin 上方和下方会附带额外的空隙,如何解决?
当然,我并不想暴力使用 \vspace{},我更想知道的是这附加的竖直空隙是怎么来的,如何从源头规避掉. 测量如图所示
MWE如下
\documentclass{article}

\usepackage{scrlayer}
\DeclareNewLayer
  [ rightmargin, contents = \layercontentsmeasure
  ] {measurelayer}
\DeclareNewPageStyleByLayers{measurestyle}{measurelayer}
\pagestyle{measurestyle}

\usepackage{geometry,graphicx,lipsum,amsthm}

\newtheorem{problem}{Problem}

\ExplSyntaxOn

\coffin_new:N \l__skyrmion_textfig_main_coffin
\coffin_new:N \l__skyrmion_textfig_minor_coffin
\NewDocumentEnvironment{textfig}{O{2 \c_colon_str 1}}
  {
    \group_begin:
    \seq_set_split:Nee \l__skyrmion_textfig_ratio_seq {\c_colon_str} {#1}
    \vcoffin_set:Nnw \l__skyrmion_textfig_main_coffin
      {
        \fp_eval:n
          {
            .96*\seq_item:Nn \l__skyrmion_textfig_ratio_seq {1}/
              (
                \seq_item:Nn \l__skyrmion_textfig_ratio_seq {1} +
                \seq_item:Nn \l__skyrmion_textfig_ratio_seq {2}
              )
          }\linewidth
      }
  }
  {
    \vcoffin_set_end:
    \coffin_join:NnnNnnnn \l__skyrmion_textfig_main_coffin {r}{vc}
                          \l__skyrmion_textfig_minor_coffin {l}{vc}
                            {.02\linewidth}{0pt}
    \noindent
    \coffin_typeset:Nnnnn \l__skyrmion_textfig_main_coffin {l} {vc} {0pt} {0pt}
    \group_end:
  }

\NewDocumentCommand \textfigsplit {}
  {
    \vcoffin_set_end:
    \vcoffin_set:Nnw \l__skyrmion_textfig_minor_coffin
      {
        \fp_eval:n
          {
            .96*\seq_item:Nn \l__skyrmion_textfig_ratio_seq {2}/
              (
                \seq_item:Nn \l__skyrmion_textfig_ratio_seq {1} +
                \seq_item:Nn \l__skyrmion_textfig_ratio_seq {2}
              )
          }\linewidth
      }
  }

\ExplSyntaxOff

\begin{document}

\begin{problem}
  \lipsum[2]
\end{problem}

\begin{problem}
  \lipsum[2]
\end{problem}

\begin{textfig}[1:1]
  \begin{problem}
    \lipsum[2]
  \end{problem}
  \textfigsplit
  \centering
  \includegraphics[width = .8\linewidth]{example-image-a}
\end{textfig}

\begin{textfig}
  \begin{problem}
    \lipsum[2]
  \end{problem}
  \textfigsplit
  \centering
  \includegraphics[width = .8\linewidth]{example-image-b}
\end{textfig}

\begin{problem}
  \lipsum[2]
\end{problem}

\end{document}关注者
0
被浏览
30.3k


