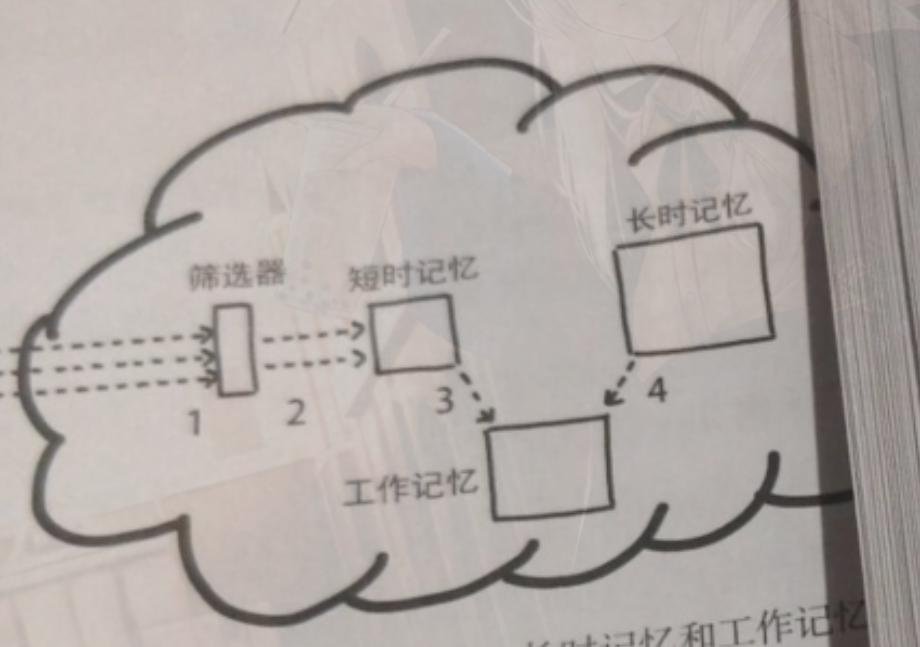
前几天有群友提出绘制如下的图片效果
经过尝试,绘制了如下的MWE和效果...
\documentclass[margin=1.5cm]{standalone}
\usepackage{ctex}
\usepackage{tikz}
\usetikzlibrary{shapes.symbols,positioning,calc}
\begin{document}
\begin{tikzpicture}[auto,rect/.style={rectangle,rounded corners=1mm,fill=blue!30,draw=blue}]
%\draw[help lines] (-5,-5) grid (5,5);
\node[cloud,fill=gray!20,aspect=2] at (0,0) {\phantom{1234567890\\1234567890\\1234567890}};%
\node[rect,minimum height=1.2cm,minimum width=.5cm] (A) at (-2.5,.5) {A};
\node[rect,minimum height=.8cm,minimum width=1cm] (B) at (-1,.5) {B};
\node[rect,minimum height=1cm,minimum width=1.2cm] (C) at (.5,-1) {C};
\node[rect,minimum height=1.3cm,minimum width=1.5cm] (D) at (2.3,.5) {D};
\node[above=.6cm] at (A) {筛选器};%想要缩到4行的上面的定义式中
\node[above=.6cm] at (B) {短时记忆};
\node[left=.6cm] at (C) {工作记忆};
\node[above=.6cm] at (D) {长时记忆};
\draw[<-,dashed] (A.west) -- ++(-3cm,0);
\draw[<-,dashed] ($(A.south west)!0.75!(A.north west)$) -- ++(-3cm,0);
\draw[<-,dashed] ($(A.south west)!0.25!(A.north west)$) node[below left] {1} -- ++(-3cm,0);
\draw[->,dashed] ($(A.south east)!0.6!(A.north east)$) -- ($(B.south west)!0.64!(B.north west)$);
\draw[->,dashed] ($(A.south east)!0.4!(A.north east)$) -- ($(B.south west)!0.34!(B.north west)$) node[midway,below] {2};
\draw[->,dashed] (B.south east) -- (C.north west) node[midway,below left=-3pt] {3};
\draw[<-,dashed] (C.north east) -- (D.south west) node[midway,below right=-3pt] {4};
\end{tikzpicture}
\end{document}
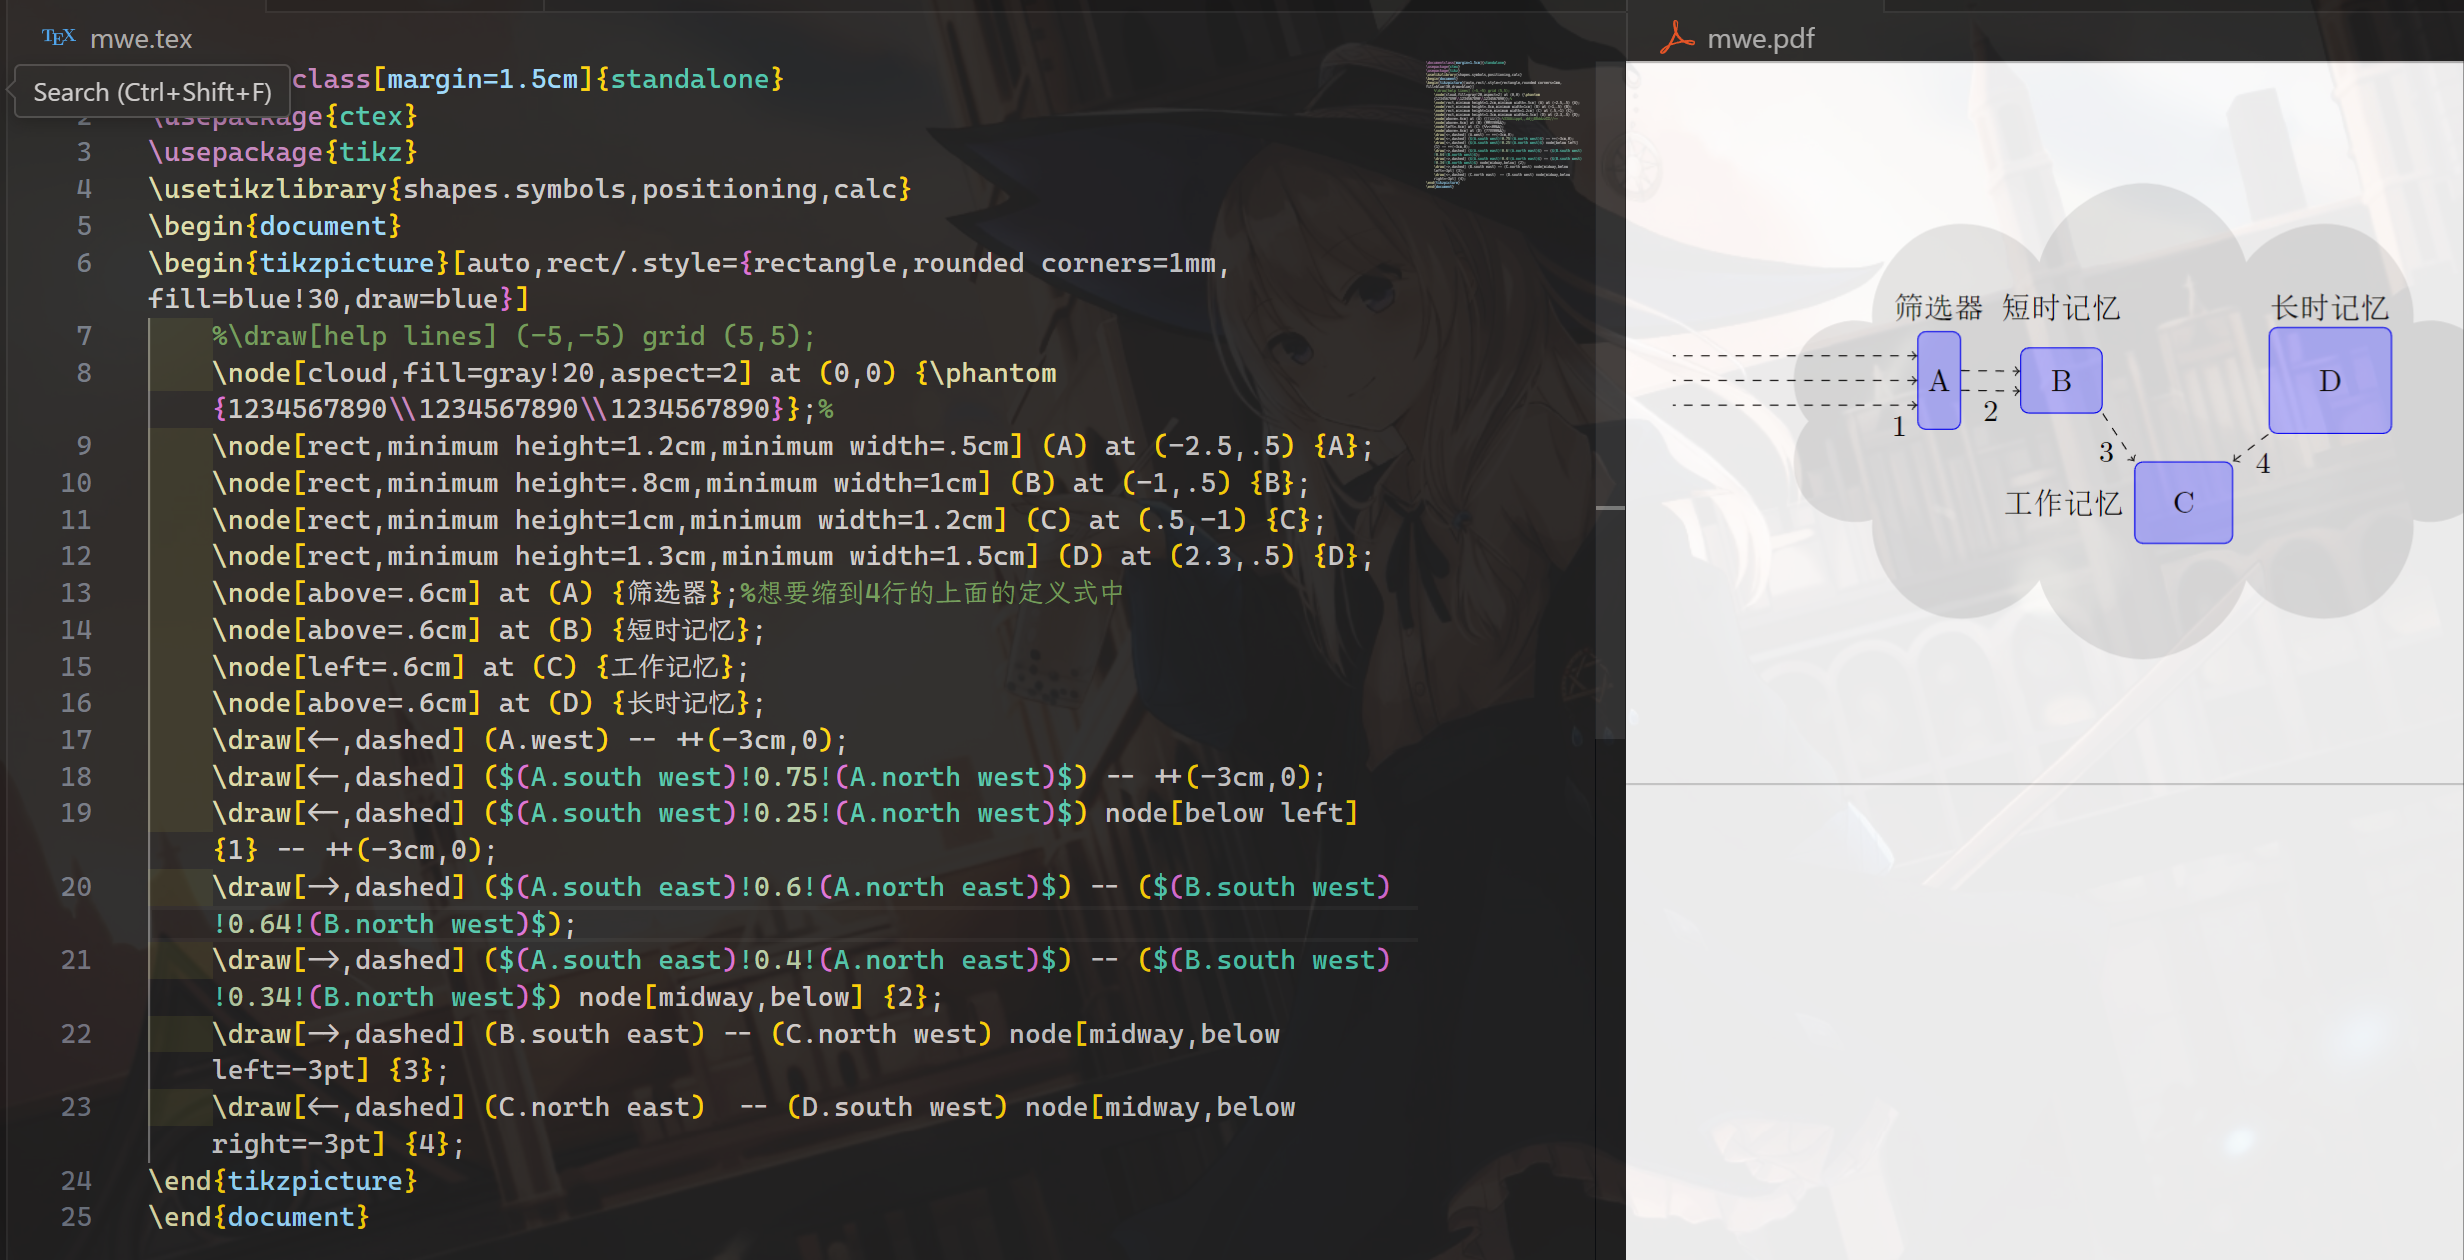
但仍存在以下的问题:
绘制(A)与(B)中曲线时,有无简单的不显式获取node.west横坐标的方式,让(A)--(B)之间的虚线平行于node的上下边界,换言之,下面的代码其实是不太好的,怎么修改.
\draw[->,dashed] ($(A.south east)!0.6!(A.north east)$) -- ($(B.south west)!0.64!(B.north west)$);
\draw[->,dashed] ($(A.south east)!0.4!(A.north east)$) -- ($(B.south west)!0.34!(B.north west)$) node[midway,below] {2};
\node[above=.6cm] at (A) {筛选器};%想要缩到4行的上面的定义式中
\node[above=.6cm] at (B) {短时记忆};
\node[left=.6cm] at (C) {工作记忆};
\node[above=.6cm] at (D) {长时记忆};
是否可以缩到上方的node命令中
4.整体tikz代码是否可以进一步改进结构/更优雅的写法,诚心求教,谢谢!
把我能优化的优化了一下
\documentclass[margin=1.5cm]{standalone}
\usepackage{ctex}
\usepackage{tikz}
\usetikzlibrary{shapes.symbols,positioning,calc}
\begin{document}
\begin{tikzpicture}[auto, rect/.style 2 args = {rectangle,rounded corners=1mm,fill=blue!30,draw=blue, minimum height = #1, minimum width = #2}]
%\draw[help lines] (-5,-5) grid (5,5);
\node[cloud,fill=gray!20,aspect=2] at (0,0) {\phantom{1234567890\\1234567890\\1234567890}};%
\node[rect = {1.2cm}{0.5cm}, label = above:筛选器] (A) at (-2.5,.5) {A};
\node[rect = {0.8cm}{1.0cm}, label = above:短时记忆] (B) at (-1,.5) {B};
\node[rect = {1.0cm}{1.2cm}, label = left:工作记忆] (C) at (.5,-1) {C};
\node[rect = {1.3cm}{1.5cm}, label = above:长时记忆] (D) at (2.3,.5) {D};
\draw[<-, dashed] (A.west) -- ++(-3cm,0);
\draw[<-, dashed, transform canvas = {yshift = .3cm}] (A.west) -- ++ (-3cm, 0);
\draw[<-, dashed, transform canvas = {yshift = -.3cm}] (A.west) -- ++ (-3cm, 0);
\draw[<-, dashed, transform canvas = {yshift = .2cm}] (B.west) -- (A.east);
\draw[<-, dashed, transform canvas = {yshift = -.2cm}] (B.west) -- (A.east);
\draw[->,dashed] (B.south east) -- (C.north west) node[midway,below left=-3pt] {3};
\draw[<-,dashed] (C.north east) -- (D.south west) node[midway,below right=-3pt] {4};
\end{tikzpicture}
\end{document}
优化代码的同时也要考虑代码的可读性,不要一味的追求短.
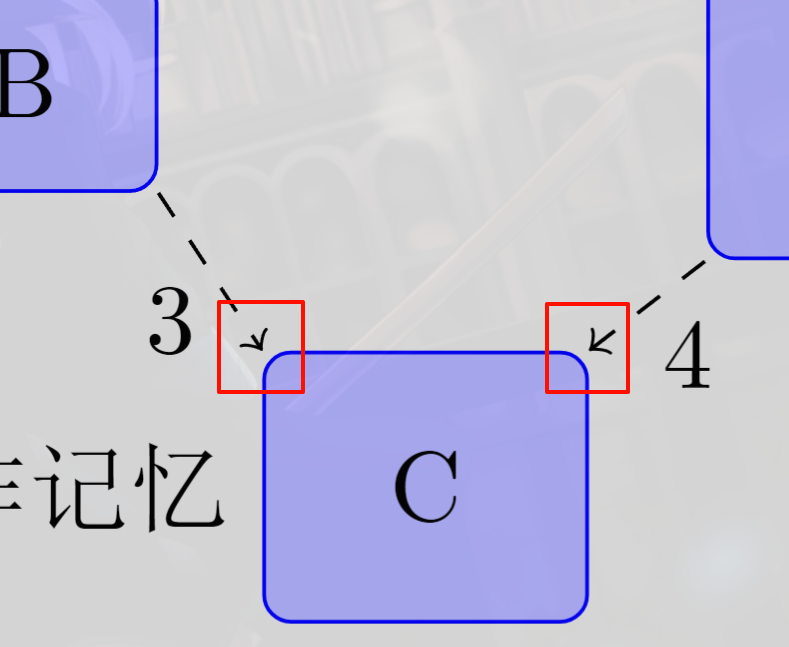
对于 问题3 来说,这很简单
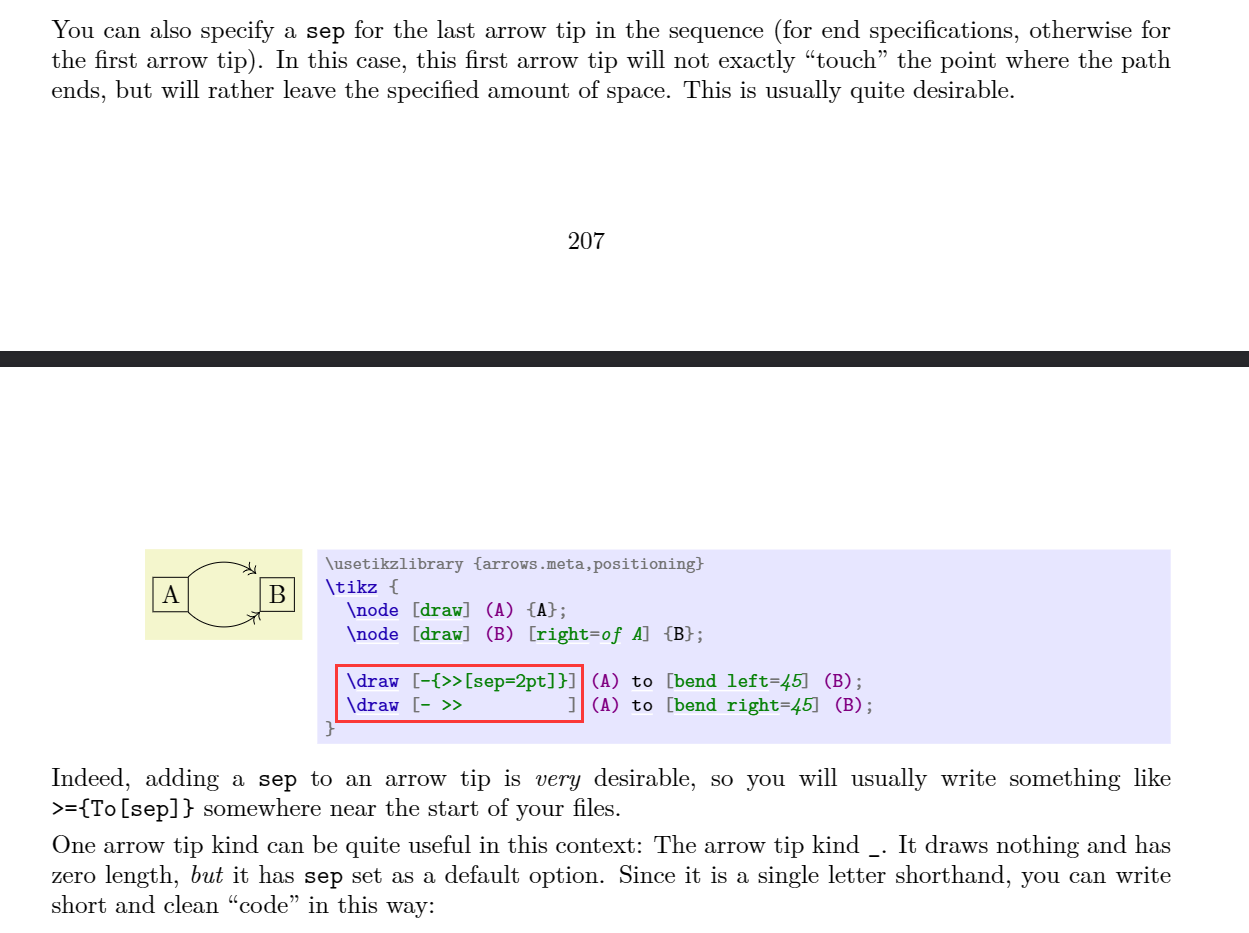
利用 To[sep]
可以解决。
鉴于只涉及到 问题3 中的三个方块的箭头,这里就删减一部分代码
\documentclass[margin=1.5cm]{standalone}
\usepackage{ctex}
\usepackage{tikz}
\usetikzlibrary{shapes.symbols,calc}
\usetikzlibrary {arrows.meta,positioning}
\begin{document}
\begin{tikzpicture}[auto,rect/.style={rectangle,rounded corners=1mm,fill=blue!30,draw=blue}]
\node[rect,minimum height=.8cm,minimum width=1cm] (B) at (-1,.5) {B};
\node[rect,minimum height=1cm,minimum width=1.2cm] (C) at (.5,-1) {C};
\node[rect,minimum height=1.3cm,minimum width=1.5cm] (D) at (2.3,.5) {D};
\draw[-{>[sep=-0.5mm]},dashed] (B.south east) -- (C.north west) node[midway,below left=-3pt] {3};
\draw[{<[sep=-0.5mm]}-,dashed] (C.north east) -- (D.south west) node[midway,below right=-3pt] {4};
\end{tikzpicture}
\end{document}
注意两点:
\usetikzlibrary {arrows.meta,positioning}
即使你之前已经引用过了 positioning
,我还是将它移动至这个地方,以说明这两个包在这个功能上是必须的。\draw[-{>[sep=-0.5mm]},dashed]
以及 \draw[{<[sep=-0.5mm]}-,dashed]
这里的用法后面会说。1000多页的文档,怎么找到的?
搜索 touch
只有27个匹配项,可以试试, 在207-208页处有
下一步找到合适的距离让箭头接触圆角,如果是普通的node就接触了,可以判定为rounded corners
影响了,于是搜索rounded corners
,在158页处有
计算距离不用说了 $(\sqrt{2}-1)r$ 这里的 r
就是你设置的 rounded corners = 1mm
,于是加上{[sep=0.5mm]}
就够了。
感谢鱼先生,又一次巩固学习了
label
,带参数的./
以及transform canvas
的用法.transform canvas
的操作好秀啊,棒棒!