啸行
啸行
这家伙很懒,什么也没写!

注册于 5年前

回答
131
文章
4
关注者
19

\documentclass{article}
\usepackage{ctex}
\usepackage[top=2.5cm,bottom=2.5cm,left=2.5cm,right=2.5cm]{geometry}
\usepackage{graphicx}
\usepackage[labelformat=simple]{subcaption} % Modify
\renewcommand{\thesubfigure}{(\alph{subfigure})} % Add
\usepackage[hidelinks]{hyperref}
\usepackage{cleveref}
\crefformat{subfigure}{#2图~#1#3}

\begin{document}
  
\begin{figure}[htbp]
  \centering
  \begin{subcaptionblock}[b]{0.48\textwidth} % Modify
    \centering
    \includegraphics[width=\textwidth]{example-image-a}
    \subcaption{子图 A}
    \label{fig:subfig1}
  \end{subcaptionblock} % Modify
  \hfill
  \begin{subcaptionblock}[b]{0.48\textwidth} % Modify
    \centering
    \includegraphics[width=\textwidth]{example-image-b}
    \subcaption{子图 B}
    \label{fig:subfig2}
  \end{subcaptionblock} % Modify
  \begin{subcaptionblock}[b]{0.48\textwidth} % Modify
    \centering
    \includegraphics[width=\textwidth]{example-image-c}
    \subcaption{子图 C}
    \label{fig:subfig3}
  \end{subcaptionblock} % Modify
  \hfill
  \begin{subcaptionblock}[b]{0.48\textwidth} % Modify
    \centering
    \includegraphics[width=\textwidth]{example-image-a}
    \subcaption{子图 A}
    \label{fig:subfig4}
  \end{subcaptionblock} % Modify
  \caption{总图}
  \label{fig:main}
\end{figure}

如\cref{fig:subfig2} 所示。
  
\end{document}

image.png

先来看这样的例子:

\documentclass{article}
\usepackage[fontset=none]{ctex}
\usepackage{xcolor}
\definecolor{mygreen}{RGB}{0,166,82}
\usepackage[papersize={10.5cm,14.85cm},scale=0.8,showframe]{geometry}
\setCJKmainfont[BoldFont=SimHei,ItalicFont=KaiTi,BoldItalicFont=FangSong]{SimSun}
\usepackage{zhnumber}
\usepackage{tcolorbox}
\newcounter{dytcb}
\tcbuselibrary{breakable}
\tcbuselibrary{skins}
\newenvironment{dytcb}[2][]%
{%
  \begin{tcolorbox}[
    enhanced,
    frame empty,
    interior empty,
    coltitle=white,
    fonttitle=\bfseries,
    colbacktitle=mygreen,
    rounded corners,
    borderline={0.25mm}{0mm}{mygreen},
    breakable,
    top=4mm,
    before skip=3.5mm,
    attach boxed title to top left={yshift=-3mm,xshift=5mm},
    boxed title style={boxrule=0pt,sharp corners=all},
    title={第\stepcounter{dytcb}\zhdig{dytcb}}单元,
    #1
    ]
    #2
  }{\end{tcolorbox}}
\begin{document}
  \begin{dytcb}{H}
    Hello, \LaTeX !
  \end{dytcb}
  
  Hello, \LaTeX !
\end{document}

image.png

我不是很懂 tcolorbox,通过这例子,我大概猜一下,你的例子里的 H 其实被 dytcb 当成是第1个参数了。

\documentclass{article}
\usepackage{amsmath}
\usepackage{cases}
\usepackage{bm}

\begin{document}
  \begin{numcases}{a=}
    \dot{\bm{\lambda}} (t) &$= -\frac{\partial H}{\partial \bm{x}}$, \label{2-2-4} \\
    \frac{\partial H}{\partial \bm{u}} &$= 0$, \label{2-2-5} \\
    \dot{\bm{x}} &$= \bm{f} (t,\bm{x}, \bm{u})$, \notag
  \end{numcases}
\end{document} 

image.png

我使用如下命令编译出现了目录:

latexmk -pdfxe whu-beamer2015.tex

我用的操作系统是 Windows,但这不影响上述命令的使用,按理说 Ubuntu 上完整安装 texlive 也一样可以用。
截图失效就不放了。

这需要更改 nxuthesis.cls 文件。
比如说你想改“图2.1”的“2.1”字号,就需要找到 nxuthesis.cls 文件中关于 \thefigure 的定义,在第1707行

\renewcommand\thefigure{%
  \xiaowu
  \ifnum\c@chapter>\z@
    \thechapter
    \nxu@figure@number@separator
  \fi
  \@arabic\c@figure
}

这里的\xiaowu前面有定义,见600行

\nxu@def@fontsize{xiaowu}{9bp}

如果你想改变“2.1”变大,将 \xiaowu 改为 \wuhao 即可。

其他内容以此类推。

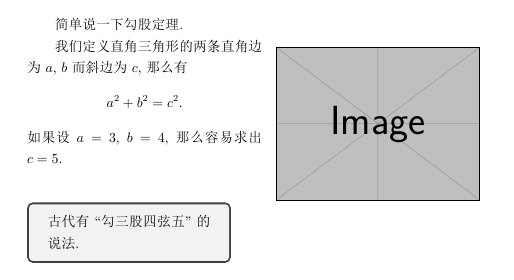
我尝试了一下这样的代码:

\documentclass{ctexart}
\usepackage{tcolorbox}
\usepackage{wrapstuff}

\begin{document}
  简单说一下勾股定理.
  \begin{wrapstuff}[r]
    \includegraphics[width=0.45\linewidth]{example-image.pdf}
  \end{wrapstuff}
  我们定义直角三角形的两条直角边为 $a$, $b$ 而斜边为 $c$,
  那么有
  \[ a^2 + b^2 = c^2. \]
  如果设 $a=3$, $b=4$, 那么容易求出 $c=5$.
  
  \begin{tcolorbox}[width=0.45\linewidth]
    古代有``勾三股四弦五''的说法.
  \end{tcolorbox}  
\end{document}

image.png

做得极端点
cdba9937d13dc785a743dcce2e3a9aa8.png

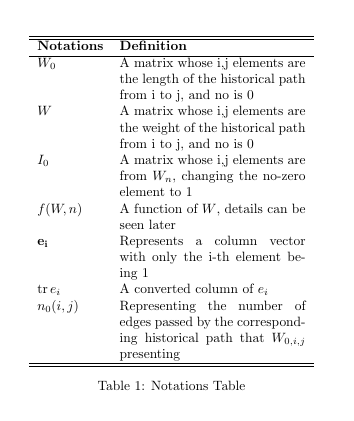
\documentclass{article}
\usepackage{mathtools}
\begin{document}
  \begin{table}
    \centering 
    \begin{tabular}{lp{0.4\linewidth}}
      \hline\hline
      \multicolumn{1}{c}{\textbf{Notations}} & \textbf{Definition}                                                                                      \\ \hline
      $ W_{0} $                              & A matrix whose i,j elements are the length of the historical path from i to j, and no is 0               \\
      $ W $                                  & A matrix whose i,j elements are the weight of the historical path from i to j, and no is 0               \\
      $ I_{0}$                               & A matrix whose i,j elements are from $W_{n}$, changing the no-zero element to 1                          \\
      $ f(W,n) $                             & A function of $W$, details can be seen later                                                              \\
      $ \mathbf{e_{i}}$                      & Represents a column vector with only the i-th element being 1                                            \\
      $ \operatorname{tr}{e_{i}} $           & A converted column of $e_{i}$                                                                            \\
      $n_{0}(i,j) $                          & Representing the number of edges passed by the corresponding historical path that $W_{0,i,j}$ presenting \\ \hline\hline
    \end{tabular} 
    \caption{Notations Table} 
  \end{table} 
\end{document}

zhfs真的存在于你的电脑里吗?正常来讲,能够使用的字体应该都在 fc-list 的结果里,这个命令你可以先查查怎么用。

很早以前我见过这样的答案,但是我现在忘了在哪看到的了。

\documentclass{ctexart}
\usepackage{xeCJKfntef}
\usepackage{xcolor}
\usepackage{tagging}
\usetag{ans}% 注释掉该行语句不显示答案
\newcommand{\answer}[1]{\iftagged{ans}{\CJKunderline{#1}}{{\CJKunderline[textformat=\color{white}]{#1}}}}

\begin{document}
圆是\answer{到定点的距离等于定长的点的集合}.
\end{document}

这么提问是希望我们对着图片再打一遍代码吗 :)

align 和它的不带标号的版本 align* 可以排列多列对齐的公式,列与列之间用 & 分隔,而且在 & 左右的公式分别按照右对齐、左对齐的方式排列,所以很多人在用多个 & 时就从观感上容易产生很大的间距,相信这点你已经知道。在使用时,& 一般会放 = 的前面:

\documentclass{article}
\usepackage{amsmath}
\begin{document}
\begin{align*}
  x &= t & x &= \cos t & x &= t^2 \\
  y &= 2t & y &= \sin(t+1) & y &= e^t
\end{align*}
\end{document}

image.png

当然有时也可以放在二元运算符前面,只不过这时我通常会这么用(lshort-zh-cn 中也有类似的用法)

\documentclass{article}
\usepackage{amsmath}
\begin{document}
\begin{align*}
  (a+b)^2 ={}& a^2 + b^2\\
  & + 2ab
\end{align*}
\end{document}

image.png

alignat 及不带标号的 alignat* 则不在列与列之间产生间距,但可以手工增加间距。alignat 环境有一个参数,表示每行要对齐的公式个数,每两列一组,如下面把列间距设定为一个 \quad 的距离

\documentclass{article}
\usepackage{amsmath}
\begin{document}
\begin{alignat*}{2}
  x &= \sin t & \quad & t \ge 0 \\
  y &= \cos t &       & t < 0
\end{alignat*}
\end{document}

image.png

看第2行第3列我没用 \quad,但是间距依然保留下来,这是因为上一行的 \quad 位置必须在每一行都有所体现。它的这种特性就非常适合排版线性方程组

\documentclass{article}
\usepackage{amsmath}
\begin{document}
\begin{alignat*}{6}
  & x_1 & & + x_2 & & +x_3 & &+ x_4 & &+ x_5 & &=1 \\
  & x_1 & & & & +x_3 & & & & + x_5 & &=2 \\
  & & & \mathbin{\phantom{+}}x_2 & & & & +x_4 & & & &=3
\end{alignat*}
\end{document}

image.png
关于 \mathbin,可以参考 tex.stackexchange.com 的解释。\phantom 则是产生一个幻影。

可以考虑使用 wrpstuff 包处理图文混排,然后 tasks 包做题目的排版

biblatex 最好就用 biber,用 bibtex 的话,功能依旧受限。

不要用

\documentclass[mathserif]{beamer}

换成

\documentclass{beamer}
\usefonttheme[onlymath]{serif}

发布
问题