Eureka
Eureka
这家伙很懒,什么也没写!

注册于 2年前

回答
12
文章
0
关注者
0

其实这几个问题的共同原因都在 \chapter 命令的定义中了, 参见 book.cls 中的定义:

\newcommand\chapter{\if@openright\cleardoublepage\else\clearpage\fi
                   \thispagestyle{plain}%
                   \global\@topnum\z@
                   \@afterindentfalse
                   \secdef\@chapter\@schapter}

这个命令里面的 \thispagestyle{plain} 就产生了这个页码. 而对应的 \tableofcontents 的定义如下:

\newcommand\tableofcontents{%
   \if@twocolumn
     \@restonecoltrue\onecolumn
   \else
     \@restonecolfalse
   \fi
   \chapter*{\contentsname
       \@mkboth{%
          \MakeUppercase\contentsname}{\MakeUppercase\contentsname}}%
   \@starttoc{toc}%
   \if@restonecol\twocolumn\fi
   }

这个里面调用的是 \chapter* 命令,其实就是上面的那个 \@schapter 命令. 所以说解决办法也就很简单了, 在一个局部里面, 把 \tableofcontents 内部的这个 \chapter* 改一下就行了. 你可以选择重定义前者,也可以选择重定义后者. 这里我使用前者:

\documentclass[landscape,openany]{book}
\usepackage[a6paper]{geometry}
\makeatletter
\renewcommand\tableofcontents{%
          \if@twocolumn
            \@restonecoltrue\onecolumn
          \else
            \@restonecolfalse
          \fi
          \@schapter{\contentsname
              \@mkboth{%
                  \MakeUppercase\contentsname}{\MakeUppercase\contentsname}}%
          \@starttoc{toc}%
          \if@restonecol\twocolumn\fi
          }
\makeatother

\begin{document}
\pagestyle{empty}
\tableofcontents 

\chapter{First}
\chapter{Second}
\chapter{Third}
\chapter{First}
\chapter{Second}
\chapter{Third}
\chapter{First}
\chapter{Second}
\chapter{Third}
\end{document}

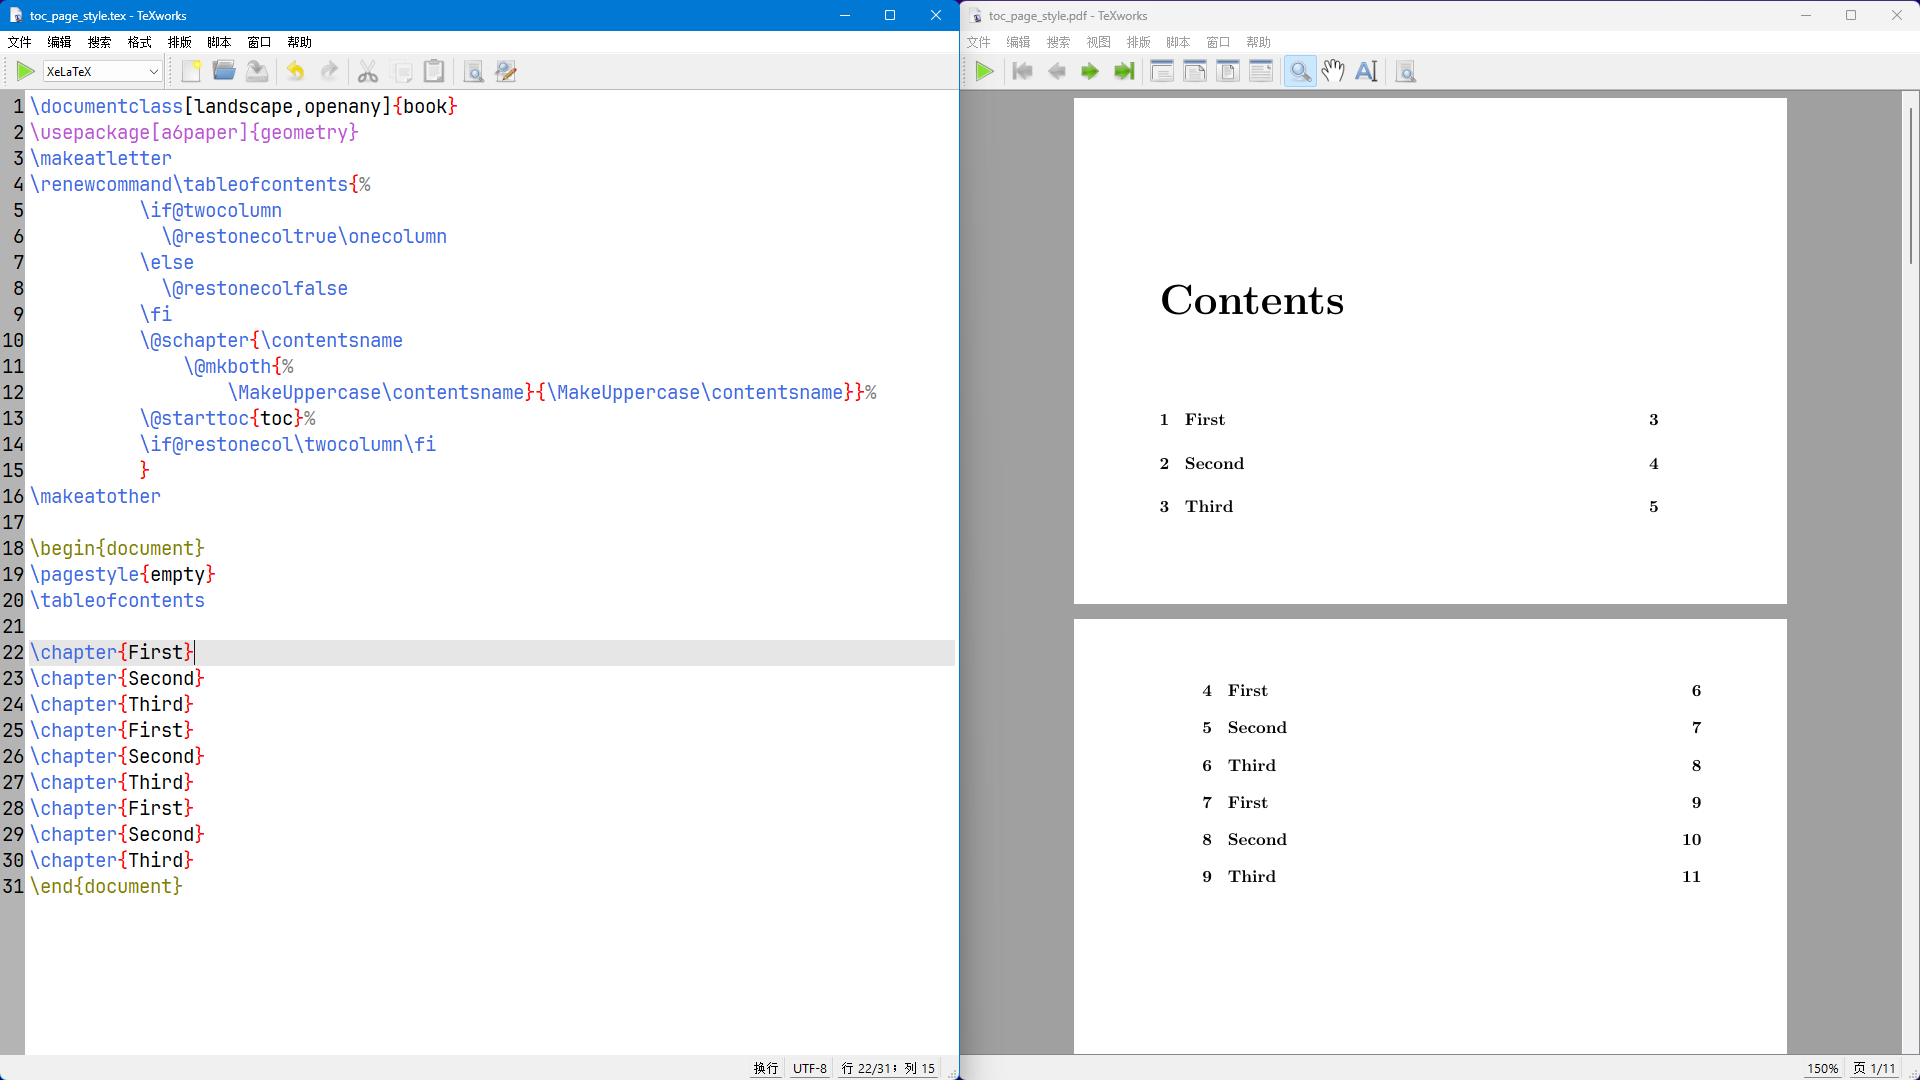
编译结果如下:
image.png

为了更好的理解这个问题,你可以试试下面这个例子:

\documentclass[landscape,openany]{book}
\usepackage[a6paper]{geometry}
\makeatletter

\begin{document}
\pagestyle{empty}
\@schapter{Contents}
\thispagestyle{plain} % comment this line to test page style
\@starttoc{toc}

\chapter{First}
\chapter{Second}
\chapter{Third}
\chapter{First}
\chapter{Second}
\chapter{Third}
\chapter{First}
\chapter{Second}
\chapter{Third}
\end{document}

至于你后面提到的 tocloft 宏包,你可以自己去看它的实现.

解答

你提问中的 cmu 疑似拼写有误? 回到问题本身:是这样的,你可以从原始的 Computer Modern math 中把 \int, \sum 这两个符号给 偷过来. 具体的示例如下:

% TeX-Program: pdflatex
\documentclass{article}
\usepackage{stix}
\DeclareSymbolFont{cmmlargesymbols}{OMX}{cmex}{m}{n}
\DeclareMathDelimiter{\Newint}{\mathop}{cmmlargesymbols}{"52}{cmmlargesymbols}{"5A}
\DeclareMathDelimiter{\Newsum}{\mathop}{cmmlargesymbols}{"50}{cmmlargesymbols}{"58}

\begin{document}
stix style int $\int_a^b$ and sum $\sum_a^b$:

\[
  \int_{a}^{b} x \;\mathrm{d}x = \sum_{i=1}^{\infty}\frac{x^2}{2} + C
\]

computer modern math style int $\Newint_a^b$ and sum $\Newsum_a^b$:
\[
  \Newint\nolimits_{a}^{b} x \;\mathrm{d}x = \Newsum_{i=1}^{\infty}\frac{x^2}{2} + C
\]
\end{document}

编译结果:
image.png

备注

  • 当然,你可以无脑使用 unicode-math 这个宏包,不过就需要使用 xetex 了,我这个方案的话,你可以在 pdftex 下进行编译.
  • 目前这个偷过来的方式比较的粗糙, 如果有后续要求,请继续提问

前言

其实在 TSE 上已经有人问过一样的问题了,如下: printing colored borders of hyperref package (latex)

但是下面的回答是叫他每次都手动添加. 这肯定不是你想要的:
image.png

1. ocgcolorlinks

首先解答关于最后那个 ocgcolorlinks 的问题, 这个东西其实是有用的,只不过你没有使用正确。这个 ocgcolorlinks 只能够控制 linkcolor, 并不能够控制 linkborder。下面就是把此 option 分别置为 falsetrue 的打印预览图:

  • 置为 false:

image.png

  • 置为 true:

image.png

所以现在想要在打印的时候保留这个 border,你需要的也许是 ocgbordercolors 而不是 ocglinkcolors , 但是遗憾的是,目前 hyperref 没有这个选项. 而且它还采用了一个比较 邪恶 的的做法,直接在宏包中写入 pdf 源码. hyperref 中的这部分代码如下:

\def\Hy@setpdfborder{%
  \ifx\@pdfborder\@empty
  \else
    /Border[\@pdfborder]%
  \fi
  \ifx\@pdfborderstyle\@empty
  \else
    /BS<<\@pdfborderstyle>>%
  \fi
}

你猜猜这个 /BS<< ... >> 以及 /Border[...] 是啥东西?这个就是手写pdf,其实在 pdf specification 中你可以找到这两个命令的用法的, 如下:
image.png

所以你如果会手写 pdf 的话,你可以做出来一些比较 interesting 的 border style. 比如下面这样的:
image.png

但是由于目前,我也不会手写 pdf, 所以我采用的方法是就是重定义这部分命令. 具体操作细节见下面说明.

2. 思路分析

下面我们就看看这个 ocglinkcolors 选项怎么起作用的? hyperref 宏包中跟这部分有关的代码 snippets 如下:

% line: 4501
\Hy@AtBeginDocument{%
  \ifHy@ocgcolorlinks
    \kvsetkeys{Hyp}{colorlinks}%
    \ifHy@pdfa
      \Hy@Warning{%
        PDF/A: Optional Content Groups are prohibited,\MessageBreak
        using `colorlinks' instead of `ocgcolorlinks'%
      }%
      \Hy@ocgcolorlinksfalse
    \fi
  \fi
  \ifHy@ocgcolorlinks
  \else
    \Hy@DisableOption{ocgcolorlinks}%
  \fi
  \ifHy@colorlinks
    \def\@pdfborder{0 0 0}%
    \let\@pdfborderstyle\@empty
    \Hy@CatcodeWrapper{%
      \RequirePackage{color}%
     }%
    \def\Hy@colorlink#1{%
      \begingroup
      \HyColor@UseColor#1%
    }%
    \def\Hy@endcolorlink{\endgroup}%
    \Hy@Info{Link coloring ON}%
  \else
    \ifHy@frenchlinks
      \def\Hy@colorlink#1{\begingroup\fontshape{\scdefault}\selectfont}%
      \def\Hy@endcolorlink{\endgroup}%
      \Hy@Info{French linking ON}%
    \else
      \def\Hy@colorlink#1{\begingroup}%
      \def\Hy@endcolorlink{\endgroup}%
      \Hy@Info{Link coloring OFF}%
    \fi
  \fi
  % line: 4538
  ...
 
 }

这个 ocglinkcolors 默认为 false, 所以默认情况下会直接走到判断 \ifHy@colorlinks. 如果此时 colorlinks 这个选项为 true,那么 hyperref 会取消这个 border, 对应的语句为: def\@pdfborder{0 0 0}. 然后把这个 \Hy@colorlink1 放到对应的 hyper-text 前面,把 \Hy@endcolorlink 放到 这个 hyper-text 后面,可以想象成下面这个样子:

\Hy@colorlink <hyper-text> \Hy@endcolorlink

这个就是 ocglinkcolors 的运行过程. 想要把这个 box 输出出来也就很简单了:只要把这个 <hyper-text> 放到一个 \fbox 命令中就行了. 但是因为这里是以前以后的两个命令,时候我就用了一个 box 来截取这个 <hyper-text>, 然后把这个 box 放到 \fbox 中. 具体可编译的的代码如下:

\documentclass{article}
\usepackage{xcolor}
\usepackage[colorlinks=true]{hyperref}
\newsavebox{\mybox}
\NewDocumentEnvironment{hyperbox}{}
  {\begin{lrbox}{\mybox}}
  {\end{lrbox}\fbox{\usebox{\mybox}}}

\begin{document}
\makeatletter
\def\Hy@colorlink#1{%
  \begingroup%
  \HyColor@UseColor#1%
  \begin{hyperbox}
}%
\def\Hy@endcolorlink{\end{hyperbox}\endgroup}%
\makeatother


\tableofcontents
\section{Test Title}
Href Test: \href{www.google.com}{GOOGLE}


\subsection{Bib Test}
This is a test.\cite{meow}
\begin{thebibliography}{1}
\setcounter{enumiv}{15}
\bibitem{meow} Meow, Cat. \emph{Meow}. 2021.
\end{thebibliography}
\end{document}

打印预览结果:
image.png

3. 备注

  • 如果你想要在 colorlinks=false 的情况下输入这个 \fbox 的话,你可以定义 colorlinks=false 那个分支的两个命令.
  • 盒子的样式你也可以自定义,把那个 \fbox 换成你喜欢的任何的盒子命令就可以了,比如 \tcbbox{}.
  • 个人觉得这个方法目前还不好,如果有更复杂的需求,请继续提问,我就可能会改用其它更好的方法

Happy Hyperref !!

目前给一个比较粗糙的答案, 使用的是递归生成的, 生成的效果大概如下:

  • 支持分支,不可以指定上下限

image.png

这种情况下可以用上一些 PS 的手段,然后就可以得到像下面这样的结果:
image.png

  • 不支持分支,可以指定上下限

image.png

完整的可编译代码如下:

\documentclass{article}
\usepackage{amsmath}
\usepackage[a3paper, margin=1in]{geometry}


\ExplSyntaxOn
\int_new:N \g_recursion_depth_int
\int_gset:Nn \g_recursion_depth_int {0}
\seq_new:N \g_data_collect_I_seq
\seq_new:N \g_data_collect_II_seq

% ==> fractuation integral
% ARGUMENTS SPECIFICATION
% #1 -> subscript
% #2 -> superscript
% #3 -> total depth
\NewDocumentCommand\NEWINT{mmm}{
  \int_compare:nTF {\g_recursion_depth_int <= #3}{
    \int_gadd:Nn \g_recursion_depth_int {1}
    \_split_int_fractal_tree:ennn 
      {\_split_list}{#1}{#2}{#3}
  }{
    \int
      \c_math_subscript_token{#1}
      \c_math_superscript_token{#2}
  }
}
\NewDocumentCommand\_split_list{}{}
\DeclareDocumentCommand\SplitList{m}{
  \renewcommand\_split_list{#1}
}
% ==> split tree using a int array
% ARGUMENTS SPECIFICATION
% #1 -> places to split the tree
% #2 -> subscript
% #3 -> superscript
% #4 -> total depth
\cs_new_protected:Npn \_split_int_fractal_tree:nnnn #1#2#3#4 {
  \clist_if_in:nVTF {#1}\g_recursion_depth_int {
    \NEWINT
        {\int\c_math_subscript_token {
            #2 \c_math_superscript_token{#3}
          }
        }
        {\int\c_math_superscript_token {#3 \c_math_subscript_token {#2}}}
        {#4}
  }{
    \int_compare:nTF {\g_recursion_depth_int = 1}{
      \NEWINT
        {\int\c_math_subscript_token {#2}\c_math_superscript_token{1}\!x\mathrm{d}x}
        {\int\c_math_superscript_token {#3}\c_math_subscript_token{0}\!x\mathrm{d}x}
        {#4}
    }{
      \NEWINT
        {\int\c_math_subscript_token   {#2}\c_math_superscript_token{\scriptscriptstyle 1}}
        {\int\c_math_superscript_token {#3}\c_math_subscript_token{\scriptscriptstyle 0}}
        {#4}
    }
  }
}
\cs_generate_variant:Nn \_split_int_fractuation_tree:nnnn {ennn}
\makeatletter
\newcommand{\raisemath}[1]{\mathpalette{\raisem@th{#1}}}
\newcommand{\raisem@th}[3]{\raisebox{#1}{$#2#3$}}
\makeatother
\ExplSyntaxOff


\begin{document}
% \SplitList{5, 10, 25, 50}
\[
  \NEWINT{\beta}{\alpha}{20}
\]


\begin{align}
  & \int_a^b x \\
  & \int_a^{\raisemath{-10pt}{b}} x
\end{align}
\end{document}
  • l3coffin 的思路我还没有去尝试,后续我也许会换到这个方向上来试一试.
  • 关于积分上下限的位置,目前可以使用 \raisemath{}{} 这个函数

不知道我有没有正确理解的需求, 看看下面是不是你想要的.

只需要把上述的 \filldraw 命令换成 \fill 命令即可. 修改后的代码如下:

\documentclass[UTF8]{ctexbook}
\usepackage{xcolor}
\usepackage{tikz}
\newcommand{\piyu}[4]{%
\raisebox{-0.3em}{\begin{tikzpicture}
    \draw[lightgray] (0,0pt) rectangle (20pt, 10pt);%矩形
    \fill[fill = lightgray] (0,0pt) rectangle (10pt, 10pt);%填色,还可以设置线宽
    \node [below,rotate= 0] at (5pt, 6pt) {\smash{\hbox{\color{white}\fangsong\fontsize{8}{10}\selectfont{#1}}\hss}};
    \node [below,rotate= 0] at (15pt, 6pt) {\smash{\hbox{\color{black}\fangsong\fontsize{8}{10}\selectfont{#2}}\hss}};
\end{tikzpicture}%
}% end of raisebox
{\textcolor{#3}{{\fangsong{\fontsize{8}{10}\selectfont#4}}}}}%


\begin{document}
虽是如此说,只这酒色财气四件中,惟有“财色”二者更为利害。怎见得他的利害?假如一个人到了那穷苦的田地,
受尽无限凄凉,耐尽无端懊恼,晚来摸一摸米瓮,苦无隔宿之炊,早起看一看厨前,愧没半星烟火,
\piyu{绣}{眉}{green}{情景逼真。酸俫读此,能不雪涕!}妻子饥寒,一身冻馁,就是那粥饭尚且艰难,
那讨馀钱沽酒?\piyu{绣}{旁}{green}{酒因财缺。}更有一种可恨处,亲朋白眼,面目寒酸,便是凌云志气,
分外消磨,怎能勾与人争气!\piyu{绣}{旁}{green}{气以财弱。}\piyu{张}{夹}{red}{以上反起财。}
正是:\piyu{张}{夹}{red}{这一个“正是”是冷。}

\end{document}

编译结果如下:

image.png

这个问题其实在 TSE 上已经有了解答了, 相关解答如下:

把上述的思路照搬过来,一个修改后的可以正常对齐的示例为:

\documentclass[english,11pt,oneside,article]{memoir}
\usepackage[english]{babel}
\usepackage{geometry}
\usepackage{lipsum}
\setlength{\emergencystretch}{2em}

\usepackage{letltxmacro}
\LetLtxMacro\origttfamily\ttfamily
\DeclareRobustCommand*{\ttfamily}{%
  \origttfamily
  \hyphenchar\font=`\-\relax
  \fontdimen3\font=.25em\relax
  \fontdimen4\font=.167em\relax
  \fontdimen7\font=.167em\relax
}

\makeatletter
\DeclareRobustCommand\vttfamily{%
  \not@math@alphabet\vttfamily\relax
  \fontfamily{cmvtt}% cmvtt (Computer Modern) or lmvtt (Latin Modern)
  \selectfont
}
\DeclareTextFontCommand{\textvtt}{\vttfamily}
\makeatother

\geometry{left=20mm,right=20mm, top=20mm, bottom=50mm}
\OnehalfSpacing
\leftskip3em\rightskip2em


\begin{document}
\lipsum[1]

{\ttfamily \lipsum[1]}
\end{document}

编译结果如下:
image.png

1. 思路

根据 tocloft 的官方文档,我们可以知道所谓的那一系列的 leader 是由命令 \cftdotfill 控制的, 此命令的声明如下:

\providecommand{\cftdotfill}[1]{%
  \def\@tempa{#1}%
  \def\@tempb{\cftnodots}%
  \ifx\@tempa\@tempb
    \hfill
  \else
    \ifStartUnumToc
      \hfill\StartUnumTocfalse
    \else
      \leaders\hbox{$\m@th\mkern #1 mu\hbox{\cftdot}\mkern #1 mu$}\hfill
    \fi
  \fi
}

其中的 #1 就是你指定的那个 \cftXdotsep, 这里的 X 就是 chap. 我们可以看到里面有一个比较操作 \ifx\@tempa\@tempb, 这里其实是比较当前传入的 \cftXdotsep\cftnodots, 查看 tocloft.sty 文档,可以发现其生命如下:

% around line 167
\newcommand{\cftnodots}{10000}

所以现在的思路就来了,只要我们在使用 \chapter* 前,让这个 \ifxtrue 对应的分支,那么就可以取消 ToC 中对应条目后面的 leader 了. 所以只需要把对应的 \cftXdotsep 设置的足够大即可.

我为什么回去找这个 \cftdotfill? 因为官方文档中有这样的说明: "However, if the separation is too large then no dots will be actually typeset. The macro cftnodots is a separation value that is ‘too large’"

2. patch command

下面就来说怎么实现上面的目标,我个人喜欢 patch 的方式,当然,你也可以采用 renewcommand 的方式. 所以这里我引入了 etoolbox 宏包用于在 \chapter*\chapter 命令前设置这两个 \cftXdotsep. 如果你读过 source2e 应该知道,一般的 star-form 的命令和对应的原始命令是通过如下的方式生命的:

\def\foo{\@ifstar\@foo\@@foo}
\def\@foo#1{...}
\def\@@foo#1{...}

所以我们这里要 patch 的命令其实是 \@schapter\@chapter,分别对应 star-form 和 original-form. 但是我们这里要把这些 \cftXdotsep 的重定义注入到 .toc 文件中. (你可以想一想为什么要注入到 .toc 文件,而不是直接放在你的 .tex 文件中?). 所以我们 patch 部分的代码为:

% ==> start patch
\usepackage{etoolbox}
\makeatletter
% 1. cancel dot line
\def\chapter@CancelLeader#1{
  \write\@auxout{%
    \protect\@writefile{toc}{%
      \protect\renewcommand{\protect\cftchapdotsep}{#1}%
    }%
  }%
}
\pretocmd{\@schapter}{\chapter@CancelLeader{10000}}{}{}
\pretocmd{\@chapter}{\chapter@CancelLeader{2}}{}{}
\makeatother

patch 后的 .toc 文件大概长这样:

\renewcommand {\cftchapdotsep }{10000}
\contentsline {chapter}{前序}{I}{}%
\renewcommand {\cftchapdotsep }{10000}
\renewcommand {\cftchapdotsep }{2}
\contentsline {chapter}{\numberline {1}概述}{1}{}%
\contentsline {section}{\numberline {1.1}diyi}{1}{}%
\renewcommand {\cftchapdotsep }{2}
\contentsline {chapter}{\numberline {2}Test I}{3}{}%
\contentsline {section}{\numberline {2.1}sse I}{3}{}%
\contentsline {section}{\numberline {2.2}sse II}{3}{}%
\renewcommand {\cftchapdotsep }{10000}
\contentsline {chapter}{Test II}{5}{}%
\contentsline {section}{\numberline {2.3}sse I}{5}{}%
\contentsline {section}{\numberline {2.4}sse II}{5}{}%

3. mwe

最终修改后的代码为:

\documentclass[12pt,b5paper,twoside]{book}
\usepackage{titlesec,xeCJK,zhlipsum,fontspec}
\usepackage[margin=2.5cm]{geometry}


\setcounter{tocdepth}{1}
\renewcommand{\normalsize}{\fontsize{10.5pt}{14pt}\selectfont}
\titleformat{\chapter}{\centering\fontsize{16pt}{16pt}\sffamily}{\fontsize{16pt}{16pt}\selectfont 第 \thechapter 章}{1em}{}
\titlespacing{\chapter}{0pt}{2cm}{20pt}
\renewcommand{\contentsname}{目 \quad 录}
\usepackage[titles]{tocloft}
\renewcommand{\cftchapnumwidth}{5em}
\renewcommand{\cftdot}{\ensuremath{\cdot}}
\renewcommand{\cftdotsep}{2}
\renewcommand{\cftchapleader}{\cftdotfill{\cftchapdotsep}}
\renewcommand{\cftchapdotsep}{2} 
\renewcommand{\cftchappresnum}{第\ }
\renewcommand{\cftchapaftersnum}{章\ }
\renewcommand{\cftsecindent}{2em}
\renewcommand{\cftsecnumwidth}{2.5em}
\renewcommand{\cftsecpresnum}{\S\ }
\renewcommand{\cftsecaftersnum}{.}


% ==> start patch
\usepackage{etoolbox}
\makeatletter
\def\chapter@CancelLeader#1{
  \write\@auxout{%
    \protect\@writefile{toc}{%
      \protect\renewcommand{\protect\cftchapdotsep}{#1}%
    }%
  }%
}
\pretocmd{\@schapter}{\chapter@CancelLeader{10000}}{}{}
\pretocmd{\@chapter}{\chapter@CancelLeader{2}}{}{}
\makeatother


\begin{document}
  \setlength{\parindent}{2em}
  \pagenumbering{Roman}
  \chapter*{前序}
  \zhlipsum[1]
  \addcontentsline{toc}{chapter}{前序}
  \tableofcontents
  
  \clearpage
  \pagenumbering{arabic}
  \chapter{概述}
  \section{diyi}
  \zhlipsum[2]

  \chapter{Test I}
  \section{sse I}
  \section{sse II}

  
  \chapter*{Test II}
  \addcontentsline{toc}{chapter}{Test II}
  \section{sse I}
  \section{sse II}
\end{document}

对应的编译结果如下:

image.png

4. page number

我觉得\chapter* 对应 ToC 项后面的 page number 后看起来并不是那么的美观, 但是既然你在问题里面要求了,我还是把对应的 patch 代码补充在这里吧。把以下的代码放到导言区即可:

%\usepackage{etoolbox}
\makeatletter
% 2. cancel page number
\newif\ifChapter@Num
\def\addcontentsline#1#2#3{%
  \addtocontents{#1}{\protect\contentsline{#2}{#3}{\ifChapter@Num\thepage\fi}{}%
  \protected@file@percent}
}
\pretocmd{\@schapter}{\Chapter@Numfalse}{}{}
\pretocmd{\section}{\Chapter@Numtrue}{}{}
\pretocmd{\@chapter}{\Chapter@Numtrue}{}{}
\makeatother

加上这个 patch 后的编译效果如下:
image.png

可以使用一个宏 \@addtoreset 来更新 equation 计数器, 可用的代码如下:

\documentclass{article}
\usepackage{amsmath}
\usepackage{lipsum}
\renewcommand{\thesection}{\S{}\arabic{section}}
\makeatletter
\@addtoreset{equation}{section}
\renewcommand{\theequation}{\arabic{section}.\arabic{equation}}
\makeatother


\begin{document}
\tableofcontents
\vspace*{8em}

\section{equation sign}
\begin{align}
  a^2 + b^2 = c^2 \\
  a^2 + b^2 = c^2 \\
  1 + 1 = 3
\end{align}


\section{ref style}
\begin{subequations}
  \begin{align}
  \sum_{n=1}^{\infty} \frac{1}{n^2} &= \frac{\pi^1}{1111} \\
  \sum_{n=1}^{\infty} \frac{1}{n^2} &= \frac{\pi^2}{2222} \\
  \sum_{n=1}^{\infty} \frac{1}{n^2} &= \frac{\pi^3}{3333} \\
  \sum_{n=1}^{\infty} \frac{1}{n^2} &= \frac{\pi^4}{4444}\label{eq:pythagoras}
  \end{align}
  \label{eq:mult-lines}
\end{subequations}


Hello world \ref{eq:pythagoras}, equation ref style: \eqref{eq:pythagoras}
\end{document}

编译结果:
image.png

有两种方式可以活获得一个box或者是元素的维度信息:

  • 在LaTeX 中有 \settowidth, \settoheight, \settodepth 这几个宏
  • 在原始的 plain TeX 中有 \wd, \ht, \dp 这几个宏

下面风别给两个使用样例:

\newlength{\mylen}
\settowidth{\mylen}{aa}
\the\mylen
\newdimen\mywidth
\setbox0=\hbox{aa}
\mywidth=\wd0
\the\mywidth

两者的输出均为:
image.png

得到了这个长度之后,你就可以放到里的坐标里面参与运算了.

下面我只做了一个样例,关于 $\pi$ 那个, 我觉得难点在于下寻找最小的可重复的 pattern。话不多说,上代码:

\documentclass{article}
\usepackage[margin=1cm, a1paper]{geometry}
\usepackage{xcolor}
\usepackage{graphicx}

\begin{document}
\ExplSyntaxOn
\newcommand\logo[1][black]{
  \textcolor{#1}{\scalebox{8}{\(\pi\)}}
}

\cs_set_nopar:Nn \newSetCof:nn {
  \coffin_if_exist:cF {l_tmp#1_coffin}
    {\coffin_new:c {l_tmp#1_coffin}}
  \hcoffin_set:cn {l_tmp#1_coffin}{#2}
}
\cs_set_nopar:Nn \useCof:n {
  \coffin_typeset:cnnnn {l_tmp#1_coffin} 
    {l} {b} {0pt} {0pt}
}

% set coffins
\newSetCof:nn {Ia}{\logo[red]}
\newSetCof:nn {Ib}{\logo[red]}
\newSetCof:nn {IIa}{\logo[blue]}
\newSetCof:nn {IIb}{\logo[blue]}


\centering
% 1. make the basic pattern I
\coffin_rotate:Nn \l_tmpIb_coffin {-90}
\coffin_join:NnnNnnnn \l_tmpIa_coffin {r} {t} 
                      \l_tmpIb_coffin {r} {b} 
                      {-8pt} {-19pt}
% 2. make the basic pattern II
\coffin_rotate:Nn \l_tmpIIb_coffin {-90}
\coffin_join:NnnNnnnn \l_tmpIIa_coffin {r} {t} 
                      \l_tmpIIb_coffin {r} {b} 
                      {-8pt} {-19pt}
% define these 2 basic component
\coffin_set_eq:NN \l_tmpa_coffin \l_tmpIa_coffin
\coffin_rotate:Nn \l_tmpIIa_coffin {180}
\coffin_set_eq:NN \l_tmpb_coffin \l_tmpIIa_coffin
\coffin_reset_poles:N \l_tmpa_coffin
\coffin_reset_poles:N \l_tmpb_coffin


% ==> join these 2 basic component
\coffin_new:N \l_tmp_before_coffin
\coffin_new:N \l_tmp_after_coffin
\coffin_set_eq:NN \l_tmp_before_coffin \l_tmpa_coffin
\coffin_set_eq:NN \l_tmp_after_coffin \l_tmpb_coffin
% 1: rotate aroud upper right corner ==> style I
\cs_set_nopar:Nn \__fisrt_repeat_pattern:nn {
  \coffin_reset_poles:N \l_tmp_before_coffin
  \coffin_join:NnnNnnnn \l_tmp_before_coffin {hc} {t} 
                        \l_tmp_after_coffin {hc} {b} 
                        {#1}{#2}
}

% 2: rotate aroud upper right corner ==> style II
\cs_set_nopar:Nn \__second_repeat_pattern:nn {
  \coffin_set_eq:NN \l_tmp_after_coffin \l_tmp_before_coffin
  \coffin_rotate:Nn \l_tmp_after_coffin {180}
  \coffin_reset_poles:N \l_tmp_before_coffin
  \coffin_join:NnnNnnnn \l_tmp_before_coffin {r} {t} 
                        \l_tmp_after_coffin {r} {t} 
                        {#1}{#2}
  \coffin_set_eq:NN \l_tmp_after_coffin \l_tmp_before_coffin
}


% ==> start repeat
\__fisrt_repeat_pattern:nn {8pt} {-21pt}
\__second_repeat_pattern:nn {-10pt} {-52pt}

\__fisrt_repeat_pattern:nn {10pt} {-45pt}
\__second_repeat_pattern:nn {-10pt} {-52pt}

\__fisrt_repeat_pattern:nn {30.5pt} {-160pt}
% \__second_repeat_pattern:nn {-10pt} {-52pt}
\useCof:n {_before}
\ExplSyntaxOff


\end{document}

想要达到平铺的效果,可能还需要把第三个 pattern 找到,然后再去平铺. 所给示例的编译效果如下:

image.png

针对问题一, 即附件c

我给你说一下修改的地方:

  1. elgantlatex.cls 注释掉 1282 行的内容:

image.png

  1. 同样是 elgantlatex.cls 这个文件,第108行, 把这个imakeidx 放到 hyperref 前面:

image.png

对应的再把,相应的 c.tex 的第 30 行注释掉:
image.png

编译结果:
image.png

问题二

本人对 TeXStudio 不熟悉,所以无法告知

发布
问题