M
M
这家伙很懒,什么也没写!

注册于 3年前

回答
11
文章
0
关注者
0

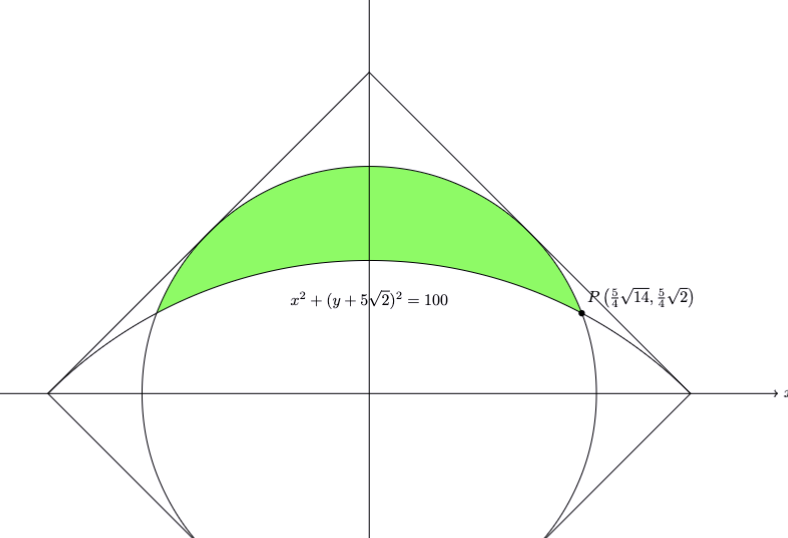
\documentclass{standalone}
\usepackage{tikz,pgfplots}
\usetikzlibrary{arrows.meta}

\begin{document}

\begin{tikzpicture}
    
  % Define the coordinates
  \coordinate (O1) at (0, {-5*sqrt(2)});
  \coordinate (O2) at (0, 0);
  
  % Define the square vertices
  \coordinate (A) at (0, {5*sqrt(2)});
  \coordinate (B) at ({5*sqrt(2)}, 0);
  \coordinate (C) at (0, {-5*sqrt(2)});
  \coordinate (D) at ({-5*sqrt(2)}, 0);
  
  % Define point P
  \coordinate (P) at ({(5/4)*sqrt(14)}, {(5/4)*sqrt(2)});
  
  % ++++++++++++++++++++++++++++++++++++++++++++++
  \begin{scope}[even odd rule]
    \clip (P) rectangle +(-10, 5);
    \clip (O1) circle[radius=10] (O2) circle[radius=5];
    \fill[green!70] (O1) circle[radius=10] (O2) circle[radius=5];
  \end{scope}
  % ++++++++++++++++++++++++++++++++++++++++++++++

  % Draw the axes
  \draw[->] (-9, 0) -- (9, 0) node[right] {$x$};
  \draw[->] (0, -9) -- (0, 9) node[above] {$y$};
  
  % Clip to the region above the x-axis for the first circle
  \begin{scope}
      \clip (-12, 0) rectangle (12, 15);
      
      % Draw the circle C: x^2 + (y + 5*sqrt(2))^2 = 100, only above x-axis
      \draw (O1) circle[radius=10];
  \end{scope}

  % Draw the circle x^2 + y^2 = 25
  \draw (O2) circle[radius=5];
  
  % Draw the square
  \draw (A) -- (B) -- (C) -- (D) -- cycle;
  
  % Draw and label point P
  \fill (P) circle (2pt);
  \node[above right] at (P) {$P\left(\frac{5}{4}\sqrt{14}, \frac{5}{4}\sqrt{2}\right)$};
  
  % Label the circles
  \node at (0, {5*sqrt(2) - 5}) {$x^2 + (y + 5\sqrt{2})^2 = 100$};
  \node at (0,-5.5) {$x^2 + y^2 = 25$};
  
\end{tikzpicture}

\end{document}

bef92a577c7f5b1b1145dd18fb593e0d.png

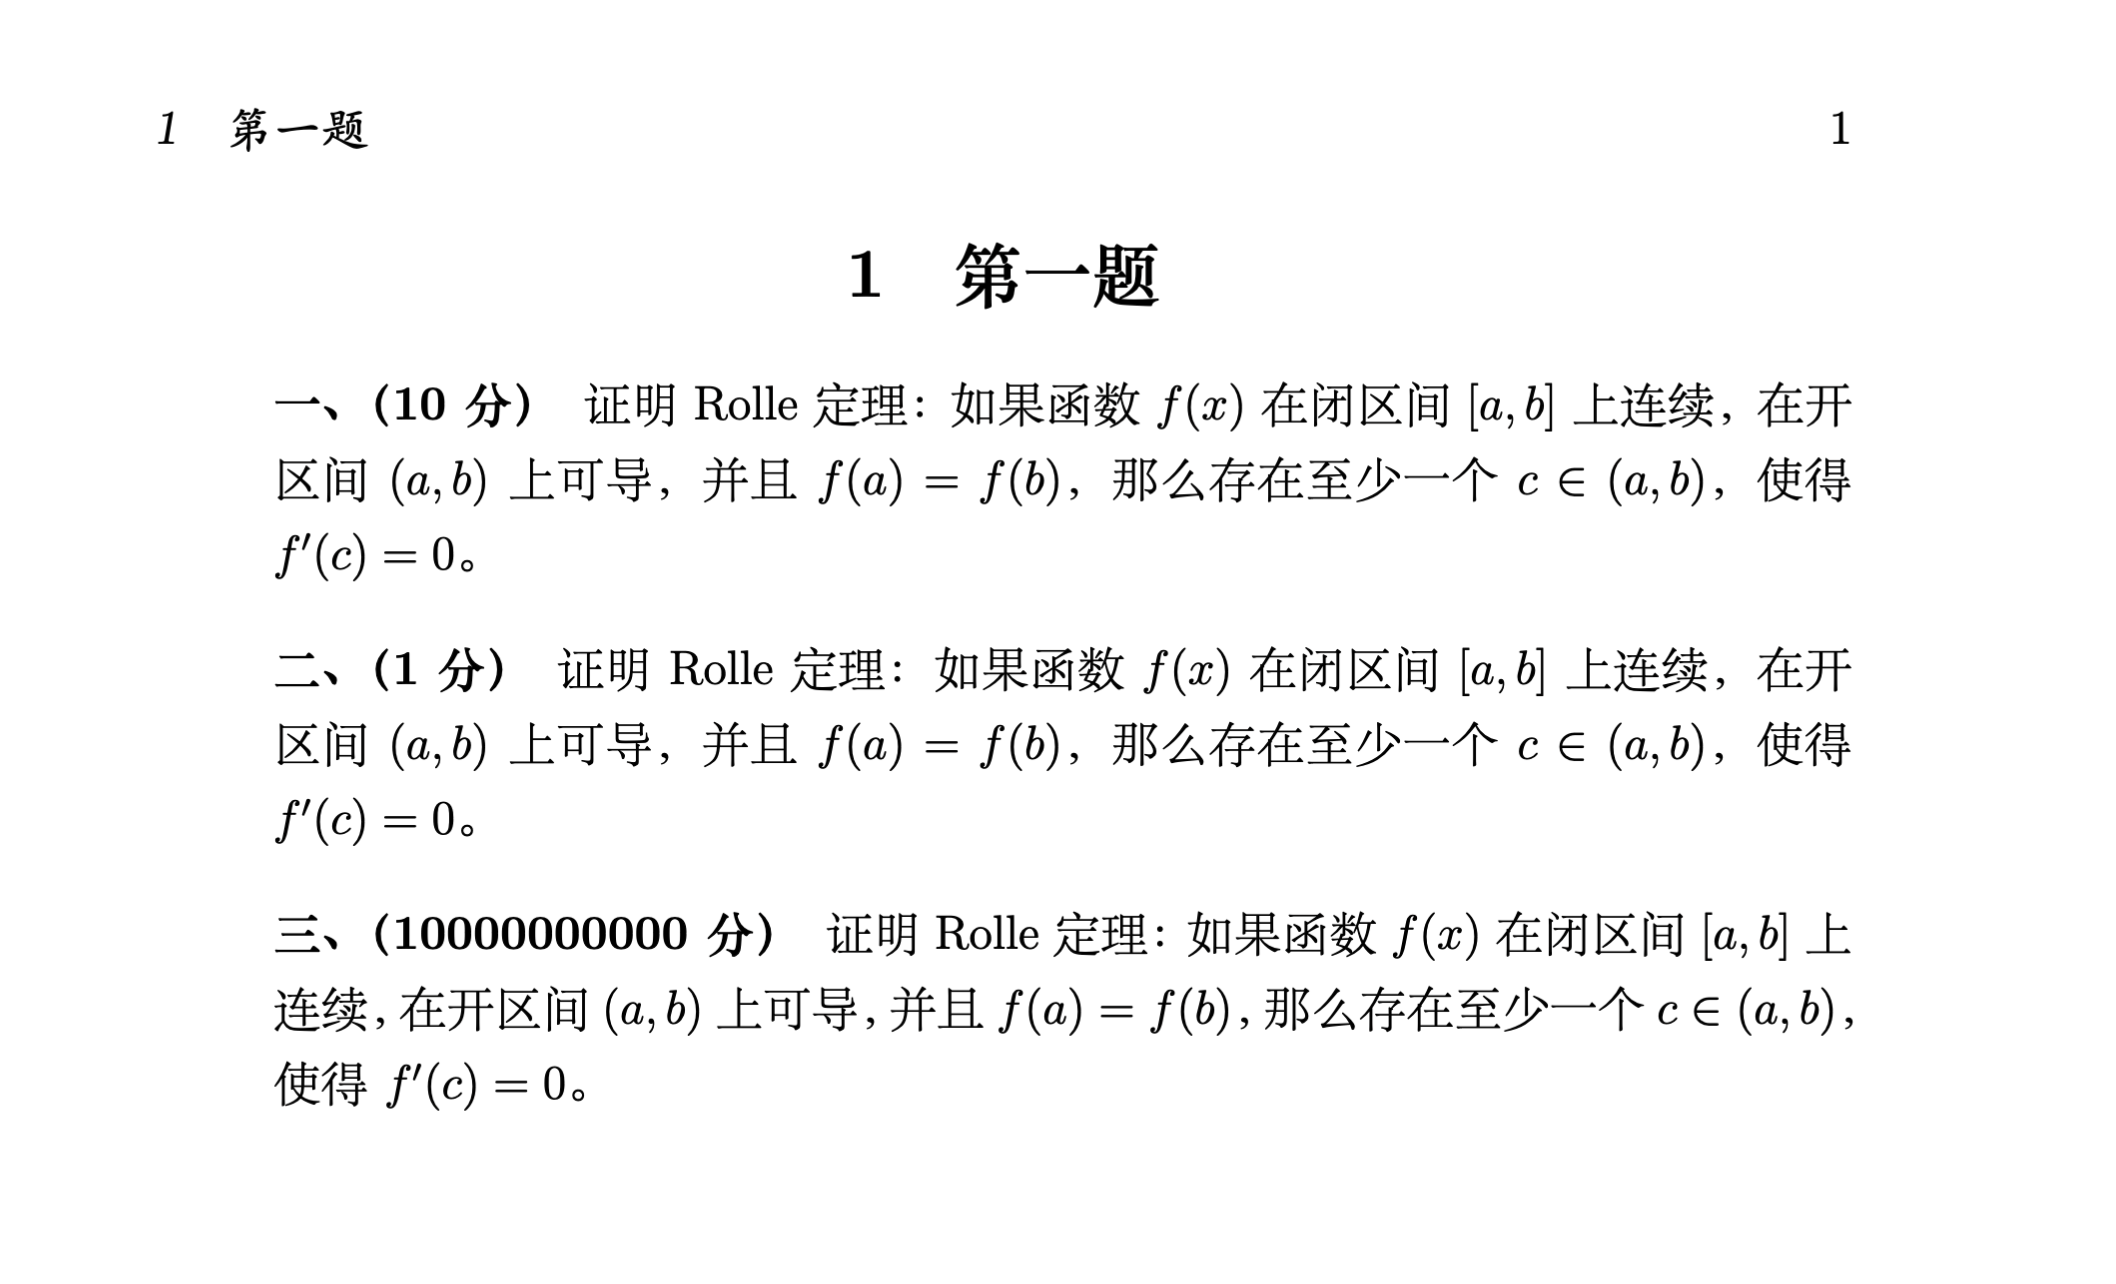
\documentclass[a4paper,12pt]{ctexart}
\usepackage{geometry}
\geometry{left=3cm,right=3cm,top=2.5cm,bottom=2.5cm}
\usepackage{amsmath}
\usepackage{calc}

\newcommand{\score}[1]{\textbf{#1分}}
\newcommand{\myitem}[1]{
  \setlength{\itemindent}{\widthof{\textbf{\stepcounter{enumi}\chinese{enumi}、(#1分)}}}% 
  \addtolength{\itemindent}{\labelsep}%
  \addtocounter{enumi}{-1} 
  \item[\textbf{\stepcounter{enumi}\chinese{enumi}、(#1分)}]
}

\begin{document}
\section{第一题}

\begin{enumerate}
    \myitem{10} 证明 Rolle 定理:如果函数 $f(x)$ 在闭区间 $[a, b]$ 上连续,在开区间 $(a, b)$ 上可导,并且 $f(a) = f(b)$,那么存在至少一个$c\in  (a, b)$,使得 $f'(c) = 0$。        
    \myitem{1} 证明 Rolle 定理:如果函数 $f(x)$ 在闭区间 $[a, b]$ 上连续,在开区间 $(a, b)$ 上可导,并且 $f(a) = f(b)$,那么存在至少一个$c\in  (a, b)$,使得 $f'(c) = 0$。
    \myitem{10000000000} 证明 Rolle 定理:如果函数 $f(x)$ 在闭区间 $[a, b]$ 上连续,在开区间 $(a, b)$ 上可导,并且 $f(a) = f(b)$,那么存在至少一个$c\in  (a, b)$,使得 $f'(c) = 0$。
\end{enumerate}

\end{document}

a5474ce3c0666a5ae4d14e43dae85bc2.png

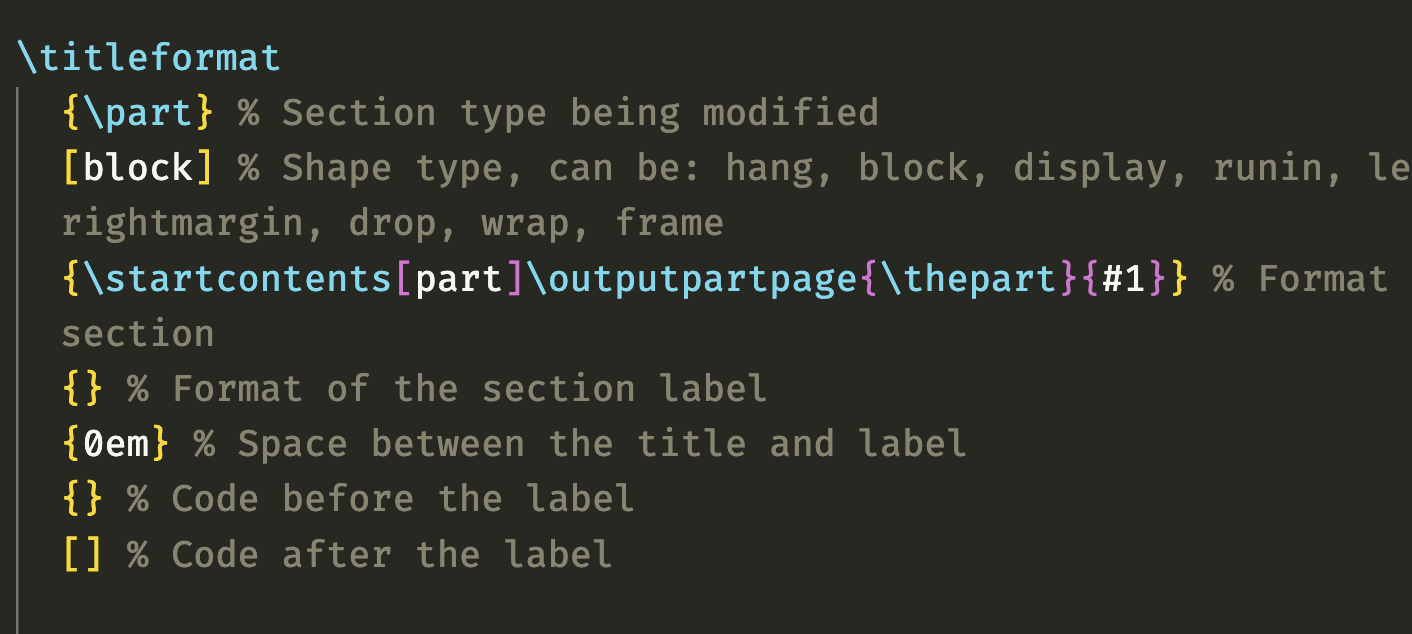
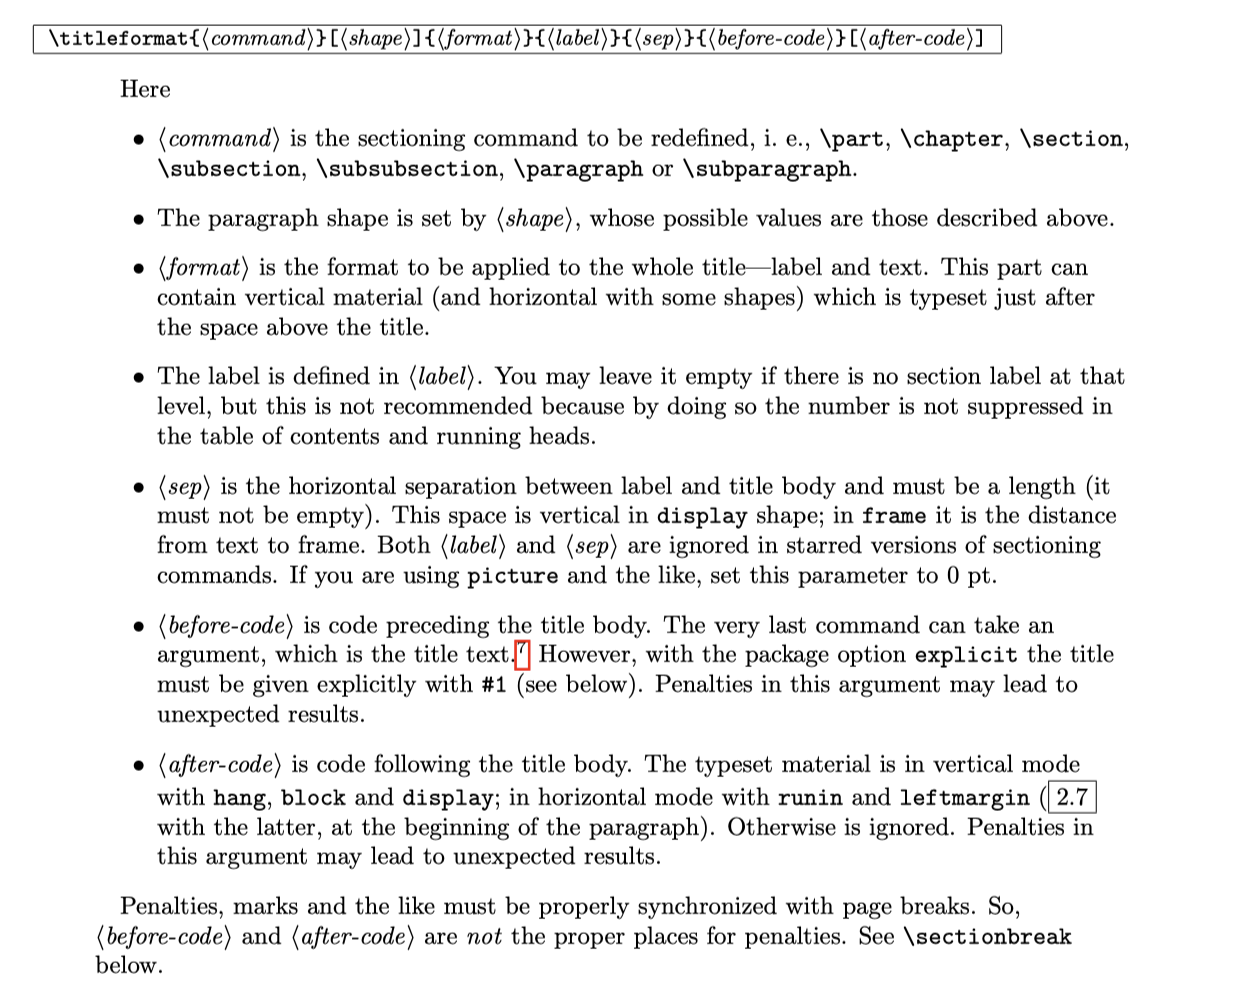
这是 titlesectitletoc 共同作用的结果。

  • 首先,在 LegrandOrangeBook.cls 中加载 titlesec 包的时候使用了 newparttoc 选项,这使得可以通过 titletoc 包的相关命令来控制目录条目的输出。

28e42bbd5a1132b61d52b2e48240a6ba.png

eb5adceeea9351e5505f5f221f7b85ae.png

  • 其次,重新定义了\part命令,用来输出 part 页面。(这里并没有区分有序号和无序号的页面设置)

5f4e4033593fef40f9768b2669b7e354.png

ed71f652441da06b5b3eaf5e2daaf280.png

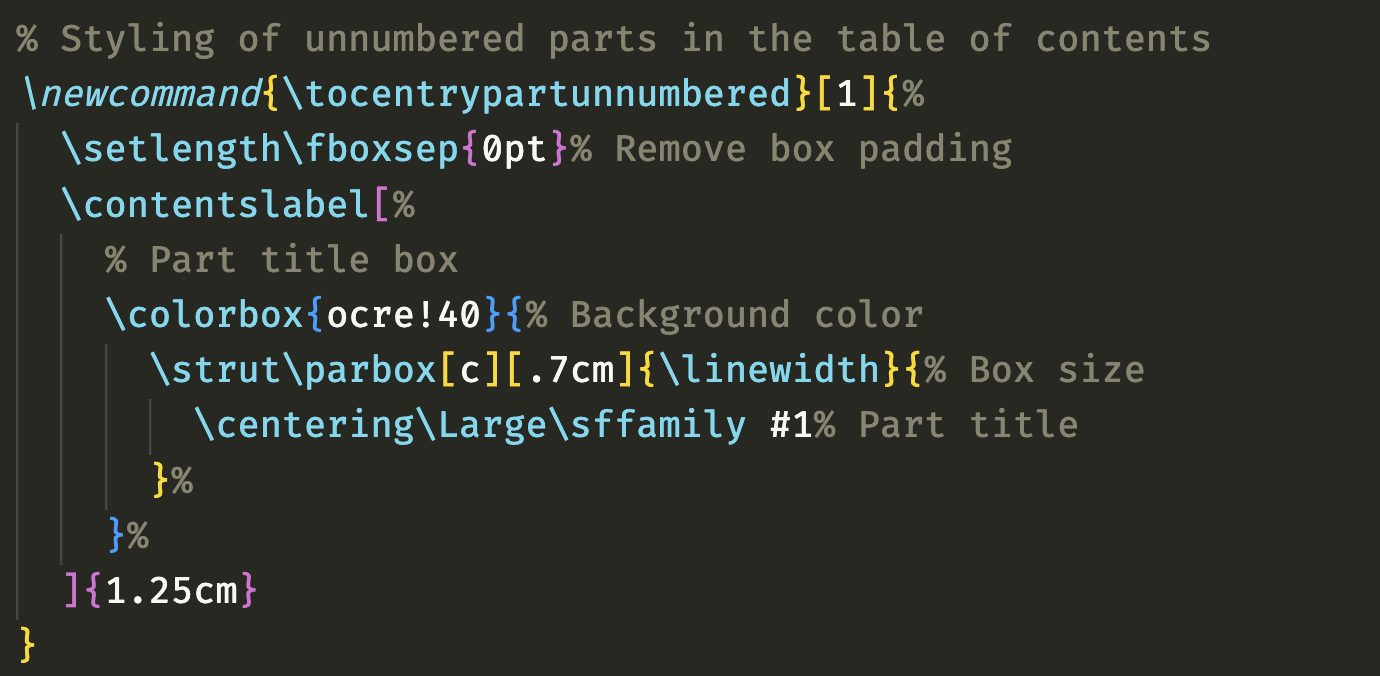
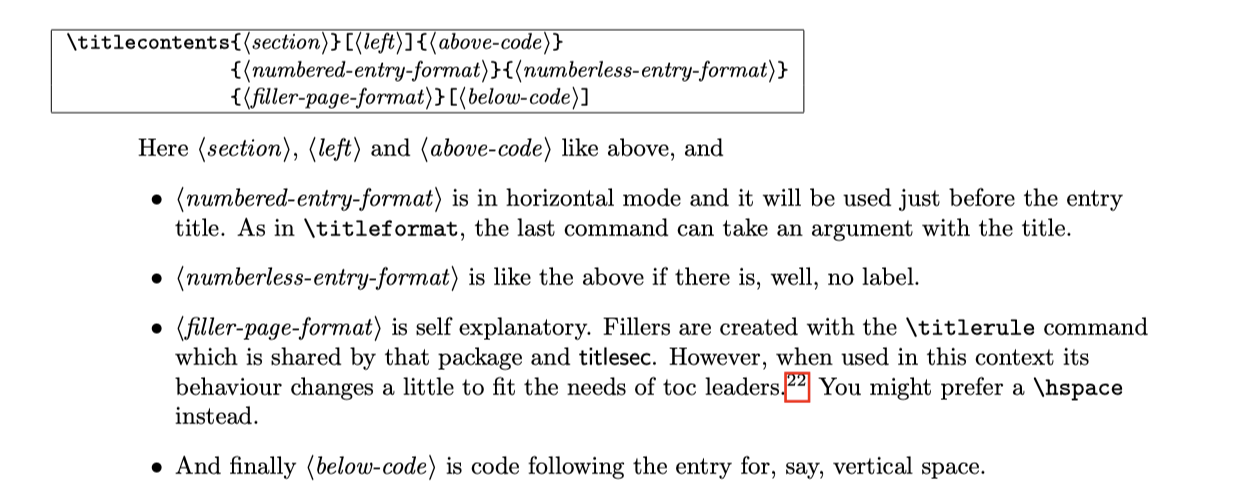
  • 最后,通过 titletoc 包中的 titlecontents 命令来控制 part 相关目录条目的输出,其中无序号条目由自定义命令 tocentrypartunnumbered 控制

f1f7b957a0722a144a543373ace0105b.png

bfb9dd5b9f97057fdd55c17dcd2e0dc1.png

d27fb2b8430322bbe8a84426372b1095.png

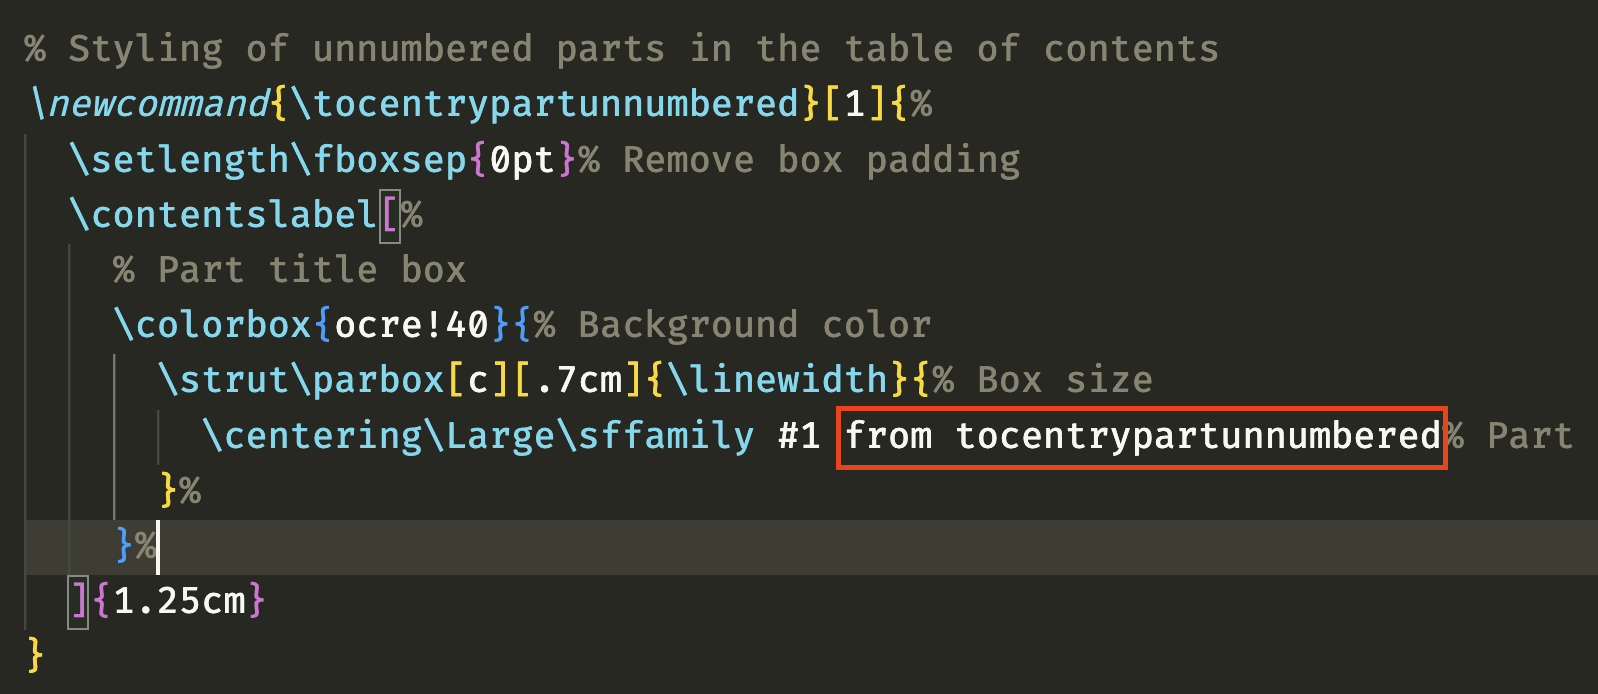
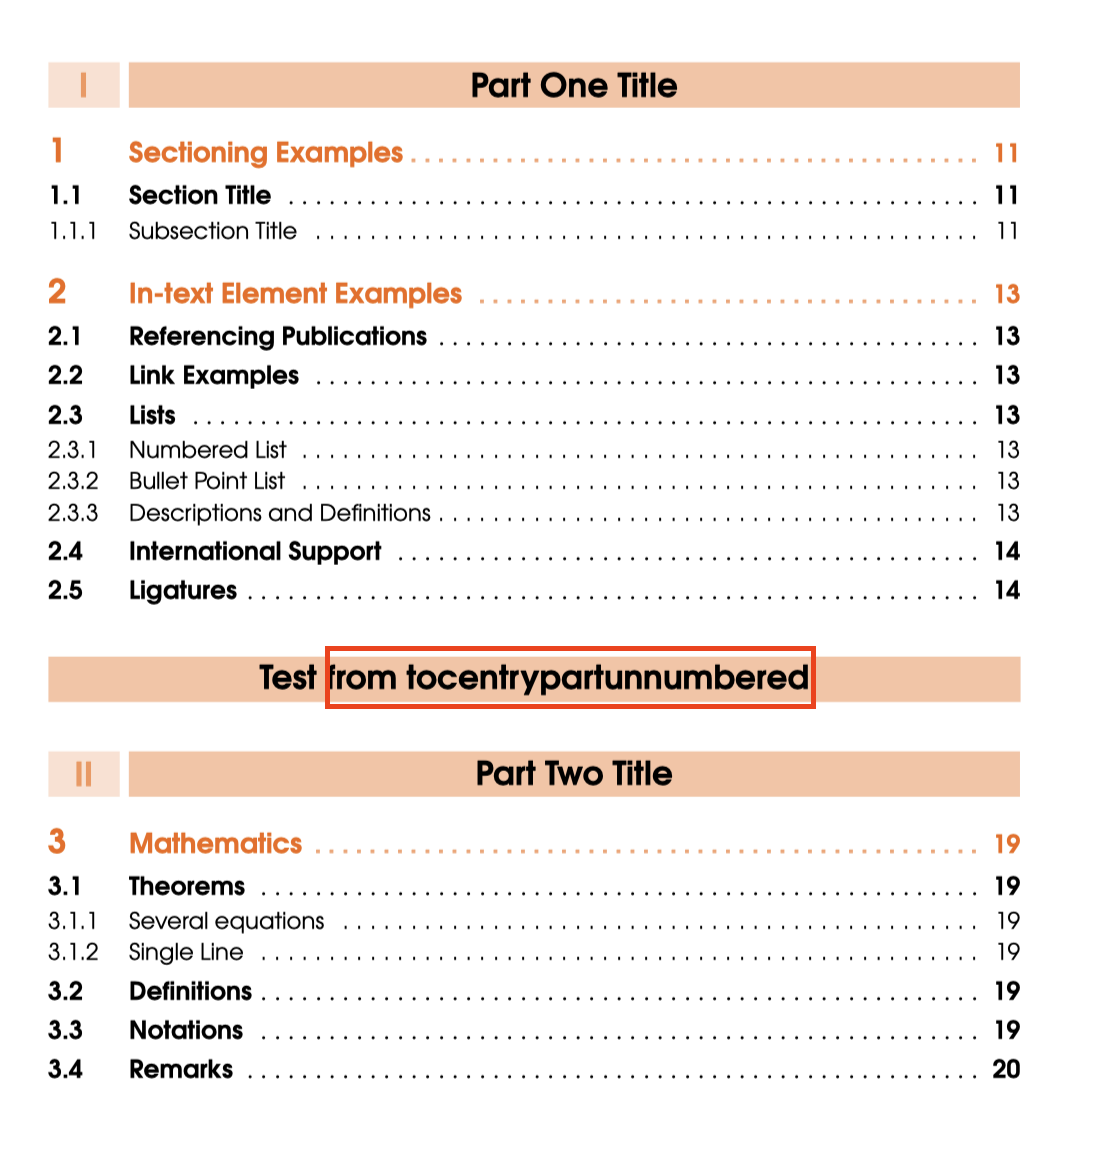
可以做一个简单的验证,修改 tocentrypartunnumbered
d14976a1714e614dc825d01ae6133132.png

dfdece40cde1e4a21577a60c45703762.png

可以用 setspace 包,给需要的单元格添加控制行距的命令cmd=\setstretch{1}来实现

\documentclass{article}
\usepackage{tabularray}
\usepackage{setspace}
\usepackage{ctex}

\begin{document}
\begin{tblr}{colspec = {ll}, hlines, stretch = {-1}, column{1} = {2\ccwd}, column{2} = {4\ccwd,cmd=\setstretch{1}}}
    \SetCell[r = 2]{l, h}\textbf{巻一} & 〇〇〇〇  \\
                                       & 〇〇〇〇〇\\
    \SetCell[r = 2]{l, h}\textbf{巻二} & 〇〇〇〇〇\\
                                       & 〇〇〇〇〇\\
    \textbf{巻三}                      & 〇〇〇〇〇\\
\end{tblr}

\vspace{1\baselineskip}
\begin{tblr}{colspec = {ll}, hlines, stretch = {1}, column{1} = {2\ccwd}, column{2} = {4\ccwd}}
    \SetCell[r = 2]{l, h}\textbf{巻一} & 〇〇〇〇  \\
                                       & 〇〇〇〇〇\\
    \SetCell[r = 2]{l, h}\textbf{巻二} & 〇〇〇〇〇\\
                                       & 〇〇〇〇〇\\
    \textbf{巻三}                      & 〇〇〇〇〇\\
\end{tblr}
\end{document}

3f1e95ab92d8bff0a14fda3608c8af92.png

vscode可以考虑使用LaTeX Workshop这个扩展,命令补全的一些设置可以参考 这里

如果只要求文档中的自定义命令补全的话,默认配置应该就可以了。

除去by lemma后,如果只有两列对齐的情况下,在\text{(by Lemma)}前简单地添加&&即可。

\documentclass{article}
\usepackage{amsmath}

\begin{document}

\begin{align*}
    c^2 &= a^2 + b^2 \\
        &= a^2 + b^2 \\
        &&\text{(by Lemma)}\\
        &= a^2 + b^2 \\
\end{align*}

\end{document}

6739fa341dbfd67e05ac1fd97a8e8d43.png

如果只是要按某一列内各行合并单元格后的情况来交替颜色,思路是可以写一小段逻辑来控制新的行索引,这样就能根据这个新的索引来交替行的颜色。

tabularray提供了inner key process接口,可以通过\UseTblrLibrary{functional}提供的类l3风格函数,构造出符合要求的 hook。

tabularray中,SetCell会设置合并行的首个原始单元格的rowspan属性为xx视合并的行数而定。如果能够拿到这个值,就可以确定每一组的边界,再重新定义行索引就很容易了。

不过tabularray并没有直接暴露获取rowspan数据的接口,目前只提供了获取单元格内容的接口cellGetText。当然也可以选择魔改tabularray,仿照cellGetText添一个cellGetSpan

这里选择一个讨巧的方法,在确定某一列为key的情况下,一般来说,合并的单元格中,首个原始的单元格必定不是空,剩下的一定是空,这样就可以区分出哪些是被合并的行,只需要将这些行的新索引默认与首行的索引相同即可。

\documentclass[]{ctexbook}

\usepackage{tabularray}
\UseTblrLibrary{booktabs}
\UseTblrLibrary{functional}
\usepackage[]{xcolor}
\usepackage[]{amsmath}
\usepackage[]{tipa}

\begin{document}

\IgnoreSpacesOn

\prgNewFunction \groupByCol { m } {
  \intZero \lTmpaInt
  \intStepOneInline {2} {\arabic{rowcount}} {% ignore head
    \tlSet \lTmpaTl {\cellGetText {##1} {#1}}
    \tlVarIfEmptyF \lTmpaTl
      { \intIncr \lTmpaInt }
    \intCompareT {\intMathMod {\lTmpaInt-1} {2}} = {0}
      { \rowSetStyle {##1} {bg=azure9} }
  }
}

\IgnoreSpacesOff

{\small
\begin{longtblr}[
  caption = {国家与城市}
]{
  width = \textwidth,
  colspec = {X[1,l,h]  X[1,l,h]  X[3,l,h]},
  rowhead = 1, rowfoot = 0, % 每个分页里表头表尾的数量
  process = \groupByCol{2}
}
  
  \toprule
  \textbf{城市} & \textbf{国家} & \textbf{性质}\\
  \midrule

  华盛顿 & \SetCell[r=2]{h}美国 & 首都\\
  洛杉矶 &  & a\\
  东京 & 日本 & 首都\\
  莫斯科 & 俄罗斯 & 首都\\
  \bottomrule

\end{longtblr}

\begin{longtblr}[
    caption = {Prefixes for Numbers},
]{
    width = \textwidth,
    colspec = {X[1,c,h]  X[1,l,h]  X[3,l,h]},
    rowhead = 1, rowfoot = 0, % 每个分页里表头表尾的数量
    % row{even} = {azure9},
    process = \groupByCol{1},
}
    
    \toprule
    \textbf{Meaning} & \textbf{Prefixes} & \textbf{example} \\ \midrule
    \SetCell[r=2]{c} {a half \\ $\frac{1}{2}$} & \textbf{semi-} & {semilunar valve 半月瓣\\ \hspace*{1em}(lun/o: moon; -ar: pertaining to)}\\
    & \textbf{hemi-} & {hemisphere \\ hemiplegia 半瘫\\ \hspace*{1em}(-plegia/\textipa{"pli:\textdyoghlig I@}/: paralysis)}\\

    \SetCell[r=2]{c} {one, single \\ 1} & \textbf{mono-} & monocyte 单核细胞\\
    & \textbf{uni-} & unicellular 单细胞的\\

    \SetCell[r=2]{c} {two \\ 2} & \textbf{bi-} & {bicuspid 二尖瓣的 \\ \hspace*{1em}(cusp/i: point)}\\
    & \textbf{di-} & {dioxide 二氧化物 \\ diplegia 双侧瘫痪}\\

    double & \textbf{dipl/o} & diploid n.【生】二倍体;(结晶)偏方24面体
    adj.二倍体的(含有两套染色体)\\

    {three \\ 3} & \textbf{tri-} & {triplet \\ triceps 三头肌 \\ \hspace*{1em}(-ceps: head)}\\

    \SetCell[r=2]{c} {four \\ 4} & \textbf{quadr-} & quadrant\\
    & \textbf{tetra-} & tetracycline/\textipa{""tetr@"saIklm}/ 四环素\\

    \SetCell[r=2]{c} many & \textbf{multi-} & {multipara/\textipa{m2l"tIp@r@}/ 经产妇 \\ \hspace*{1em}(-para: to bring forth, to bear)}\\
    & \textbf{poly-} & polycystic kidney 多囊肾\\
    \bottomrule

\end{longtblr}
}
\end{document}

效果:
88a38abd3e6b7b6afa6d56c47a7a33ec.png

  • 如果是要和列表外的段落一致,直接用 wide 模式即可,默认是一个 \parindent 长度的缩进,也可以赋值改变大小;
  • 如果是在列表内部要求段落缩进,只需要设置 listparindent 参数。
\documentclass[a4paper]{article}
\usepackage[slantfont,boldfont]{xeCJK}
\usepackage{lipsum}
\usepackage{zhlipsum}

\usepackage{enumitem}

\begin{document}
    
    \lipsum[1][1-3]
    
    \begin{enumerate}[label=\arabic*.,wide]
    % \begin{enumerate}[label=\arabic*.,wide=2\parindent]
    % \begin{enumerate}[label=\arabic*.,listparindent=\parindent]
        \item 第一项
        \par\lipsum[2][1-3]
        \par\lipsum[3][1-3]
        \item 第二项
        \par\zhlipsum[1-2][name=aspirin]
    \end{enumerate}

\end{document}

scope 上添加一个 name prefix 属性就可以区别了

\begin{tikzpicture}
    \begin{scope}[name prefix = l1-]
    \foreach \x/\y in {1/A,2/B,3/C,4/D}
    {\node[inner sep=0pt](a\x)at(\x,0){$\y$};}
    \foreach \x/\y in {a1/a2,a2/a3,a3/a4}
    {\draw(\x)--(\y);}
    \end{scope}
    
    \begin{scope}[name prefix = l2-, shift={(-1,-.8)}]
    \foreach \x/\y in {1/E,2/F,3/G,4/H}
    {\node[inner sep=0pt](a\x)at(\x,0){$\y$};}
    \foreach \x/\y in {a1/a2,a2/a3,a3/a4}
    {\draw(\x)--(\y);}
    \end{scope}

    \foreach \x in {1,4}{
        \draw [red] (l1-a\x) -- (l2-a\x);
    }
    
\end{tikzpicture}

fafa420503b07341773401052ce2371d.png

同理,还有 name suffix

试了一下,可以编译成功。以下几点你都满足了吗?

  • TeX Live, including the programs latexmk, xindy and biber.
  • Standard fonts included in TeX Live, in particular the Fandol fonts. For some strange reason I used and installed the TeX Gyre Heros fonts in the system. In case of error messages related to these fonts, please look for the OTF files (inside the directories in your computer which store TeX-related fonts) whose names start with texgyreheros, and install them manually in your system.
  • The Noto Sans CJK SC fonts from Noto CJK, which should also be installed system-wide.

\renewcommand{\fltitem}[2][0pt]{
    \setlength{\fltitemwidth}{\linewidth}%
    \addtolength{\fltitemwidth}{-\floatfltwidth}%
    \addtolength{\fltitemwidth}{-0.5em}%
    \parbox[t]{\fltitemwidth}{\item #2}\\[#1]
}

e4e00b6e25e67eb7e606158f5844a798.png

发布
问题