
在.cls里面搜类似「浙大蓝」这种颜色的名称...改一下...
另外,你猜猜「巧妇难为无米之炊」的LaTeX论坛版是什么呢...
在.cls里面搜类似「浙大蓝」这种颜色的名称...改一下...
另外,你猜猜「巧妇难为无米之炊」的LaTeX论坛版是什么呢...
参考knots包虽然已经有最佳答案了,我也来补充一个治标的方法,需要保证连续的线可以使用双线
double绘制,选项[draw = white, double=black,double distance =0.4pt]
也许比较治本的方法。
\documentclass[tikz,border=5pt]{standalone}
% https://tex.stackexchange.com/a/762955/322482
% https://github.com/loopspace/spath3/issues/37
\ExplSyntaxOn
\msg_redirect_name:nnn { kernel } { variant-same-as-base } { info }
\ExplSyntaxOff

\usetikzlibrary{knots}

\ExplSyntaxOn
\msg_redirect_name:nnn { kernel } { variant-same-as-base } { error }
\ExplSyntaxOff

\begin{document}
\begin{tikzpicture}
    \begin{knot}[clip width=5, flip crossing=1]
    \strand[red, ultra thick] (0,0) .. controls +(1,0) and +(-1,0) .. (2,1) .. controls +(1,0) and +(-1,0) .. (4,0);
    \strand[blue, ultra thick] (0,1) .. controls +(1,0) and +(-1,0) .. (2,0) .. controls +(1,0) and +(-1,0) .. (4,1);
    \end{knot}
\end{tikzpicture}
\end{document}
\documentclass[tikz,border=5pt]{standalone}
% https://tex.stackexchange.com/a/762955/322482
% https://github.com/loopspace/spath3/issues/37
\ExplSyntaxOn
\msg_redirect_name:nnn { kernel } { variant-same-as-base } { info }
\ExplSyntaxOff

\usetikzlibrary{intersections,spath3}

\ExplSyntaxOn
\msg_redirect_name:nnn { kernel } { variant-same-as-base } { error }
\ExplSyntaxOff

\begin{document}
\begin{tikzpicture}
\path[spath/save=pathA] (0,0) .. controls +(1,0) and +(-1,0) .. (2,1) .. controls +(1,0) and +(-1,0) .. (4,0);
\path[spath/save=pathB] (0,1) .. controls +(1,0) and +(-1,0) .. (2,0) .. controls +(1,0) and +(-1,0) .. (4,1);
\tikzset{
  spath/split at intersections={pathA}{pathB},
  spath/insert gaps after components={pathA}{5pt}{1},
  spath/insert gaps after components={pathB}{5pt}{2},
}

\draw[red, ultra thick, spath/use=pathA];
\draw[blue, ultra thick, spath/use=pathB];
\end{tikzpicture}
\end{document}
那个最佳答案里的 knot 宏包实际上也有问题,不能满足我的要求
...? 或许补充更多原始需求的信息...?
类似花老师的这个需求:
Step1. 代码不要包含一大堆与原始问题无关的内容。
Step2. 可以考虑基于angles库绘制代码,简化并美化角度的标注
Step3. 基于patterns库实现阴影的绘制
\documentclass[tikz,border=5pt]{standalone}
\usepackage{amsmath}
\usepackage{fourier}
\usetikzlibrary{arrows.meta,angles,quotes,patterns,bending}
\begin{document}
    \begin{tikzpicture}
        \draw[-Stealth,thick] (-2,0)--(4,0);
        \draw[-Stealth,thick] (0,-3)--(0,3) node[above]{$(z)$};
        \draw (3,-3) -- coordinate[pos=.1] (A) (0,0) node[label=below left:$O$] (O) {} -- coordinate[pos=.9] (B) (2.5,3);
        \draw[pattern=north west lines,pattern color=magenta!50] (A) -- (0,0) -- (B) -- (A) -- cycle;
        \pic["$\pi/\alpha$", draw=teal, text=teal, fill=white, -Stealth, angle eccentricity=1.75] {angle = A--O--B};
    \end{tikzpicture}
\end{document}
\documentclass{standalone}
\usepackage{libertine}
\usepackage{libertinust1math}
\usepackage{pgfplots}
\pgfplotsset{compat=1.18}

\begin{document}
    \begin{tikzpicture}
    \begin{axis}[
        width=10cm,height=6cm,
        ymin=0, ymax=450,
        xtick={1,2,3,4,5},
        ytick={0,50,100,150,200,250,300,350,400,450},
        xticklabels={Jan., Feb., Mar., Apr., May.},
        ymajorgrids=true,
        axis line style={gray},
        tick style={draw=none}
    ]
    \addplot[
        color=blue!60!cyan,
        line width=1.5pt,
        mark=diamond*,
        mark size=3pt,
        scatter,scatter src=explicit symbolic,
        scatter/classes={
            a={cyan},
            b={magenta},
            c={teal},
            d={orange},
            e={violet}
        }
    ] table [meta=color] {
        x y color
        1 100 e
        2 200 d
        3 265 c
        4 400 b
        5 355 a
    };
    \end{axis}
    \end{tikzpicture}
\end{document}
在我的电脑下,情况恰恰相反。在 C:\texlive\2026\bin\windows\pdftocairo.exe下的数据可以正确处理问题:

是否可以正确处理中文取决于被置于环境变量首位的 pdftocairo.exe 是否可以找到合适的 cmap 文件:
以 texlive/bin/windows/pdftocairo.exe 为例,根据 codex 老师的扫盘,其 cmap 数据位于:
/c/texlive/2026/tlpkg/texworks/share/poppler/cMap
$ tree
.
|-- Adobe-CNS1
|   |-- Adobe-CNS1-0
|   |-- Adobe-CNS1-1
|   |-- Adobe-CNS1-2
|   |-- Adobe-CNS1-3
|   |-- Adobe-CNS1-4
|   |-- Adobe-CNS1-5
|   |-- Adobe-CNS1-6
|   |-- Adobe-CNS1-7
|   |-- Adobe-CNS1-B5pc
|   |-- Adobe-CNS1-ETen-B5
|   |-- Adobe-CNS1-H-CID
|   |-- Adobe-CNS1-H-Host
|   |-- Adobe-CNS1-H-Mac
|   |-- Adobe-CNS1-UCS2
|   |-- B5-H
|   |-- B5-V
|   |-- B5pc-H
|   |-- B5pc-UCS2
|   |-- B5pc-UCS2C
|   |-- B5pc-V
|   |-- CNS-EUC-H
|   |-- CNS-EUC-V
|   |-- CNS1-H
|   |-- CNS1-V
|   |-- CNS2-H
|   |-- CNS2-V
|   |-- ETHK-B5-H
|   |-- ETHK-B5-V
|   |-- ETen-B5-H
|   |-- ETen-B5-UCS2
|   |-- ETen-B5-V
|   |-- ETenms-B5-H
|   |-- ETenms-B5-V
|   |-- HKdla-B5-H
|   |-- HKdla-B5-V
|   |-- HKdlb-B5-H
|   |-- HKdlb-B5-V
|   |-- HKgccs-B5-H
|   |-- HKgccs-B5-V
|   |-- HKm314-B5-H
|   |-- HKm314-B5-V
|   |-- HKm471-B5-H
|   |-- HKm471-B5-V
|   |-- HKscs-B5-H
|   |-- HKscs-B5-V
|   |-- UCS2-B5pc
|   |-- UCS2-ETen-B5
|   |-- UniCNS-UCS2-H
|   |-- UniCNS-UCS2-V
|   |-- UniCNS-UTF16-H
|   |-- UniCNS-UTF16-V
|   |-- UniCNS-UTF32-H
|   |-- UniCNS-UTF32-V
|   |-- UniCNS-UTF8-H
|   `-- UniCNS-UTF8-V
|-- Adobe-GB1
|   |-- Adobe-GB1-0
|   |-- Adobe-GB1-1
|   |-- Adobe-GB1-2
|   |-- Adobe-GB1-3
|   |-- Adobe-GB1-4
|   |-- Adobe-GB1-5
|   |-- Adobe-GB1-GBK-EUC
|   |-- Adobe-GB1-GBpc-EUC
|   |-- Adobe-GB1-H-CID
|   |-- Adobe-GB1-H-Host
|   |-- Adobe-GB1-H-Mac
|   |-- Adobe-GB1-UCS2
|   |-- GB-EUC-H
|   |-- GB-EUC-V
|   |-- GB-H
|   |-- GB-V
|   |-- GBK-EUC-H
|   |-- GBK-EUC-UCS2
|   |-- GBK-EUC-V
|   |-- GBK2K-H
|   |-- GBK2K-V
|   |-- GBKp-EUC-H
|   |-- GBKp-EUC-V
|   |-- GBT-EUC-H
|   |-- GBT-EUC-V
|   |-- GBT-H
|   |-- GBT-V
|   |-- GBTpc-EUC-H
|   |-- GBTpc-EUC-V
|   |-- GBpc-EUC-H
|   |-- GBpc-EUC-UCS2
|   |-- GBpc-EUC-UCS2C
|   |-- GBpc-EUC-V
|   |-- UCS2-GBK-EUC
|   |-- UCS2-GBpc-EUC
|   |-- UniGB-UCS2-H
|   |-- UniGB-UCS2-V
|   |-- UniGB-UTF16-H
|   |-- UniGB-UTF16-V
|   |-- UniGB-UTF32-H
|   |-- UniGB-UTF32-V
|   |-- UniGB-UTF8-H
|   `-- UniGB-UTF8-V
|-- Adobe-Japan1
|   |-- 78-EUC-H
|   |-- 78-EUC-V
|   |-- 78-H
|   |-- 78-RKSJ-H
|   |-- 78-RKSJ-V
|   |-- 78-V
|   |-- 78ms-RKSJ-H
|   |-- 78ms-RKSJ-V
|   |-- 83pv-RKSJ-H
|   |-- 90ms-RKSJ-H
|   |-- 90ms-RKSJ-UCS2
|   |-- 90ms-RKSJ-V
|   |-- 90msp-RKSJ-H
|   |-- 90msp-RKSJ-V
|   |-- 90pv-RKSJ-H
|   |-- 90pv-RKSJ-UCS2
|   |-- 90pv-RKSJ-UCS2C
|   |-- 90pv-RKSJ-V
|   |-- Add-H
|   |-- Add-RKSJ-H
|   |-- Add-RKSJ-V
|   |-- Add-V
|   |-- Adobe-Japan1-0
|   |-- Adobe-Japan1-1
|   |-- Adobe-Japan1-2
|   |-- Adobe-Japan1-3
|   |-- Adobe-Japan1-4
|   |-- Adobe-Japan1-5
|   |-- Adobe-Japan1-6
|   |-- Adobe-Japan1-7
|   |-- Adobe-Japan1-90ms-RKSJ
|   |-- Adobe-Japan1-90pv-RKSJ
|   |-- Adobe-Japan1-H-CID
|   |-- Adobe-Japan1-H-Host
|   |-- Adobe-Japan1-H-Mac
|   |-- Adobe-Japan1-PS-H
|   |-- Adobe-Japan1-PS-V
|   |-- Adobe-Japan1-UCS2
|   |-- EUC-H
|   |-- EUC-V
|   |-- Ext-H
|   |-- Ext-RKSJ-H
|   |-- Ext-RKSJ-V
|   |-- Ext-V
|   |-- H
|   |-- Hankaku
|   |-- Hiragana
|   |-- Hojo-EUC-H
|   |-- Hojo-EUC-V
|   |-- Hojo-H
|   |-- Hojo-V
|   |-- Katakana
|   |-- NWP-H
|   |-- NWP-V
|   |-- RKSJ-H
|   |-- RKSJ-V
|   |-- Roman
|   |-- UCS2-90ms-RKSJ
|   |-- UCS2-90pv-RKSJ
|   |-- UniHojo-UCS2-H
|   |-- UniHojo-UCS2-V
|   |-- UniHojo-UTF16-H
|   |-- UniHojo-UTF16-V
|   |-- UniHojo-UTF32-H
|   |-- UniHojo-UTF32-V
|   |-- UniHojo-UTF8-H
|   |-- UniHojo-UTF8-V
|   |-- UniJIS-UCS2-H
|   |-- UniJIS-UCS2-HW-H
|   |-- UniJIS-UCS2-HW-V
|   |-- UniJIS-UCS2-V
|   |-- UniJIS-UTF16-H
|   |-- UniJIS-UTF16-V
|   |-- UniJIS-UTF32-H
|   |-- UniJIS-UTF32-V
|   |-- UniJIS-UTF8-H
|   |-- UniJIS-UTF8-V
|   |-- UniJIS2004-UTF16-H
|   |-- UniJIS2004-UTF16-V
|   |-- UniJIS2004-UTF32-H
|   |-- UniJIS2004-UTF32-V
|   |-- UniJIS2004-UTF8-H
|   |-- UniJIS2004-UTF8-V
|   |-- UniJISPro-UCS2-HW-V
|   |-- UniJISPro-UCS2-V
|   |-- UniJISPro-UTF8-V
|   |-- UniJISX0213-UTF32-H
|   |-- UniJISX0213-UTF32-V
|   |-- UniJISX02132004-UTF32-H
|   |-- UniJISX02132004-UTF32-V
|   |-- V
|   `-- WP-Symbol
|-- Adobe-Japan2
|   `-- Adobe-Japan2-0
|-- Adobe-KR
|   |-- Adobe-KR-0
|   |-- Adobe-KR-1
|   |-- Adobe-KR-2
|   |-- Adobe-KR-3
|   |-- Adobe-KR-4
|   |-- Adobe-KR-5
|   |-- Adobe-KR-6
|   |-- Adobe-KR-7
|   |-- Adobe-KR-8
|   |-- Adobe-KR-9
|   |-- Adobe-KR-UCS2
|   |-- UniAKR-UTF16-H
|   |-- UniAKR-UTF32-H
|   `-- UniAKR-UTF8-H
`-- Adobe-Korea1
    |-- Adobe-Korea1-0
    |-- Adobe-Korea1-1
    |-- Adobe-Korea1-2
    |-- Adobe-Korea1-H-CID
    |-- Adobe-Korea1-H-Host
    |-- Adobe-Korea1-H-Mac
    |-- Adobe-Korea1-KSCms-UHC
    |-- Adobe-Korea1-KSCpc-EUC
    |-- Adobe-Korea1-UCS2
    |-- KSC-EUC-H
    |-- KSC-EUC-V
    |-- KSC-H
    |-- KSC-Johab-H
    |-- KSC-Johab-V
    |-- KSC-V
    |-- KSCms-UHC-H
    |-- KSCms-UHC-HW-H
    |-- KSCms-UHC-HW-V
    |-- KSCms-UHC-UCS2
    |-- KSCms-UHC-V
    |-- KSCpc-EUC-H
    |-- KSCpc-EUC-UCS2
    |-- KSCpc-EUC-UCS2C
    |-- KSCpc-EUC-V
    |-- UCS2-KSCms-UHC
    |-- UCS2-KSCpc-EUC
    |-- UniKS-UCS2-H
    |-- UniKS-UCS2-V
    |-- UniKS-UTF16-H
    |-- UniKS-UTF16-V
    |-- UniKS-UTF32-H
    |-- UniKS-UTF32-V
    |-- UniKS-UTF8-H
    `-- UniKS-UTF8-V
可以检查一下该路径是否存在。
BTW, 我基于 scoop 安装的 C:\Users\Kasmir\scoop\shims\pdftocairo.exe 不能正确处理中文,我猜是我安装的版本不是很对...
pdftocairo.exe --help
pdftocairo version 25.12.0
Copyright 2005-2025 The Poppler Developers - http://poppler.freedesktop.org
Copyright 1996-2011, 2022 Glyph & Cog, LLC针对上面对于\multirow的数字不好确定的情况,这是该方法的缺陷:
\documentclass[fontset=fandol]{ctexart}
\usepackage{array}
\usepackage{multirow}
\usepackage{amsmath,amsfonts}
\usepackage{makecell}
\usepackage{graphicx}
\usepackage[export]{adjustbox}
\begin{document}
\begin{tabular}{|c|c|c|}
\hline
\textbf{条件} & \textbf{方程} & \textbf{说明} \\ \hline
\multirow{2}{*}{圆心在原点} & $x^2+y^2=r^2$ & $a=b=0$ \\ \cline{2-3}
 & $x^2+y^2+F=0$ & $D=E=0$ \\ \hline
\multirow{3}{*}{圆与$x,y$轴都相切} & \makecell{$(x-a)^2+(y-b)^2=a^2$\\$(|a|=|b|\neq 0)$} & $|a|=|b|=r$ \\ \cline{2-3}
 & \makecell{$x^2+y^2+Dx+Ey+F=0$\\$(|D|=|E|\neq 0)$} & $D^2=E^2=4F$ \\ \hline
\multirow{3}{*}{圆与$x,y$轴都相切} & \makecell{$\dfrac{1}{2}(x-a)^2+(y-b)^2=a^2$\\$(|a|=|b|\neq \dfrac{1}{2})$} & $|a|=|b|=r$ \\ \cline{2-3}
 & \makecell{$x^2+y^2+\dfrac{4}{5}Dx+Ey+F=0$\\$(|D|=|E|\neq 0)$} & $D^2=E^2=F$ \\ \hline
\multirow{6.5}{*}{圆与$x,y$轴都相切} & \makecell{$\dfrac{1}{2}(x-a)^2+(y-b)^2=a^2$\\$(|a|=|b|\neq \dfrac{1}{2})$} & $|a|=|b|=r$ \\ \cline{2-3}
 & \makecell{$x^2+y^2+\dfrac{4}{5}Dx+Ey+F=0$\\$(|D|=|E|\neq 0)$} &\includegraphics[width=4cm,height=3.25cm,valign=m]{example-image-duck}\\\hline
\end{tabular}
\end{document}
几个建议:
\documentclass{article}
\usepackage{glossaries}
\makeglossaries

\newglossaryentry{latex}{
    name={LaTeX},
    description={A document preparation system}
}

\begin{document}

This document is written using \gls{latex}.

\printglossaries

\end{document}要正确编译上面的文档,有两种方案:
pdflatex main
makeglossaries main
pdflatex mainlatexmk,但也不能太直接一步到位,参考这个链接:在codex老师的帮助下,我发现我在windows下需要微调一下.latexmkrc:
add_cus_dep('glo', 'gls', 0, 'run_makeglossaries');
add_cus_dep('acn', 'acr', 0, 'run_makeglossaries');

sub run_makeglossaries {
    my ($base_name, $path) = fileparse( $_[0] ); #handle -outdir param by splitting path and file, ...
    pushd $path; # ... cd-ing into folder first, then running makeglossaries ...

    if ( $silent ) {
        # system "makeglossaries -q '$base_name'"; #unix
        system "makeglossaries", "-q", "$base_name"; #windows
    }
    else {
        # system "makeglossaries '$base_name'"; #unix
        system "makeglossaries", "$base_name"; #windows
    };

    popd; # ... and cd-ing back again
}
再用
latexmk -pdf main
现在要做的,就是如何把上述配置移植到 sublime 风格的配置文件上,让他实际上做和上面命令行完全相同的事。
有类似原理支持相关功能的 hwemoji 宏包,担任让不支持与ctex共同使用。
\documentclass{article}
% \usepackage{ctex}
\usepackage{hwemoji}
\begin{document}

\texttt{pdflatex-friendly}

%中文 + emoji ?

✏ 🆔 🍄 😀 😁

\end{document}

哎哎... CJK的内部实现想必修改了某些映射...不过为什么pdftex-only呢....2026年了,pdflatex+CJK也许已经不是主流,除非是在维护某些旧文档...
应但是bug...
理论上lang=cn与lang=it都应该覆盖\bibname,不应该出现这种行为的不一致性。
在 elegantbook.cls 中,语言分支的代码结构如下:
cn 分支(第 192-219 行 + 第 409-453 行):
% 第 194 行:加载 ctex 处理中文排版
\RequirePackage[UTF8, scheme=plain, fontset=none]{ctex}

% 第 418 行:手动重定义 \bibname
\renewcommand{\bibname}{参考文献}
cn 分支没有加载 babel,也没有做任何与 biblatex 语言字符串相关的设置。
it 分支(第 492-526 行):
% 第 494 行:加载 babel 意大利语
\RequirePackage[italian]{babel}
it 分支甚至没有手动写 \renewcommand{\bibname}{...},但 \printbibliography 的标题却是正确的意大利语。
% 第 403-407 行:biblatex 在语言分支之前加载
\RequirePackage[
  backend=\ELEGANT@bibend,
  citestyle=\ELEGANT@citestyle,
  bibstyle=\ELEGANT@bibstyle]{biblatex}
加载顺序为:
ctex 或 babel(语言分支,第 192 行起)biblatex(第 407 行)\renewcommand 覆盖(第 409 行起)biblatex 有两套并行的标题系统:
| 系统 | 机制 | 命令 |
|---|---|---|
| LaTeX 标题宏 | \bibname / \refname | 由 \renewcommand 修改 |
| biblatex 本地化字符串 | bibliography / references | 由 .lbx 文件或 \DeclareBibliographyStrings 定义 |
关键点:\printbibliography 的默认标题不是直接读取 \bibname,而是读取 biblatex 自己的本地化字符串 bibliography。biblatex 在初始化和 \begin{document} 时刻会用自己的字符串系统同步覆盖 \bibname。
lang=it 的完整链路:
elegantbook.cls 第 494 行:
  \RequirePackage[italian]{babel}
       ↓
  babel 将文档主语言注册为 italian
       ↓
  biblatex 检测到 babel 语言为 italian
       ↓
  自动加载 italian.lbx
  (路径:texmf-dist/tex/latex/biblatex/lbx/italian.lbx)
       ↓
  italian.lbx 第 90 行定义:
    bibliography = {{Bibliografia}{Bibliografia}}
       ↓
  \begin{document} 时,biblatex 用 italian.lbx 的字符串初始化
       ↓
  \printbibliography 标题 → Bibliografia ✓
lang=cn 的完整链路:
elegantbook.cls 第 194 行:
  \RequirePackage[...]{ctex}
       ↓
  ctex 只处理中文排版(字体、断行等),不注册 babel 语言
       ↓
  biblatex 检测不到中文语言环境
       ↓
  且 biblatex 标准发行版中没有 chinese.lbx
       ↓
  biblatex 回退到默认语言 → english
       ↓
  english.lbx 定义:
    bibliography = {{Bibliography}{Bibliography}}
       ↓
  elegantbook.cls 第 418 行:
    \renewcommand{\bibname}{参考文献}
  ← 此时 \bibname 暂时被改为"参考文献"
       ↓
  \begin{document} 时,biblatex 用 english.lbx 的字符串
  重新初始化,\bibname 被覆盖回 "Bibliography"
       ↓
\printbibliography 标题 → Bibliography ✗用户提到的两种绕过方式:
% 方式一:延迟到 \begin{document} 之后覆盖
\AtBeginDocument{%
    \renewcommand{\bibname}{参考文献}
}有效原因:\AtBeginDocument 在 biblatex 的 \begin{document} 初始化之后执行,所以覆盖不会被 biblatex 再冲掉。
% 方式二:直接指定标题
\printbibliography[title={参考文献}]有效原因:title= 参数直接覆盖了 biblatex 的默认标题逻辑,绕过了整个字符串系统。
| lang=it | lang=cn | |
|---|---|---|
| 语言包 | \RequirePackage[italian]{babel} | \RequirePackage[...]{ctex} |
| 是否注册 babel 语言 | 是 | 否 |
| biblatex 识别的语言 | italian | english(回退默认) |
| biblatex 加载的 .lbx | italian.lbx | english.lbx |
| bibliography 字符串 | Bibliografia | Bibliography |
\renewcommand{\bibname} 是否生效 | 不需要(.lbx 已处理) | 写了但被 biblatex 覆盖 |
一句话总结:lang=it 之所以正常,是因为 \RequirePackage[italian]{babel} 触发了 biblatex 自身的本地化机制(加载 italian.lbx),biblatex 从自己的字符串系统中获得了正确的意大利语标题。而 lang=cn 只是通过 \renewcommand{\bibname}{参考文献} 修改了 LaTeX 层面的标题宏,并没有对接 biblatex 的本地化字符串系统;biblatex 在 \begin{document} 时仍按默认的 english.lbx 重新初始化 \bibname,导致中文设置被覆盖。
这本质上是 elegantbook.cls 的 lang=cn 分支只做了一半的工作:改了 LaTeX caption macro,但遗漏了 biblatex 的 DeclareBibliographyStrings 接口。
在 elegantbook.cls 的 lang=cn 分支中,用 \DefineBibliographyStrings 接入 biblatex 的本地化字符串系统。由于 cn 分支没有注册 babel 语言,biblatex 实际加载的是 english.lbx,所以需要覆盖 english 语言的字符串。
elegantbook.cls 第 418-419 行之后(\bibname 和 \ebibname 定义之后),添加:
\ifdefstring{\ELEGANT@lang}{cn}{
  \renewcommand{\baselinestretch}{1.3}
  \renewcommand{\contentsname}{目录}
  \renewcommand{\figurename}{图}
  \renewcommand{\tablename}{表}
  \renewcommand{\partname}{\color{structurecolor}}
  \renewcommand{\thepart}{第\zhnumber{\arabic{part}}部分}
  \renewcommand{\listfigurename}{插图目录}
  \renewcommand{\listtablename}{表格目录}
  \renewcommand{\bibname}{参考文献}
  \newcommand{\ebibname}{参考文献}
  % >>> 新增:接入 biblatex 本地化字符串系统 >>>
  \DefineBibliographyStrings{english}{
    bibliography = {参考文献},
    references   = {参考文献},
  }
  % <<< 新增结束 <<<
  \renewcommand{\appendixname}{附录}
  % ... 后续不变 ...
}{\relax}\documentclass[
lang=cn,fontset=fandol,
]{elegantbook}
\geometry{paperheight=8cm}
\addbibresource{xampl.bib}
\begin{document}
\chapter{第一章}
Hello\cite{article-minimal} World! 中文!
\printbibliography
\end{document}
以下的分析来自 codex-5.5-xhigh:
原因是book.cls的\tableofcontents把\@mkboth放进了\chapter*{...}标题参数里;你的\titleformat又把该标题交给\myroundedbox',其中xstring' 的\StrLeft/\StrGobbleLeft会拆解整个 token list,触发\@mkboth递归,最终报TeX capacity exceeded [input stack size=10000]。
我已采用最佳修正:重定义\tableofcontents,把\@mkboth移到\chapter*{\contentsname}之后执行。这样目录标题装饰宏只处理可见文字“目录”,不再处理页眉标记命令。
\documentclass[fontset=fandol]{ctexbook}
\RequirePackage{titlesec}
\RequirePackage{fancyhdr}
\RequirePackage{xstring}
\RequirePackage{tikz}
\newcommand{\myroundedbox}[1]{%
  \begin{tikzpicture}[baseline=(mbox.base), overlay, remember picture]
    \StrLeft{#1}{1}[\firstchar]
    \StrGobbleLeft{#1}{1}[\restchars]
    \node[anchor=west,draw=cyan,line width=2pt,fill=white,inner xsep=3pt,inner ysep=3pt,font=\bfseries] (mbox) {\firstchar\hskip 0.3em\restchars};
  \end{tikzpicture}%
}
\titleformat{\chapter}[display]
  {%
    \sffamily%
    \thispagestyle{empty}
  }
  {}
  {-1.1em}
  {\myroundedbox}
\titlespacing{\chapter}{0pt}{-1.5\baselineskip}{0\baselineskip}
% book.cls puts \@mkboth inside the TOC chapter title; keep it outside
% because \myroundedbox uses xstring to split only visible title text.
\makeatletter
\renewcommand\tableofcontents{%
    \if@twocolumn
      \@restonecoltrue\onecolumn
    \else
      \@restonecolfalse
    \fi
    \chapter*{\contentsname}%
    \@mkboth{\MakeUppercase\contentsname}{\MakeUppercase\contentsname}%
    \@starttoc{toc}%
    \if@restonecol\twocolumn\fi
    }
\makeatother

\begin{document}

\tableofcontents %

\chapter{课节导引}
\section{引导点公式速记速记}

\end{document}
如上的 patch 可以似乎可以解决问题...

该问题的一个简化版本等价于:
\documentclass[fontset=fandol]{ctexbook}
\RequirePackage{titlesec}
\RequirePackage{fancyhdr}
\RequirePackage{xstring}
\RequirePackage{tikz}
\newcommand{\myroundedbox}[1]{%
  \begin{tikzpicture}[baseline=(mbox.base), overlay, remember picture]
    \StrLeft{#1}{1}[\firstchar]
    \StrGobbleLeft{#1}{1}[\restchars]
    \node[anchor=west,draw=cyan,line width=2pt,fill=white,inner xsep=3pt,inner ysep=3pt,font=\bfseries] (mbox) {\firstchar\hskip 0.3em\restchars};
  \end{tikzpicture}%
}
\titleformat{\chapter}[display]
  {%
    \sffamily%
    \thispagestyle{empty}
  }
  {}
  {-1.1em}
  {\myroundedbox}
\titlespacing{\chapter}{0pt}{-1.5\baselineskip}{0\baselineskip}

\begin{document}

% \tableofcontents %

\chapter{课节导引}
\section{引导点公式速记速记}

\end{document}如果加上\tableofcontents,将导致如下报错:
! TeX capacity exceeded, sorry [input stack size=10000].
\@mkboth ...rotect \ttl@gmk {\protect \@mkboth {#1
                                                  }{#2}}
l.25 \tableofcontents另外,对于这种站内的链接,不建议不贴文件。否则这隐含着让其他人都要付费下载一次。
能否请 @u122987 关注一下。
\documentclass[zihao=-4]{ctexbook}
\RequirePackage[
    papersize={210mm,297mm},
    margin=25mm,showframe,
    ]{geometry}
\RequirePackage{enumitem}

\usepackage{newtxtext}

\begin{document}

\begin{enumerate}[label={[}\arabic*{]}, labelindent=\parindent, leftmargin=*]
    \item Tao Y, \textbf{Liu H}, Wang X, et al. Probabilistically Informed Motion Primitives for Impedance Control with Guided Motion Planning in Contact-Rich Manipulation Tasks[J]. xxxx. (学生一作在投,SCI,Q1, IF=4.7,对应第四章)
\end{enumerate}

\end{document}xelatex+newtxtext
lualatex+newtxtext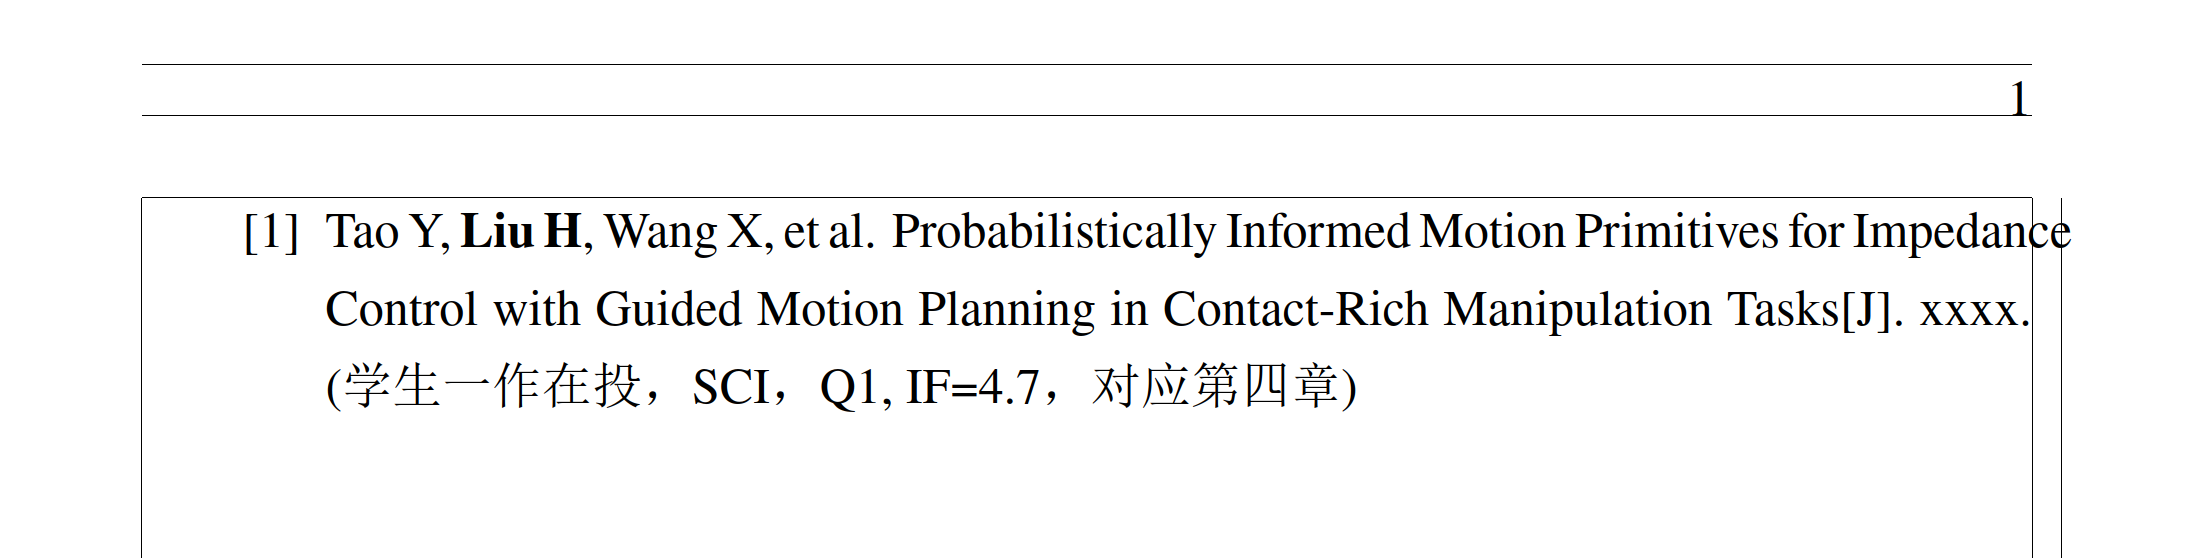
\usepackage[british]{babel}
\documentclass[zihao=-4]{ctexbook}
\RequirePackage[
    papersize={210mm,297mm},
    margin=25mm,showframe,
    ]{geometry}
\RequirePackage{enumitem}
\usepackage[british]{babel}
\usepackage{newtxtext}

\begin{document}

\begin{enumerate}[label={[}\arabic*{]}, labelindent=\parindent, leftmargin=*]
    \item Tao Y, \textbf{Liu H}, Wang X, et al. Probabilistically Informed Motion Primitives for Impedance Control with Guided Motion Planning in Contact-Rich Manipulation Tasks[J]. xxxx. (学生一作在投,SCI,Q1, IF=4.7,对应第四章)
\end{enumerate}

\end{document}xelatex+newtxtext+\usepackage[british]{babel}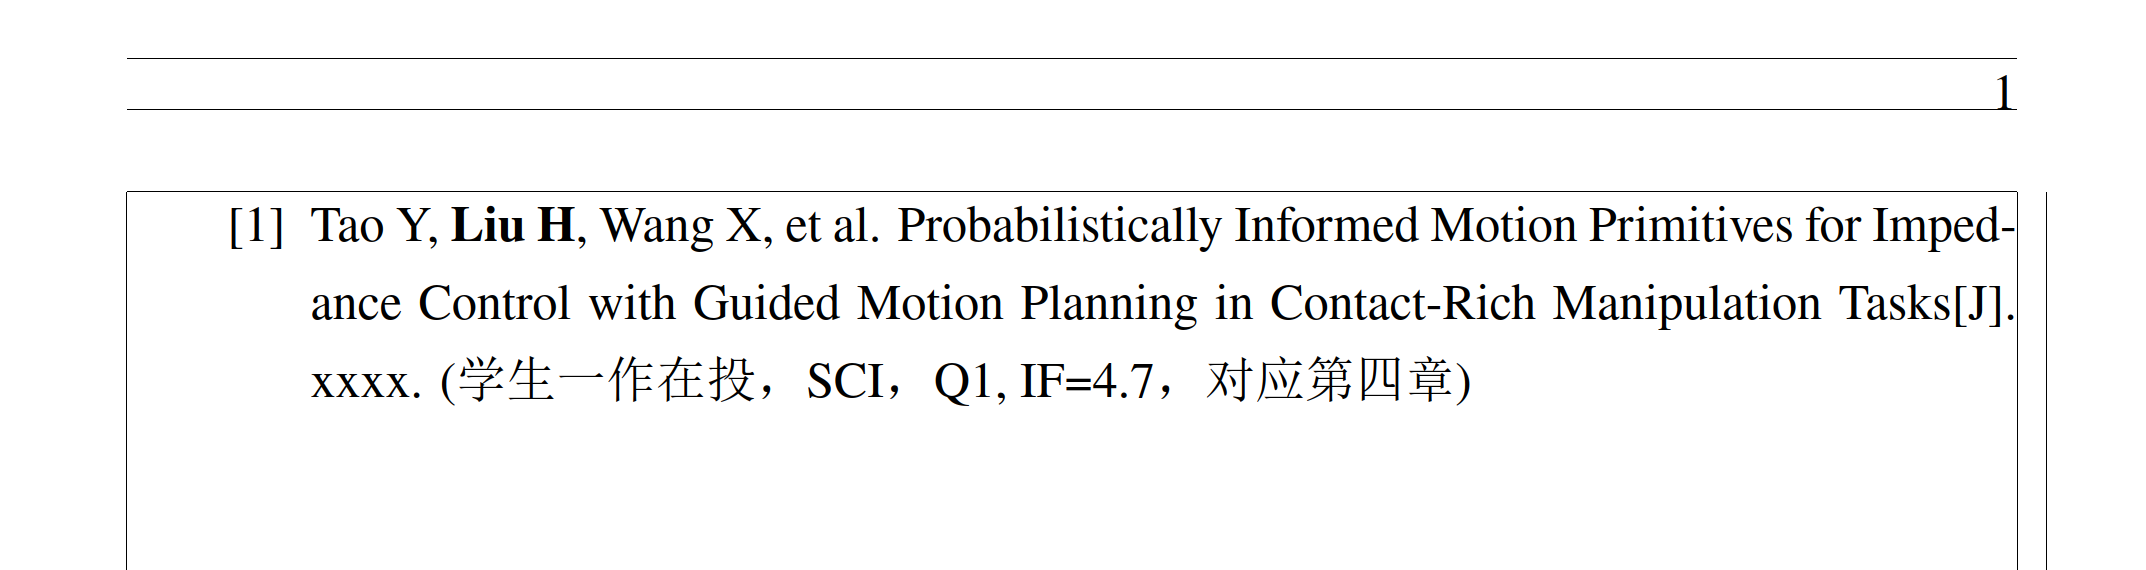
lualatex+newtxtext+\usepackage[british]{babel}
\hyphenation{im-ped-ance}\documentclass[zihao=-4]{ctexbook}
\RequirePackage[
papersize={210mm,297mm},
margin=25mm,showframe,
]{geometry}
\RequirePackage{enumitem}
\hyphenation{im-ped-ance}
\usepackage{newtxtext}
\begin{document}
\begin{enumerate}[label={[}\arabic*{]}, labelindent=\parindent, leftmargin=*]
\item Tao Y, \textbf{Liu H}, Wang X, et al. Probabilistically Informed Motion Primitives for Impedance Control with Guided Motion Planning in Contact-Rich Manipulation Tasks[J]. xxxx. (学生一作在投,SCI,Q1, IF=4.7,对应第四章)
\end{enumerate}
\end{document}xelatex+\hyphenation{im-ped-ance}: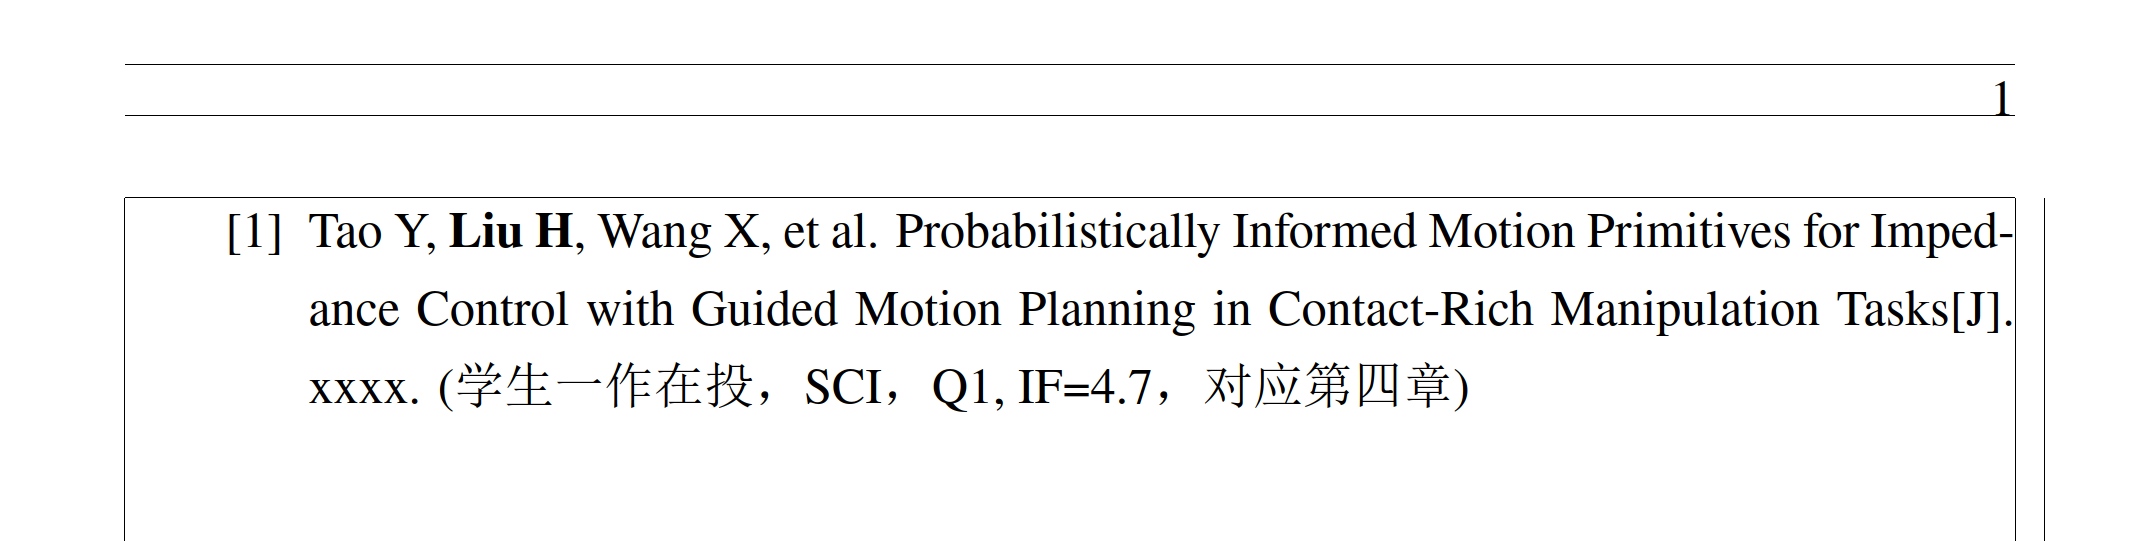
lualatex+\hyphenation{im-ped-ance}:
microtype(但只在lualatex下生效,感谢@u30 )% lualatex
\documentclass[zihao=-4]{ctexbook}
\RequirePackage[
papersize={210mm,297mm},
margin=25mm,showframe,
]{geometry}
\RequirePackage{enumitem}
\usepackage{newtxtext}
\usepackage{microtype}
\begin{document}
\begin{enumerate}[label={[}\arabic*{]}, labelindent=\parindent, leftmargin=*]
\item Tao Y, \textbf{Liu H}, Wang X, et al. Probabilistically Informed Motion Primitives for Impedance Control with Guided Motion Planning in Contact-Rich Manipulation Tasks[J]. xxxx. (学生一作在投,SCI,Q1, IF=4.7,对应第四章)
\end{enumerate}
\end{document}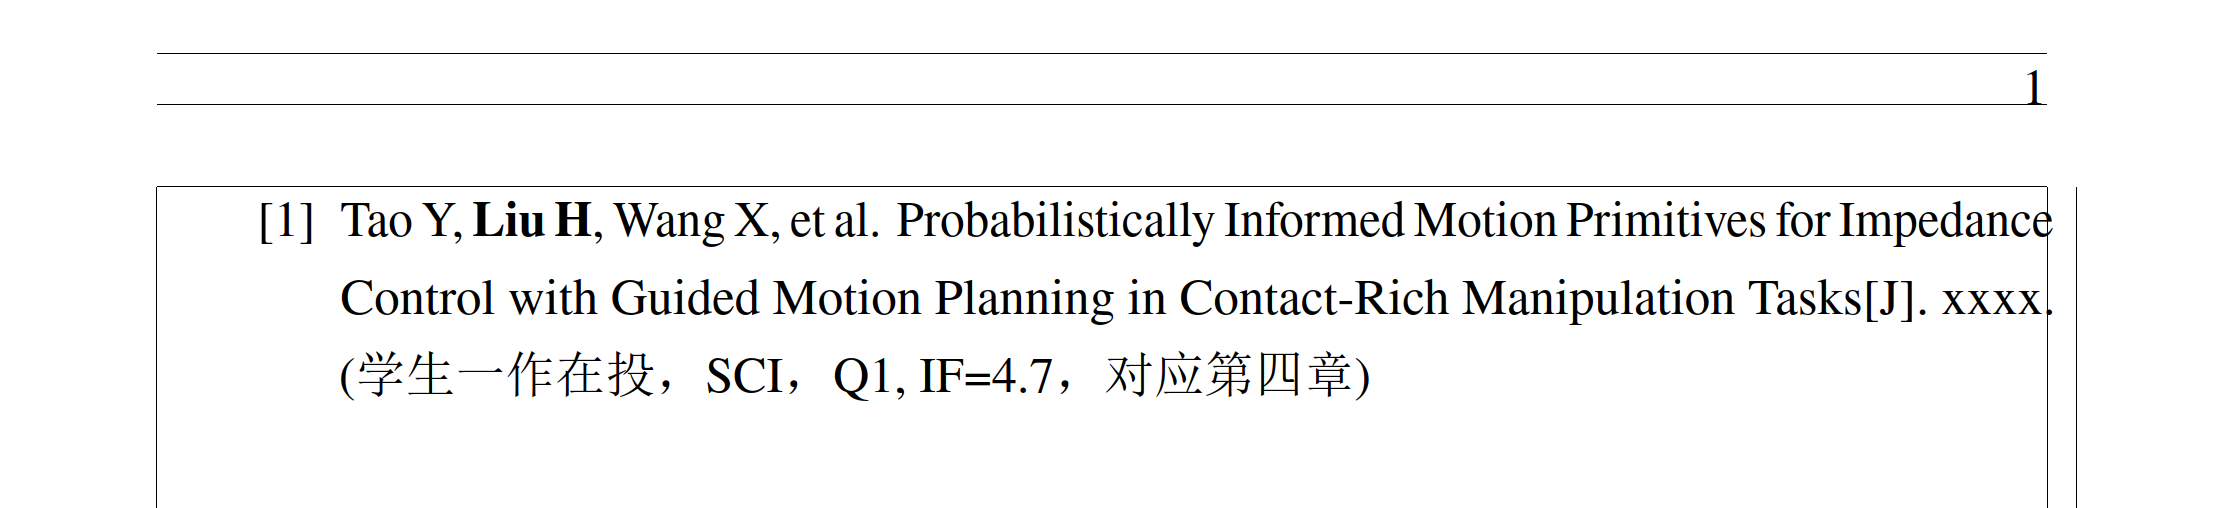
我试了一下,虽然没有任何提示,但是在这个网页 只要耐心等一分钟就可以触发自动下载。

问 如何设置beamer顶部当前导航条的背景色为另一种颜色?