挺简单的事:
画两个椭圆,连接两条母线。如果想表达遮挡关系就画两条椭圆弧和一个椭圆,其中被遮挡的一部分椭圆弧用虚线表达。
挺简单的事:
画两个椭圆,连接两条母线。如果想表达遮挡关系就画两条椭圆弧和一个椭圆,其中被遮挡的一部分椭圆弧用虚线表达。
CJK* 环境里干什么?CJK 包编译 GBK 编码的文件也已经是过时的技术了,应该改换 xelatex 编译使用 xeCJK 包(更优的选择是使用 ctex 宏包和文档类)并以 UTF-8 编码的文件。3、如果非要用这个模板不可,那要么选择装一个 CTEX 套装来完成这项工作。
4、如果一定需要在 TeXLive 等主流发行版里完成这项工作,你需要知道:CJK* 环境的第一个参数是编码类型,第二个参数是与该编码类型对应的字体族,这需要你的 TeX 系统中存在对应的拆分好字体文件。CTEX 套装内还有这些历史遗留的产物,其他主流发行版都没有收录这些内容,你得找一下一个古老的字体配置程序 gbkfonts,然后自行为发行版进行配置,这工作太复杂,而且也没有意义。
要搞清楚,enumerate(或者使用了 shortlabels 选项的 enumitem)表示标签的参数只有 1、a、A、i、I 这几个有特殊定义,其余的短标签参数都是直接替代标签,所以 [9.] 这种标签就会把所有编号都变成 9.,[16.] 就会变成 \theenumi6.,[21.] 就变成了 2\theenumi.,那当然是不对了(最后一个是凑巧还合适)。想用 enumerate 包解决这个问题,只好手动设置计数器 enumi,在 enumerate 环境中,一开始就指定 enumi 为需要的数值减一。如:
\documentclass[10pt,twoside,openany]{book}
\usepackage{enumerate}
\begin{document}
  \emph{In Problems \ref{prb:9}--\ref{prb:12}, find the equation of the given central conic.}
\begin{enumerate}[1.]
  \setcounter{enumi}{8}
  \item\label{prb:9}  Ellipse with a focus at $(-3,0)$ and a vertex at $(6,0)$
  \item  Ellipse with a focus at $(0,-5)$ and eccentricity$\frac{1}{3}$
  \item Hyperbola with a focus at $(5,0)$ and a vertex at $(4,0)$
  \item\label{prb:12}  Hyperbola with a vertex at $(90.-3)$ and eccentricity$\frac{3}{2}$
\end{enumerate}

\emph{In Problems \ref{prb:16}--\ref{prb:18}, find $dy/dx$ and $d^2 y/dx^2$ without eliminating the parameter.}
\begin{enumerate}[1.]
  \setcounter{enumi}{15}
  \item\label{prb:16} $x=3r^2$, $y=4r^3$; $r\neq 0$
  \item  $x=1-\cos{t}$, $y=1+\sin{t}$; $t\neq  n\pi$
  \item\label{prb:18} $x=3\tan{t}-1$, $y=5\sec{t}+2$; $t\neq \frac{(2n+1)\pi}{2}$
\end{enumerate}

\emph{In Problems \ref{prb:21}--\ref{prb:24}, find the Cartesian equations of the graphs of the given polar equations.}
 \begin{enumerate}[1.]
   \setcounter{enumi}{20}
   \item\label{prb:21} $\theta=\frac{1}{2}\pi$
   \item $r=3$
   \item $r-5\cos\theta=0$
   \item\label{prb:24} $r\sin\theta-1=0$
 \end{enumerate}
\end{document}
BTW:你在原来的文件中的引用做得不好,这种引用一旦要改动几项,工作量是巨大的。 \item 也可以使用\label 来打标签,用 \ref 来做引用。还有,建议和你的老师沟通使用 enumitem 包,加上 shortlabels 选项是兼容 enumerate 包这种短标签格式的,代码不需要改什么,而且,不需要手动去设置计数器了,一旦需要修改,在编号调整这方面几乎没有工作量。
太古老的中文支持方式了,现在的发行版应该没有这些小字体了,要找 gbkfonts 这个程序自己去搞字体。
既然用模板,就不要乱改。你的需求是不是要一个只有页码在页脚中央的页面格式?那么使用\pagestyle{plain} 就行了。
首先测试是不是安装问题。命令行编译一次试试。
如果排除了安装问题,看 Texstudio 的配置有啥问题。
btw: texstudio_Dqt_LON.tex 是个啥文件?你没保存源文件?
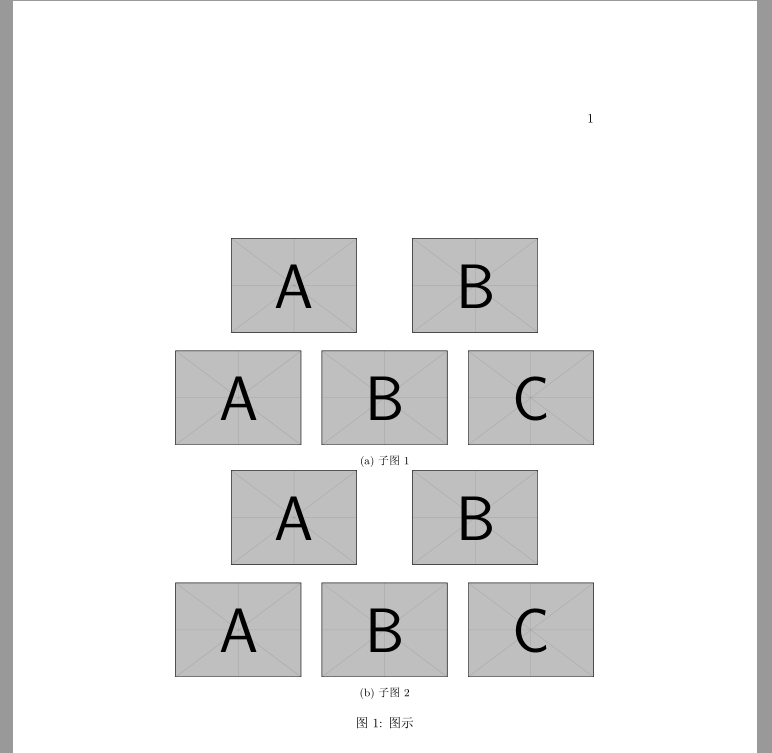
我喜欢简单直接。我不喜欢 subfig、subfigure,我喜欢 subcaption。
\documentclass{ctexart}
\usepackage{subcaption,graphicx}
\begin{document}
\begin{figure}
\begin{subfigure}{\linewidth}
\mbox{}\hfill%
\includegraphics[width=0.3\linewidth]{example-image-a.pdf}\hfill
\includegraphics[width=0.3\linewidth]{example-image-b.pdf}\hfill
\mbox{}\\[5mm]
\includegraphics[width=0.3\linewidth]{example-image-a.pdf}\hfill
\includegraphics[width=0.3\linewidth]{example-image-b.pdf}\hfill
\includegraphics[width=0.3\linewidth]{example-image-c.pdf}
\caption{子图1}
\end{subfigure}
\begin{subfigure}{\linewidth}
\mbox{}\hfill%
\includegraphics[width=0.3\linewidth]{example-image-a.pdf}\hfill
\includegraphics[width=0.3\linewidth]{example-image-b.pdf}\hfill
\mbox{}\\[5mm]
\includegraphics[width=0.3\linewidth]{example-image-a.pdf}\hfill
\includegraphics[width=0.3\linewidth]{example-image-b.pdf}\hfill
\includegraphics[width=0.3\linewidth]{example-image-c.pdf}
\caption{子图2}
\end{subfigure}
\caption{图示}
\end{figure}
\end{document}
效果:
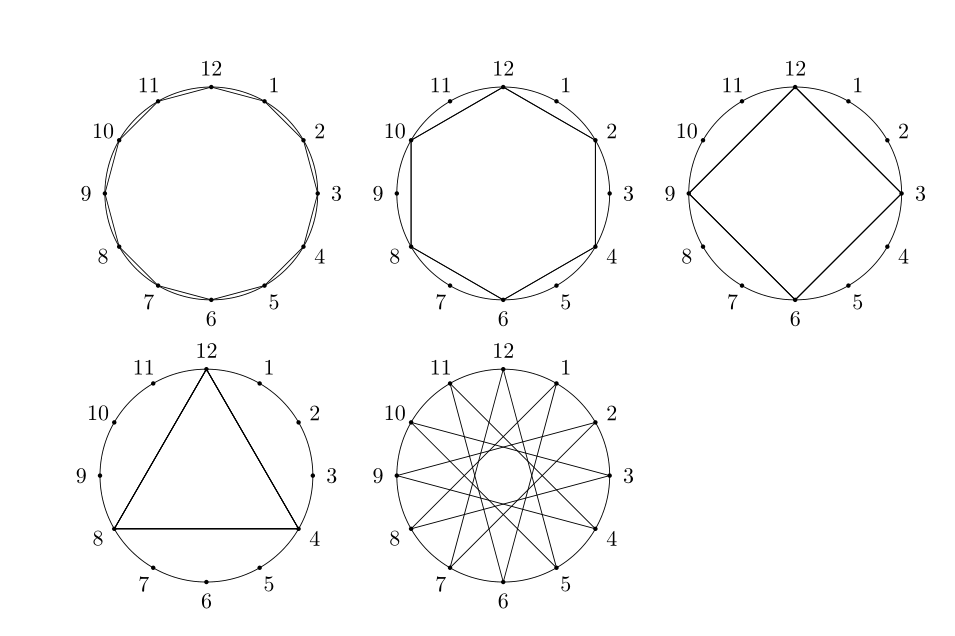
如果你不在乎线段重复绘制的话,代码可以非常简单:
\documentclass{article}
\usepackage{tikz,amsmath}
\newcommand{\Drawclock}[1]{
\begin{tikzpicture}
  \draw (0,0) circle (1.7);
  \foreach \x in {1,2,...,12}
    {\fill (90-30*\x:1.7) circle (1pt);
     \node at (90-30*\x:2.0){\x};
     \draw(90-30*#1*\x-30*#1:1.7)--(90-30*#1*\x:1.7);
    }
\end{tikzpicture}
}
\begin{document}
\foreach \i in {1,2,...,5} {\Drawclock{\i}\;}
\end{document}
效果:
enumerate 包的可选参数是用来指定标签的样式的,没有这些功能。所以下一个 enumerate 用 resume 作为了条目的标签。正确的用法是使用 enumitem 宏包。 enumitem 宏包加载时可以通过 shortlabels 选项兼容 enumerate 包的短标签格式,也可以通过 series resume 来实现接续。如:
\documentclass{article}
\usepackage[shortlabels]{enumitem}

\begin{document}

\begin{enumerate}[1),series=temp]
  \item a
  \item b
  \item c
\end{enumerate}

\begin{enumerate}[(A)]
  \item a
  \item b
  \item c
  \item d
\end{enumerate}

\begin{enumerate}[1),resume=temp]
  \item a
  \item b
  \item c
\end{enumerate}

\end{document}改用 xelatex,别没事找事。
xelatex 出现乱码是因为你的编码用的不对,不用 GBK 编码而采用 UTF-8 编码就不会有问题。
具体问题具体分析,你说得太笼统了,连举例都很笼统。
比如某目录下有sample*.csv文件,就输出想应的Tex文档以及表格,没有这个文件就跳过或者输出另外内容。
这表达的是个啥意思?只是判断 *.csv(或者其他格式文件)的存在与否执行不同的宏命令?相应的(我认为你写的想应的是错别字)TeX 文档是啥? *.csv 文件内容中通过文件路径指定的一系列文件么?表格呢?就是这个 *.csv 么?总之,这段话让人摸不透你的想法。
我不想去猜,所以建议你还是给个具体一点的例子。
你代码的16-26行写得有问题。建议用手册给出的方式重定义 \nomgroup,而且\setlength 不应该放在这个重定义里,我估计你是想把这条注释掉,但是注释错了位置。写成了 \setlength{\nomitemsep}%{0.2ex} 只把后面一个参数注释掉形成了错误。\nomgroup 的重定义也可以写成这样:
\renewcommand{\nomgroup}[1]{%
\def\TempGroupName{%
\ifthenelse{\equal{#1}{P}}{Parameters}{}%
\ifthenelse{\equal{#1}{V}}{Variables}{}%
\ifthenelse{\equal{#1}{I}}{Indices}{}%
\ifthenelse{\equal{#1}{S}}{Sets}{}%
\ifthenelse{\equal{#1}{A}}{Abbreviations}{}%
}%
\item [\textbf{\TempGroupName}]
}
这样,应该就能编译过去了。
原先考虑问题不周到,删去答案重新回答。这应该是页眉引起的问题。应该是headings 这种页面样式中 \sectionmark 定义中的 \MakeUppercase 把 {cog} 给改成了大写,从而导致 \faIcon 不能识别参数 COG,因此,报错的信息为:Package fontawesome5 Error: The requested icon COG was not found. 注意 COG 是大写。
我原来以为是 ctex 的锅,因为我注意到基本文档类 article 并没有报错。实际上,这里我犯了一个错误,忽略了 ctexart 和 article 默认页面样式的差别。ctexart 默认的页面样式是 headings,而 article 默认的页面样式是 plain,article 文档类完美躲过了这个问题。
至于这个问题的解决办法,我水平有限,还没想好怎么解决 \MakeUppercase 的问题。重新设计页眉,避免使用 \MakeUppercase 肯定是可以的,或者在指定了页面样式 headings 后 利用 xpatch 包把 \sectionmark 定义中的 \MakeUppercase 替换掉。但这样一来,显然页眉里其他英文字符不能被大写了,下面这个例子就是这样的做法:
\documentclass{article}
\usepackage{fontawesome5,xpatch}
\pagestyle{headings}
\xpatchcmd{\sectionmark}{\MakeUppercase}{\relax}{}{}
\begin{document}
\section{\faCog b}
\MakeUppercase{capital}
\section{\faCogs c}
\end{document}
嗯。。。 protect 居然就可以。。。好吧,我原来命令行
latexdef -p fontawesome5 \faCog显示的结果是:
\faCog:
\protected\long macro:->\faPreselectedIcon {cog}
就没往 \protect 上去想,那么,这样就可以解决问题了:
\documentclass{ctexart}
\usepackage{fontawesome5}
\begin{document}
\section{\protect\faCog b}
\section{\protect\faCogs c}
\end{document}试试\usepackage{../mystyle}
其实非常不建议这样做,因为这样换到别的机器上去编译的时候,必须保持着这个文档目录结构。
至于说发行版宏包是通过什么机制被 \usepackage 找到的,你可以了解一下 TDS (TeX Directory System),也叫 TEXMF 树,在 TEXMF 树下存放的文件都能被 TeX 系统找到。TeXLive 的 C:\texlive\xxxx\texmf-dist 就是系统 TEXMF 树的根目录。
对于自行开发的宏包,如果只是自己用,并且经常用到,可以放到用户 TEXMF 树下,在 TeXLive 中其根目录即为:C:\texlive\texmf-local,比如你可以把 mystyle.sty放在 C:\texlive\texmf-local\tex\latex\local 下,然后命令行执行:
texhash刷新发行版文件名数据库就可以让这个包被系统找到了。
其实这些内容在 lshort-zh 里都能找到。
你给了个 aux 是闹哪样?
补充回答
现在这个案例里,logo 位置是由 default 主题确定的,在beamerouterthemedefault.sty 中 126-133 行可以找到:
\defbeamertemplate*{sidebar right}{default}
{
  \vfill%
  \llap{\insertlogo\hskip0.1cm}%
  \vskip2pt%
  \llap{\usebeamertemplate***{navigation symbols}\hskip0.1cm}%
  \vskip2pt%
}
那么,照猫画虎可以在导言区或 beamerthemeHeverlee.sty 里添加代码设置成:
\setbeamertemplate{sidebar right}
{
  \vfill%
  \llap{\small\insertframenumber\hskip1cm}%
  \vskip2pt%
  \llap{\usebeamertemplate***{navigation symbols}\hskip0.1cm}%
  \vskip2pt%
}用insertframenumber 替代 \insertlogo,然后调整一下字号,就把页码换到了现在 logo 的位置。
原来主题中 beamerthemeHeverlee.sty 中的 75-79 行把页码放在了 frametitle 里:
\setbeamertemplate{frametitle}
        {
        \vspace{1.2em}
        {\hspace{-1em}\large{\thesection \hspace{0.5em} \insertframetitle} {\hfill\scriptsize\color{gray}$\mid$\,\insertframenumber} \rule[-.3\baselineskip]{0pt}{\baselineskip}}
        }
这里,把 \scriptsize\color{gray}$\mid$\,\insertframenumber 改成 \insertlogo 就把原来的页码换成了 logo。
我这里只是就这个问题来给一个解决方案,效果未必合适,方法也不很合理。实际上,这些都涉及到模板的设计,想要设计一个好的模板,还是要多看看优秀的设计,多看 beamer 文档手册。
问 请问如何使用tikz绘制椭圆柱体