M
M
这家伙很懒,什么也没写!

注册于 4年前

回答
17
文章
0
关注者
0

猜测是 wrapstuff 在处理环绕正文匹配 group 的时候遇到了不匹配的问题,具体需要分析源码,可以直接向作者github提issue,但貌似好久没更新了~

如果你把enumeratewrapstuff两个环境间的题干去掉,就没有这个错了,说明后面跟单一的完整环境是可以被正确处理的,而单一的完整段落显然是可以被正确处理的,那干脆显式地在题干后强制添加\par或者强制添加一个空行来满足现有的处理逻辑,从结果来看似乎猜测还是有点靠谱的~

纯属拙见,仅供参考~

\documentclass{ctexart}
\usepackage{wrapstuff}
\usepackage{graphicx}
\usepackage{enumitem}
\usepackage{wrapstuff}
\newcommand*{\mytxt}{我能吞下玻璃而不伤身体。}
\newcommand*{\mytxtt}{\mytxt\mytxt\mytxt\mytxt\mytxt\mytxt\mytxt\mytxt}

\begin{document}

\mytxtt
 \begin{wrapstuff}[r,top=2]
 \includegraphics[width=5.5cm,height=4.5cm]{example-image}
 \end{wrapstuff}
 2.(2024南宁模拟) \mytxtt(\qquad)\par
 %2.(2024南宁模拟) \mytxtt(\qquad)
 %
 \begin{enumerate}[label={\Alph*.}]%
 \item \mytxt
 \item \mytxt
 \item \mytxt
 \item \mytxt
 \end{enumerate}
\mytxtt  
\wrapstuffclear
\par\mytxtt
\par\mytxtt

\end{document}

局部截取_20250824_214107.png

coffins其实不难的,如果你对l3coffins编程式的书写风格感到不适,可以试试xcoffins--这就是一个把l3coffins封装好的,对用户使用相对友好的包。
回到这个问题上来,使用coffins来解决的思路大概如下:

  1. 把整个页面划分成3个部分,左边装饰+右边背景(红色虚线)+目录,对应三个coffins,这里假设左右比例为1:4

    \NewCoffin\LeftCoffin
    \NewCoffin\RightCoffin
    \NewCoffin\TocCoffin
    
    \SetVerticalCoffin \LeftCoffin {0.2\linewidth}{\color{red!20!white}\rule{\linewidth}{8cm}}
    \SetVerticalCoffin \RightCoffin {0.8\linewidth}{\color{blue!20!white}\rule{\linewidth}{8cm}}
  2. 在每个section开始的时候计数并设置label

    \newcounter{totalsection}
    \regtotcounter{totalsection}
    
    \AddToHook{cmd/section/before}{\refstepcounter{totalsection}}
    \AtBeginSection[]{\label{sec:\thesection}}
  3. 目录中section的标题可以通过 2. 中设置的label来获取,这样的好处就是可以通过现有的工具(如enumitem,tikz等)灵活地给目录设置样式,而beamer自带的defbeamertemplate操作比较复杂,扩展性也一般。

    \newsavebox{\myenum}
    \newlength{\enumwidth}
    
    \begin{lrbox}{\myenum}
        \begin{varwidth}{20em}
            \begin{enumerate}[label={\arabic*.\,},left=0pt]
                \foreach \i in {1,...,\number\totvalue{totalsection}} {
                    \item \hyperlink{sec:\i}{\nameref{sec:\i}}
                }
            \end{enumerate}
        \end{varwidth}
    \end{lrbox}
    \settowidth{\enumwidth}{\usebox{\myenum}}
    
    \SetVerticalCoffin \LeftCoffin {0.2\linewidth}{\color{red!20!white}\rule{\linewidth}{8cm}}
    \SetVerticalCoffin \RightCoffin {0.8\linewidth}{\color{blue!20!white}\rule{\linewidth}{8cm}}
    \SetVerticalCoffin \TocCoffin {\enumwidth}{\color{red}\fbox{\usebox{\myenum}}}
  4. 设置好这些盒子后,就可以通过盒子自带的锚点(需要的时候也可以自定义锚点),按照特定的布局进行拼接

        \SetHorizontalCoffin \OutputCoffin{}
        \JoinCoffins \RightCoffin[hc,vc]\TocCoffin[hc,vc]
        \JoinCoffins \OutputCoffin[l,vc]\LeftCoffin[l,vc]
        \JoinCoffins \OutputCoffin[r,vc]\RightCoffin[l,vc]
        \TypesetCoffin \OutputCoffin

完整代码如下

\documentclass[aspectratio=169]{beamer}
%%------------------------------------
%%------------------------------------
\usepackage{pgffor}
\usepackage{totcount}
\usepackage{xcoffins}
\usepackage{varwidth}
\usepackage{enumitem}

\NewCoffin\LeftCoffin
\NewCoffin\RightCoffin
\NewCoffin\TocCoffin
\NewCoffin\OutputCoffin

\newcounter{totalsection}
\regtotcounter{totalsection}

\AddToHook{cmd/section/before}{\refstepcounter{totalsection}}
\AtBeginSection[]{\label{sec:\thesection}}

\newsavebox{\myenum}
\newlength{\enumwidth}

\newcommand{\makecoffins}{
    \begin{lrbox}{\myenum}
        \begin{varwidth}{20em}
            \begin{enumerate}[label={\arabic*.\,},left=0pt]
                \foreach \i in {1,...,\number\totvalue{totalsection}} {
                    \item \hyperlink{sec:\i}{\nameref{sec:\i}}
                }
            \end{enumerate}
        \end{varwidth}
    \end{lrbox}
    \settowidth{\enumwidth}{\usebox{\myenum}}
    
    \SetVerticalCoffin \LeftCoffin {0.2\linewidth}{\color{red!20!white}\rule{\linewidth}{8cm}}
    \SetVerticalCoffin \RightCoffin {0.8\linewidth}{\color{blue!20!white}\rule{\linewidth}{8cm}}
    \SetVerticalCoffin \TocCoffin {\enumwidth}{\color{red}\fbox{\usebox{\myenum}}}

    \SetHorizontalCoffin \OutputCoffin{}
    \JoinCoffins \RightCoffin[hc,vc]\TocCoffin[hc,vc]
    \JoinCoffins \OutputCoffin[l,vc]\LeftCoffin[l,vc]
    \JoinCoffins \OutputCoffin[r,vc]\RightCoffin[l,vc]
    \TypesetCoffin \OutputCoffin
}

\begin{document}

\frame{
    \makecoffins
    %\tableofcontents
}

%\section{section one}
\section{section section section section section section section section section section one}
\frame{\frametitle{section one}some text}

\section{section two}
\frame{\frametitle{section two}some text}

\end{document}

局部截取_20250824_154944.png

局部截取_20250824_155319.png

@u10189 好奇这题答案是什么,$\frac{12}{10-3\sqrt{3}}$?奇奇怪怪的结果就有点慌。。。

实际上这是因为\newtheorem{problem}{Problem}定义的环境使用了默认的plain样式,自带上下各\topsep高度的空白间隙。
局部截取_20250822_002254.png
局部截取_20250822_001238.png
可以自定义样式来修改这一设置。

\newlength{\mytopsep}
\setlength{\mytopsep}{\topsep}
\divide\mytopsep by 2
\newtheoremstyle{mystyle}
    {\mytopsep}{\mytopsep}%
    {\itshape}{}
    {\bfseries}{.}
    { }{}
\theoremstyle{mystyle}
\newtheorem{problem}{Problem}

局部截取_20250822_002905.png

如果所有点都是有规律的,可以考虑把node-->node换成coordinate-->node的连接模式,从而来规避掉初始阶段a11节点没有定义的情况,保持代码形式的简洁。

  \begin{tikzpicture}[
    every label/.style={circle, inner sep=0pt, anchor=center}
  ]
    \foreach \i [
        evaluate=\i as \angle using {360/12*(\i-1/2)}
    ] in {0,...,11} {
        \node[fill, circle, inner sep=1pt, label={
            [minimum width=2.5em,label distance=.2cm]{\angle-60}:{\footnotesize $a_{\i}$}
        }] (a\i) at (\angle:2) {};
        % 动态计算上一个点的坐标(\angle-30:2)
        \draw[latex-] (a\i) -- (\angle-30:2);
    }
  \end{tikzpicture}

第一个问题:
在已知角B,且BD水平的情况下,点E就是以A为原点,角B为倾角,BD为半径的极坐标

\tkzDefShiftPoint[A](60:4.2){E}

第二个问题:
BD长度未知,但B,D,A三点均已定义(否则就无从谈起了)

  1. 角B已知,且BD水平

    • 计算出BD的长度,再用极坐标定义点
    \tkzCalcLength(B,D) \tkzGetLength{rBD}
    \tkzDefShiftPoint[A](60:\rBD){E}
    • 定义辅助点,再旋转
    \tkzDefPointWith[colinear=at A,K=1](B,D) \tkzGetPoint{x}
    \tkzDefPointBy[rotation=center A angle 60](x) \tkzGetPoint{E}
  2. 角B未知,运用尺规作图的原理,作圆找交点
\tkzDefPointWith[colinear=at A,K=1](B,D) \tkzGetPoint{x}
\tkzInterLC[near](B,A)(A,x) \tkzGetSecondPoint{E}

注:这里作圆只给出了最简单的一种方法,也可以通过半径来作圆。另外,直线和圆有两个交点的时候,需要注意先后顺序,一般会用到nearcommon等参数,具体请参考文档。

画平几草图方法肯定不止一种,宏包也不可能穷尽所有情况,关键还是要熟练掌握一些常用的重要命令,结合平几知识,组合运用,举一反三。

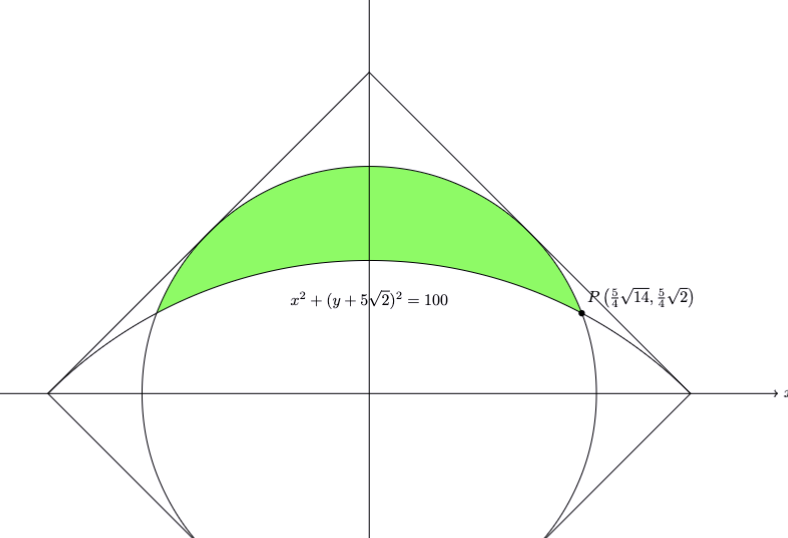
\documentclass{standalone}
\usepackage{tikz,pgfplots}
\usetikzlibrary{arrows.meta}

\begin{document}

\begin{tikzpicture}
    
  % Define the coordinates
  \coordinate (O1) at (0, {-5*sqrt(2)});
  \coordinate (O2) at (0, 0);
  
  % Define the square vertices
  \coordinate (A) at (0, {5*sqrt(2)});
  \coordinate (B) at ({5*sqrt(2)}, 0);
  \coordinate (C) at (0, {-5*sqrt(2)});
  \coordinate (D) at ({-5*sqrt(2)}, 0);
  
  % Define point P
  \coordinate (P) at ({(5/4)*sqrt(14)}, {(5/4)*sqrt(2)});
  
  % ++++++++++++++++++++++++++++++++++++++++++++++
  \begin{scope}[even odd rule]
    \clip (P) rectangle +(-10, 5);
    \clip (O1) circle[radius=10] (O2) circle[radius=5];
    \fill[green!70] (O1) circle[radius=10] (O2) circle[radius=5];
  \end{scope}
  % ++++++++++++++++++++++++++++++++++++++++++++++

  % Draw the axes
  \draw[->] (-9, 0) -- (9, 0) node[right] {$x$};
  \draw[->] (0, -9) -- (0, 9) node[above] {$y$};
  
  % Clip to the region above the x-axis for the first circle
  \begin{scope}
      \clip (-12, 0) rectangle (12, 15);
      
      % Draw the circle C: x^2 + (y + 5*sqrt(2))^2 = 100, only above x-axis
      \draw (O1) circle[radius=10];
  \end{scope}

  % Draw the circle x^2 + y^2 = 25
  \draw (O2) circle[radius=5];
  
  % Draw the square
  \draw (A) -- (B) -- (C) -- (D) -- cycle;
  
  % Draw and label point P
  \fill (P) circle (2pt);
  \node[above right] at (P) {$P\left(\frac{5}{4}\sqrt{14}, \frac{5}{4}\sqrt{2}\right)$};
  
  % Label the circles
  \node at (0, {5*sqrt(2) - 5}) {$x^2 + (y + 5\sqrt{2})^2 = 100$};
  \node at (0,-5.5) {$x^2 + y^2 = 25$};
  
\end{tikzpicture}

\end{document}

bef92a577c7f5b1b1145dd18fb593e0d.png

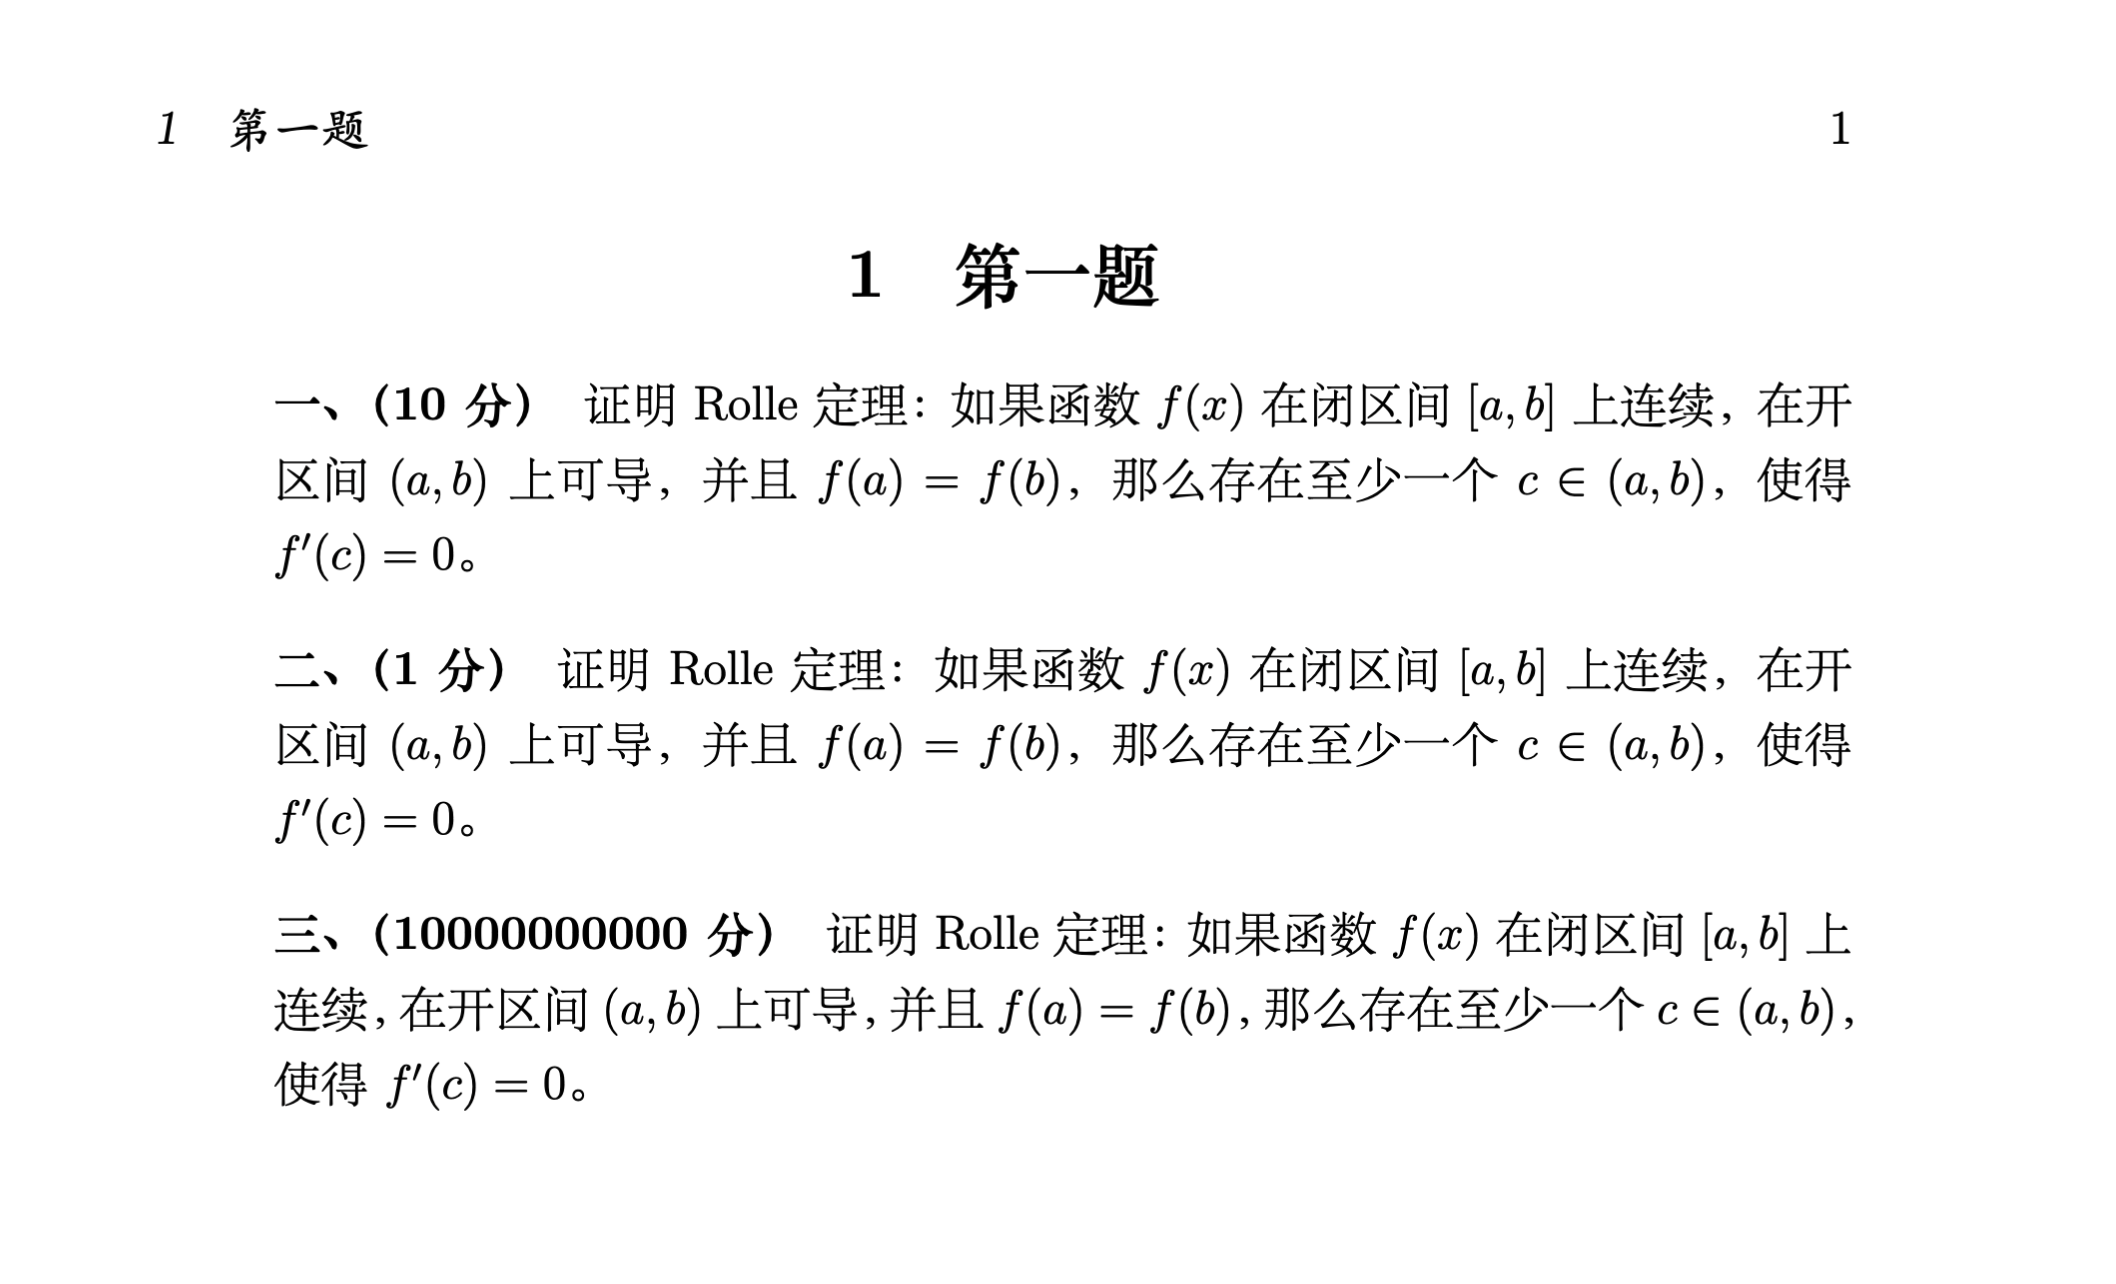
\documentclass[a4paper,12pt]{ctexart}
\usepackage{geometry}
\geometry{left=3cm,right=3cm,top=2.5cm,bottom=2.5cm}
\usepackage{amsmath}
\usepackage{calc}

\newcommand{\score}[1]{\textbf{#1分}}
\newcommand{\myitem}[1]{
  \setlength{\itemindent}{\widthof{\textbf{\stepcounter{enumi}\chinese{enumi}、(#1分)}}}% 
  \addtolength{\itemindent}{\labelsep}%
  \addtocounter{enumi}{-1} 
  \item[\textbf{\stepcounter{enumi}\chinese{enumi}、(#1分)}]
}

\begin{document}
\section{第一题}

\begin{enumerate}
    \myitem{10} 证明 Rolle 定理:如果函数 $f(x)$ 在闭区间 $[a, b]$ 上连续,在开区间 $(a, b)$ 上可导,并且 $f(a) = f(b)$,那么存在至少一个$c\in  (a, b)$,使得 $f'(c) = 0$。        
    \myitem{1} 证明 Rolle 定理:如果函数 $f(x)$ 在闭区间 $[a, b]$ 上连续,在开区间 $(a, b)$ 上可导,并且 $f(a) = f(b)$,那么存在至少一个$c\in  (a, b)$,使得 $f'(c) = 0$。
    \myitem{10000000000} 证明 Rolle 定理:如果函数 $f(x)$ 在闭区间 $[a, b]$ 上连续,在开区间 $(a, b)$ 上可导,并且 $f(a) = f(b)$,那么存在至少一个$c\in  (a, b)$,使得 $f'(c) = 0$。
\end{enumerate}

\end{document}

a5474ce3c0666a5ae4d14e43dae85bc2.png

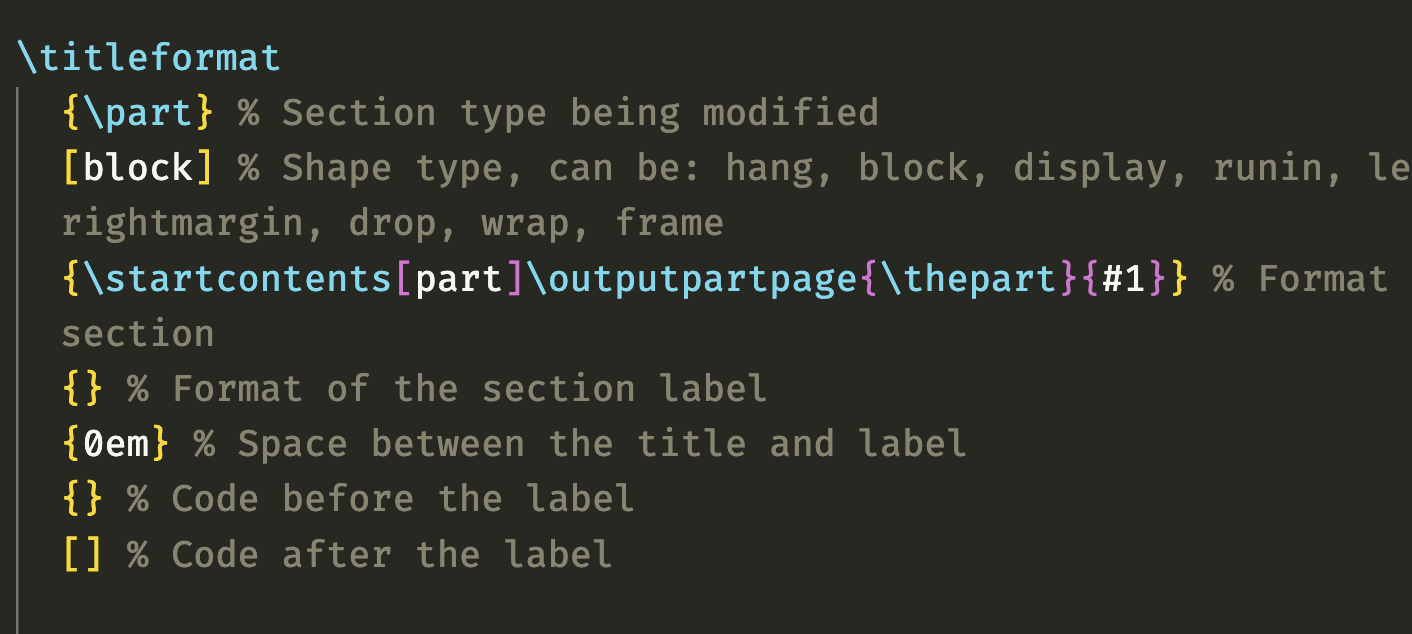
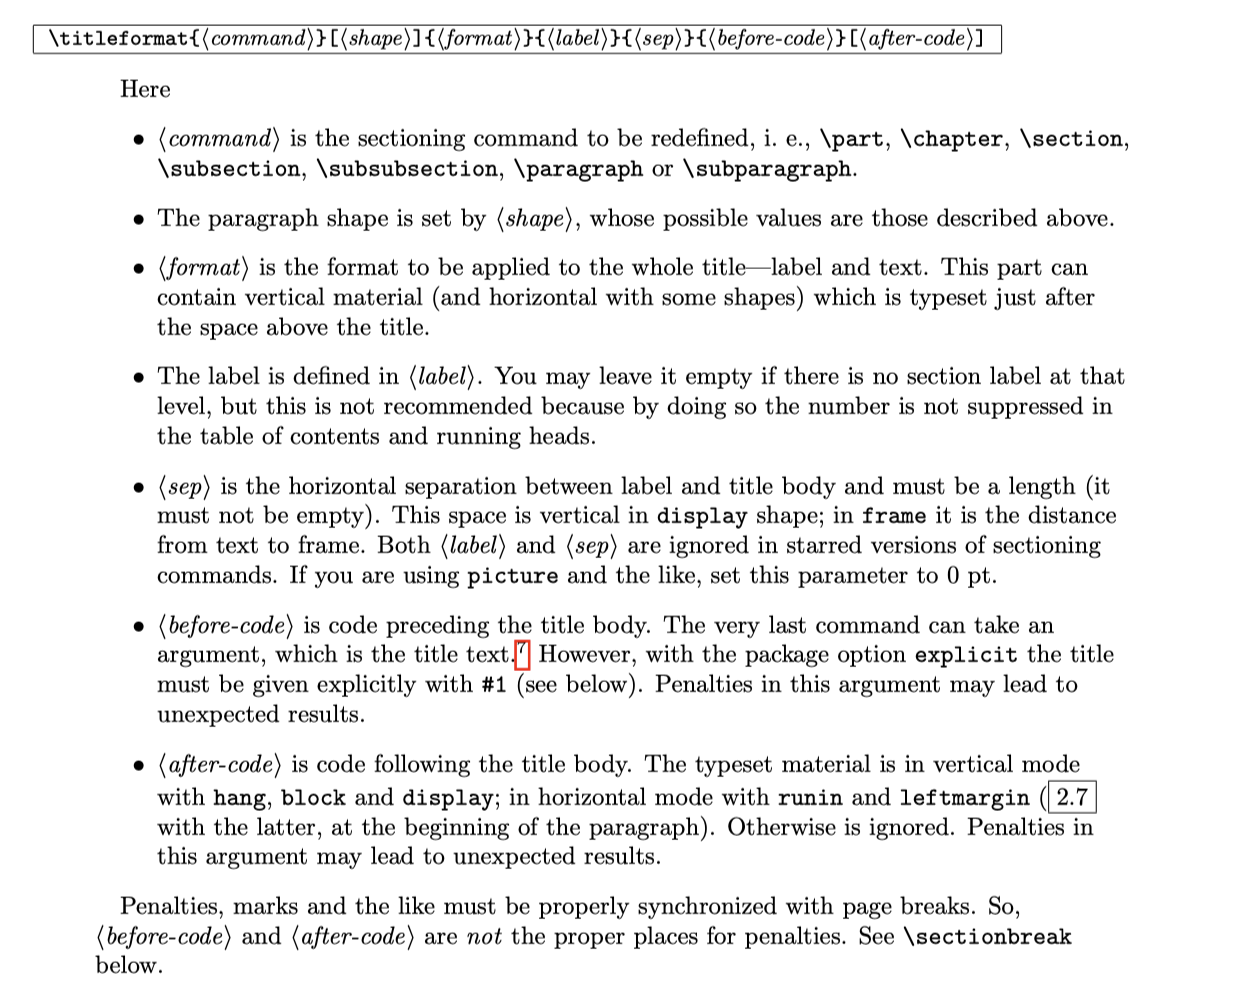
这是 titlesectitletoc 共同作用的结果。

  • 首先,在 LegrandOrangeBook.cls 中加载 titlesec 包的时候使用了 newparttoc 选项,这使得可以通过 titletoc 包的相关命令来控制目录条目的输出。

28e42bbd5a1132b61d52b2e48240a6ba.png

eb5adceeea9351e5505f5f221f7b85ae.png

  • 其次,重新定义了\part命令,用来输出 part 页面。(这里并没有区分有序号和无序号的页面设置)

5f4e4033593fef40f9768b2669b7e354.png

ed71f652441da06b5b3eaf5e2daaf280.png

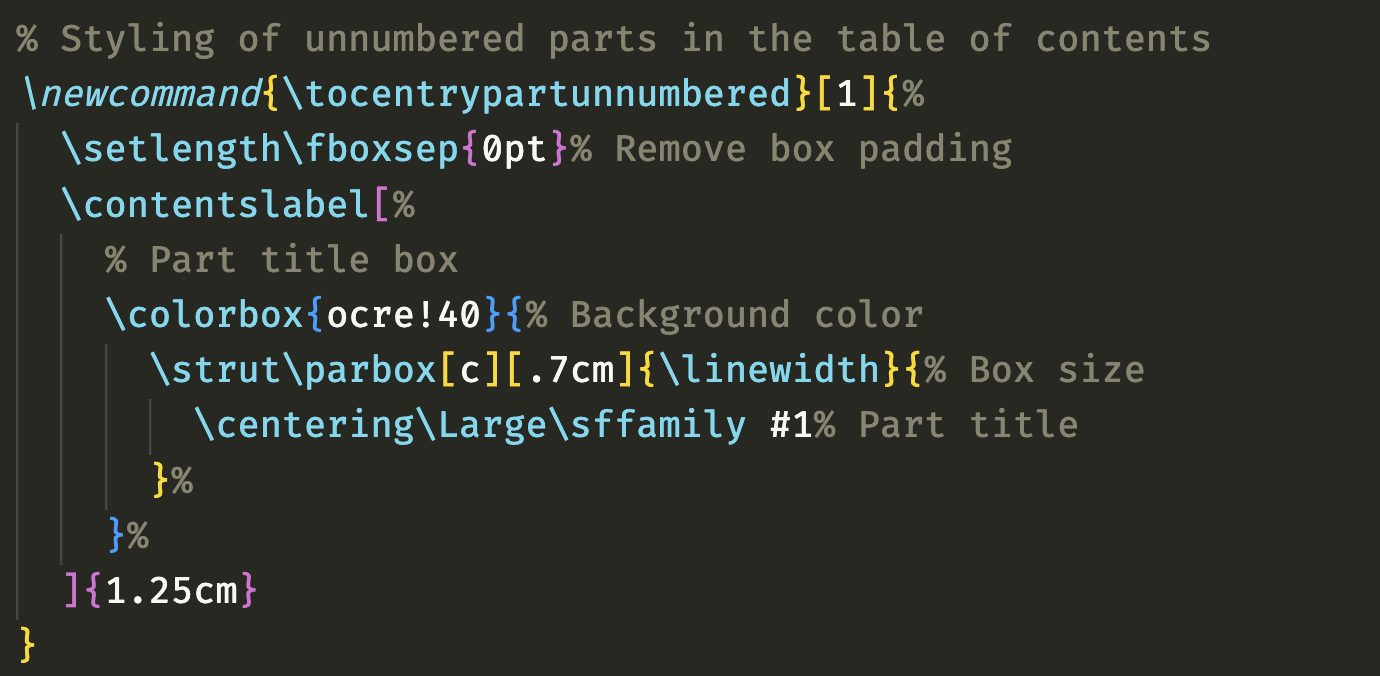
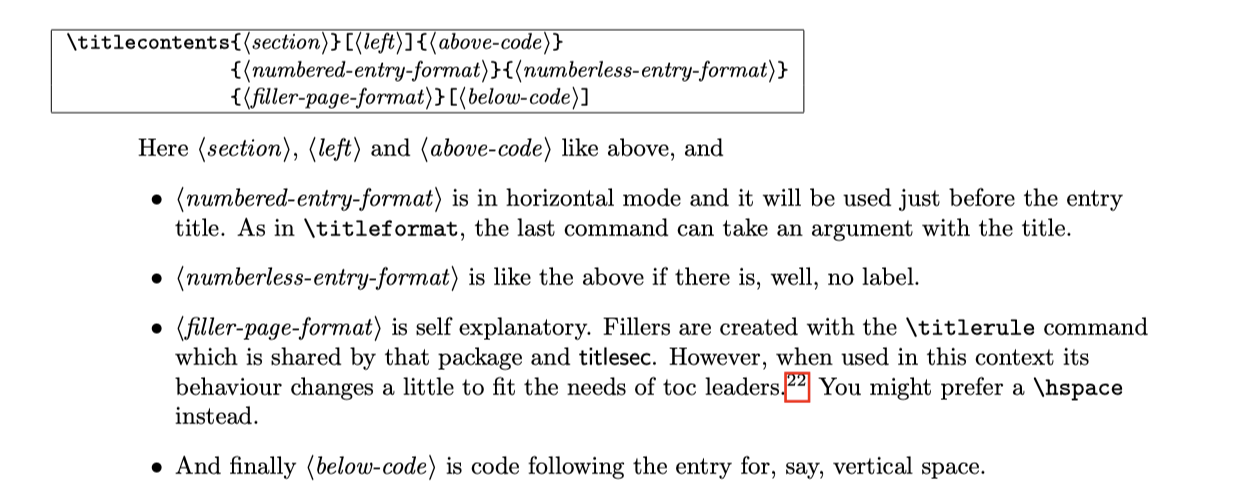
  • 最后,通过 titletoc 包中的 titlecontents 命令来控制 part 相关目录条目的输出,其中无序号条目由自定义命令 tocentrypartunnumbered 控制

f1f7b957a0722a144a543373ace0105b.png

bfb9dd5b9f97057fdd55c17dcd2e0dc1.png

d27fb2b8430322bbe8a84426372b1095.png

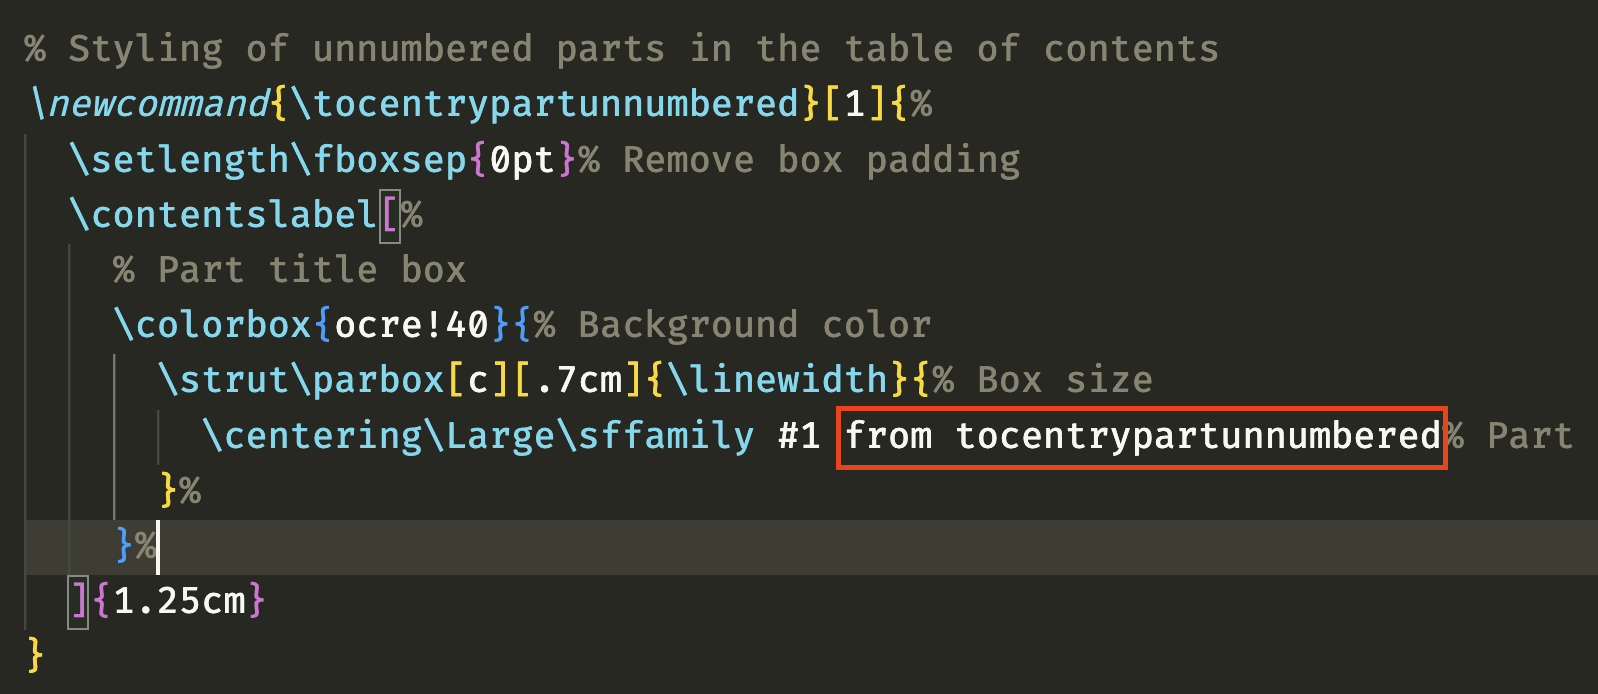
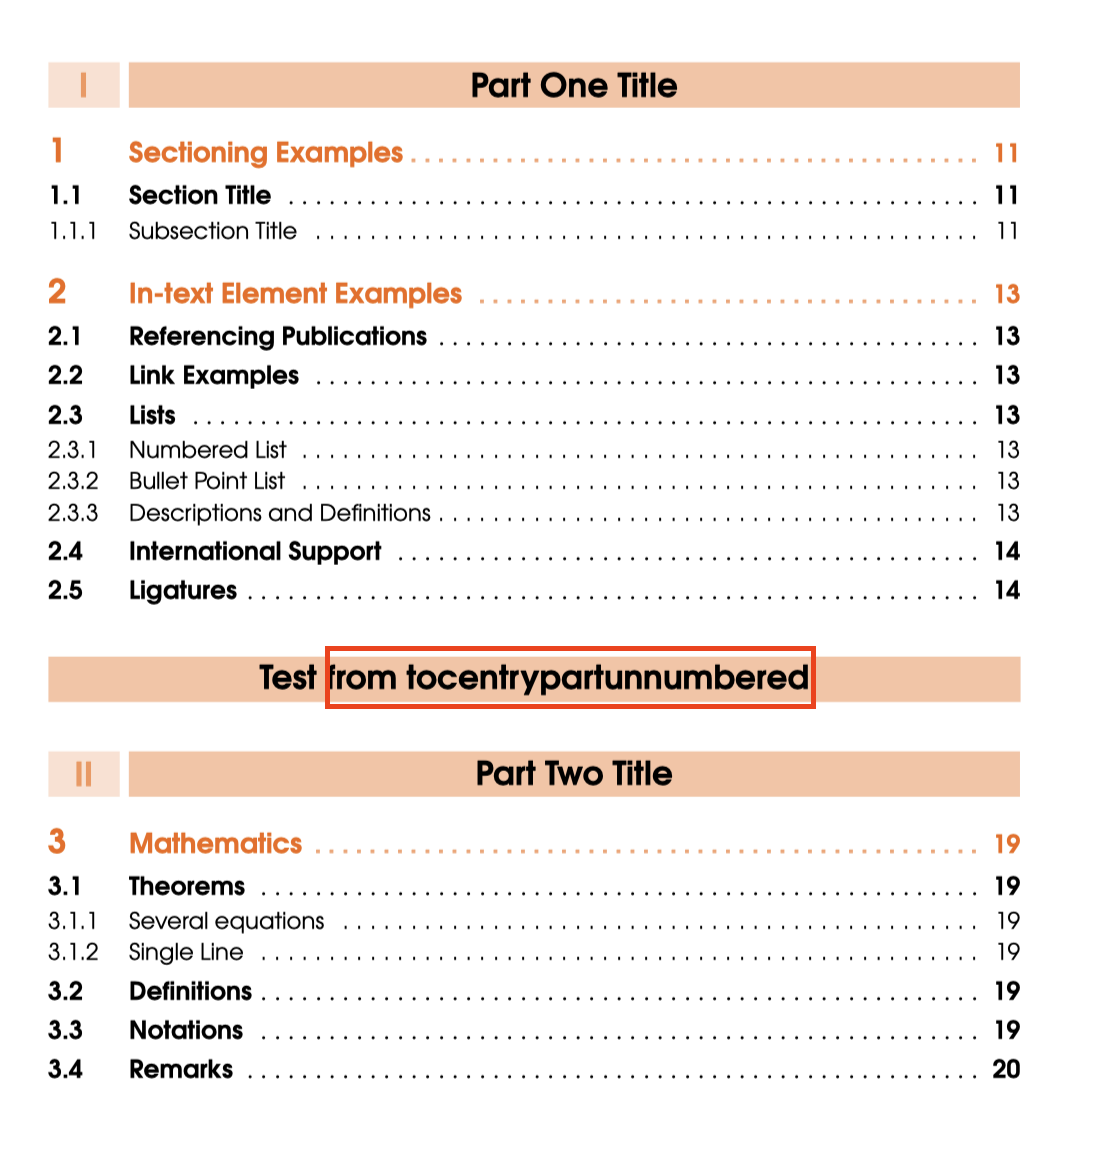
可以做一个简单的验证,修改 tocentrypartunnumbered
d14976a1714e614dc825d01ae6133132.png

dfdece40cde1e4a21577a60c45703762.png

可以用 setspace 包,给需要的单元格添加控制行距的命令cmd=\setstretch{1}来实现

\documentclass{article}
\usepackage{tabularray}
\usepackage{setspace}
\usepackage{ctex}

\begin{document}
\begin{tblr}{colspec = {ll}, hlines, stretch = {-1}, column{1} = {2\ccwd}, column{2} = {4\ccwd,cmd=\setstretch{1}}}
    \SetCell[r = 2]{l, h}\textbf{巻一} & 〇〇〇〇  \\
                                       & 〇〇〇〇〇\\
    \SetCell[r = 2]{l, h}\textbf{巻二} & 〇〇〇〇〇\\
                                       & 〇〇〇〇〇\\
    \textbf{巻三}                      & 〇〇〇〇〇\\
\end{tblr}

\vspace{1\baselineskip}
\begin{tblr}{colspec = {ll}, hlines, stretch = {1}, column{1} = {2\ccwd}, column{2} = {4\ccwd}}
    \SetCell[r = 2]{l, h}\textbf{巻一} & 〇〇〇〇  \\
                                       & 〇〇〇〇〇\\
    \SetCell[r = 2]{l, h}\textbf{巻二} & 〇〇〇〇〇\\
                                       & 〇〇〇〇〇\\
    \textbf{巻三}                      & 〇〇〇〇〇\\
\end{tblr}
\end{document}

3f1e95ab92d8bff0a14fda3608c8af92.png

vscode可以考虑使用LaTeX Workshop这个扩展,命令补全的一些设置可以参考 这里

如果只要求文档中的自定义命令补全的话,默认配置应该就可以了。

除去by lemma后,如果只有两列对齐的情况下,在\text{(by Lemma)}前简单地添加&&即可。

\documentclass{article}
\usepackage{amsmath}

\begin{document}

\begin{align*}
    c^2 &= a^2 + b^2 \\
        &= a^2 + b^2 \\
        &&\text{(by Lemma)}\\
        &= a^2 + b^2 \\
\end{align*}

\end{document}

6739fa341dbfd67e05ac1fd97a8e8d43.png

如果只是要按某一列内各行合并单元格后的情况来交替颜色,思路是可以写一小段逻辑来控制新的行索引,这样就能根据这个新的索引来交替行的颜色。

tabularray提供了inner key process接口,可以通过\UseTblrLibrary{functional}提供的类l3风格函数,构造出符合要求的 hook。

tabularray中,SetCell会设置合并行的首个原始单元格的rowspan属性为xx视合并的行数而定。如果能够拿到这个值,就可以确定每一组的边界,再重新定义行索引就很容易了。

不过tabularray并没有直接暴露获取rowspan数据的接口,目前只提供了获取单元格内容的接口cellGetText。当然也可以选择魔改tabularray,仿照cellGetText添一个cellGetSpan

这里选择一个讨巧的方法,在确定某一列为key的情况下,一般来说,合并的单元格中,首个原始的单元格必定不是空,剩下的一定是空,这样就可以区分出哪些是被合并的行,只需要将这些行的新索引默认与首行的索引相同即可。

\documentclass[]{ctexbook}

\usepackage{tabularray}
\UseTblrLibrary{booktabs}
\UseTblrLibrary{functional}
\usepackage[]{xcolor}
\usepackage[]{amsmath}
\usepackage[]{tipa}

\begin{document}

\IgnoreSpacesOn

\prgNewFunction \groupByCol { m } {
  \intZero \lTmpaInt
  \intStepOneInline {2} {\arabic{rowcount}} {% ignore head
    \tlSet \lTmpaTl {\cellGetText {##1} {#1}}
    \tlVarIfEmptyF \lTmpaTl
      { \intIncr \lTmpaInt }
    \intCompareT {\intMathMod {\lTmpaInt-1} {2}} = {0}
      { \rowSetStyle {##1} {bg=azure9} }
  }
}

\IgnoreSpacesOff

{\small
\begin{longtblr}[
  caption = {国家与城市}
]{
  width = \textwidth,
  colspec = {X[1,l,h]  X[1,l,h]  X[3,l,h]},
  rowhead = 1, rowfoot = 0, % 每个分页里表头表尾的数量
  process = \groupByCol{2}
}
  
  \toprule
  \textbf{城市} & \textbf{国家} & \textbf{性质}\\
  \midrule

  华盛顿 & \SetCell[r=2]{h}美国 & 首都\\
  洛杉矶 &  & a\\
  东京 & 日本 & 首都\\
  莫斯科 & 俄罗斯 & 首都\\
  \bottomrule

\end{longtblr}

\begin{longtblr}[
    caption = {Prefixes for Numbers},
]{
    width = \textwidth,
    colspec = {X[1,c,h]  X[1,l,h]  X[3,l,h]},
    rowhead = 1, rowfoot = 0, % 每个分页里表头表尾的数量
    % row{even} = {azure9},
    process = \groupByCol{1},
}
    
    \toprule
    \textbf{Meaning} & \textbf{Prefixes} & \textbf{example} \\ \midrule
    \SetCell[r=2]{c} {a half \\ $\frac{1}{2}$} & \textbf{semi-} & {semilunar valve 半月瓣\\ \hspace*{1em}(lun/o: moon; -ar: pertaining to)}\\
    & \textbf{hemi-} & {hemisphere \\ hemiplegia 半瘫\\ \hspace*{1em}(-plegia/\textipa{"pli:\textdyoghlig I@}/: paralysis)}\\

    \SetCell[r=2]{c} {one, single \\ 1} & \textbf{mono-} & monocyte 单核细胞\\
    & \textbf{uni-} & unicellular 单细胞的\\

    \SetCell[r=2]{c} {two \\ 2} & \textbf{bi-} & {bicuspid 二尖瓣的 \\ \hspace*{1em}(cusp/i: point)}\\
    & \textbf{di-} & {dioxide 二氧化物 \\ diplegia 双侧瘫痪}\\

    double & \textbf{dipl/o} & diploid n.【生】二倍体;(结晶)偏方24面体
    adj.二倍体的(含有两套染色体)\\

    {three \\ 3} & \textbf{tri-} & {triplet \\ triceps 三头肌 \\ \hspace*{1em}(-ceps: head)}\\

    \SetCell[r=2]{c} {four \\ 4} & \textbf{quadr-} & quadrant\\
    & \textbf{tetra-} & tetracycline/\textipa{""tetr@"saIklm}/ 四环素\\

    \SetCell[r=2]{c} many & \textbf{multi-} & {multipara/\textipa{m2l"tIp@r@}/ 经产妇 \\ \hspace*{1em}(-para: to bring forth, to bear)}\\
    & \textbf{poly-} & polycystic kidney 多囊肾\\
    \bottomrule

\end{longtblr}
}
\end{document}

效果:
88a38abd3e6b7b6afa6d56c47a7a33ec.png

  • 如果是要和列表外的段落一致,直接用 wide 模式即可,默认是一个 \parindent 长度的缩进,也可以赋值改变大小;
  • 如果是在列表内部要求段落缩进,只需要设置 listparindent 参数。
\documentclass[a4paper]{article}
\usepackage[slantfont,boldfont]{xeCJK}
\usepackage{lipsum}
\usepackage{zhlipsum}

\usepackage{enumitem}

\begin{document}
    
    \lipsum[1][1-3]
    
    \begin{enumerate}[label=\arabic*.,wide]
    % \begin{enumerate}[label=\arabic*.,wide=2\parindent]
    % \begin{enumerate}[label=\arabic*.,listparindent=\parindent]
        \item 第一项
        \par\lipsum[2][1-3]
        \par\lipsum[3][1-3]
        \item 第二项
        \par\zhlipsum[1-2][name=aspirin]
    \end{enumerate}

\end{document}

scope 上添加一个 name prefix 属性就可以区别了

\begin{tikzpicture}
    \begin{scope}[name prefix = l1-]
    \foreach \x/\y in {1/A,2/B,3/C,4/D}
    {\node[inner sep=0pt](a\x)at(\x,0){$\y$};}
    \foreach \x/\y in {a1/a2,a2/a3,a3/a4}
    {\draw(\x)--(\y);}
    \end{scope}
    
    \begin{scope}[name prefix = l2-, shift={(-1,-.8)}]
    \foreach \x/\y in {1/E,2/F,3/G,4/H}
    {\node[inner sep=0pt](a\x)at(\x,0){$\y$};}
    \foreach \x/\y in {a1/a2,a2/a3,a3/a4}
    {\draw(\x)--(\y);}
    \end{scope}

    \foreach \x in {1,4}{
        \draw [red] (l1-a\x) -- (l2-a\x);
    }
    
\end{tikzpicture}

fafa420503b07341773401052ce2371d.png

同理,还有 name suffix

发布
问题