雾月
雾月
这家伙很懒,什么也没写!

注册于 4年前

回答
223
文章
2
关注者
23

应该是vscode的配置问题。LaTeX Workshop 配置有点迷。

宏包本身没有冲突。

而且,listingminted 使用一个就好了。

newtxmath 宏包应该没有 \wideparen 命令。

为了解决这一点,只要在 newtxmath 宏包加载前使用 \let\widering\relax 取消 \widering 的定义即可,因为 newtxmath 也定义了同样的命令。

\usepackage{yhmath}%为了使用该宏包里的圆弧帽命令wideparen{}
\let\widering\relax
\usepackage{newtxtext}
\usepackage{newtxmath}

cases 环境无法做到这一点,本质上,cases 环境只是两列的 array 环境。

考虑使用 amsmath 宏包的 alignat 环境(的 inline 版 alignedat)。括号使用 \left\{ \right.cases 环境也是使用该方法实现)。

四.已知线性方程组 $\left\{\begin{alignedat}{3}
% 这里的 {} 是为了保持+的间距,并不优雅
3\lambda     &x_{1} +{}&(2\lambda +1) &x_{2} +{}&(\lambda+1) x_{3} &=\lambda\\
(2\lambda+1) &x_{1} +{}&(2\lambda +1) &x_{2} +{}&(\lambda-2) x_{3} &=\lambda+1\\
(4\lambda-1) &x_{1} +{}&     3\lambda &x_{2} +{}&  2\lambda  x_{3} &=1
\end{alignedat}\right.$.
求$\lambda$为何值时,方程组无解,有唯一解,有无穷多解?

image.png

\IfBooleanTF{#1}
        {}
        {
            \int_add:Nn \l_counter_tl {1}
            {
                \heiti
                \color{\tl_use:N \l_color_tl}
                \Large 
                \int_use:N \l_counter_tl 
            } 
        }

直接写就可以了,\int_... 会自动展开。当然也可以使用 \exp_after:wN \int_... \l_counter_tl,不过 \exp_after:wN 是多余的。

你也可以在 \str_case:nn 中使用 \tl_set_eq:NN \l_counter_tl \..._int。这是因为 \tl_set_eq:NN 就是 \let

另外 \color 中的 \tl_use:N 是不必要的,它会自动扩展。(而且 \tl_ue:N 实际上只是检查了一下命令是否存在)
(而 \color_select:n 则必须首先扩展。)

\int_add:Nn .. 1 可简写为 \int_incr:N ..,并且速度更快。

(LaTeX3的命名规范,变量:\⟨scope⟩_⟨module⟩_⟨description⟩_⟨type⟩,函数:\⟨module⟩_⟨description⟩:⟨arg-spec⟩moduledescription 应该用_分隔,module一般是必须的。)

使用 hyperref 宏包后,\newlabel 的第二个参数需要5个值。

\makeatletter
\bgroup\catcode`\ =9 \endlinechar=-1 % 简单模拟LaTeX3环境
\newcounter{probdaily} % \int_new:N \g_probdaily_counter_int
\AfterLastShipout{
  \immediate\write\@auxout
    {\string\newlabel{ProbdailyTotal}
      {
        {\the\c@probdaily} % \int_use:N \g_probdaily_counter_int
        {}
        {}
        {}
        {}
      }
    }
}
\egroup
\makeatother

LaTeX2e 2020-10-01 版本之后,ateveryend 宏包是不需要的,\AfterLastShipout 已原生提供。

\documentclass{article}
\usepackage{hyperref}

\makeatletter
\bgroup\catcode`\ =9 \endlinechar=-1
\newcounter{probdaily}
\AfterLastShipout{
  \immediate\write\@auxout
    {\string\newlabel{ProbdailyTotal}
      {
        {\the\c@probdaily}
        {}
        {}
        {}
        {}
      }
    }
}
\egroup
\makeatother

\begin{document}

Hello, \LaTeXe.

\stepcounter{probdaily}

\stepcounter{probdaily}

\ref{ProbdailyTotal} = 3

\stepcounter{probdaily}

\end{document}

image.png

ntheorem 宏包的 \thref 命令即提供此功能。查看文档第2.7节、3.2.1节、4.1节。
并且兼容已有的定理环境。

\documentclass[11pt]{ctexart}
\usepackage{amsmath}
\usepackage[amsmath,hyperref,thref]{ntheorem} % 注意 amsmath 和 hyperref 选项
\usepackage{hyperref}

\newtheorem{theorem}{定理}[section]
\renewcommand\thetheorem{\arabic{theorem}}
\newtheorem{corollary}{推论}[theorem]
\renewcommand\thecorollary{\arabic{corollary}}

\begin{document}

\section{test}

\begin{theorem}\label{th1}
  S = ah
\end{theorem}

\begin{corollary}\label{co1}
  abcd
\end{corollary}

% 不空白      和有空白
见\thref{th1} 和 \thref{co1}. 
% 之所以出现的是“定理1.1”和“推论1.1.1”是因为ntheorem宏包暂不支持重定义 `\the<theorem>`。

\end{document}

image.png

但是由于 ntheorem 宏包不支持重定义 \the<theorem>,此时可使用 cleveref 宏包的 \crefformat{}{} 命令修改:

% \usepackage{cleveref}
%\renewcommand\the....
\crefformat{theorem}{#2定理 #1#3}
\crefformat{corollary}{#2推论 #1#3}

完整的例子如下:注意此时 ntheorem 宏包是不需要的。

\documentclass[11pt]{ctexart}
\usepackage{amsmath}
% \usepackage[amsmath,thref,hyperref]{ntheorem}
\usepackage{hyperref}
\usepackage{cleveref}
\def\thref{\cref}

\newtheorem{theorem}{定理}[section]
\renewcommand\thetheorem{\arabic{theorem}}
\crefformat{theorem}{#2定理 #1#3}
\newtheorem{corollary}{推论}[theorem]
\renewcommand\thecorollary{\arabic{corollary}}
\crefformat{corollary}{#2推论 #1#3}

\begin{document}

\section{test}

\begin{theorem}\label{th1}
  S = ah
\end{theorem}

\begin{corollary}\label{co1}
  abcd
\end{corollary}

见\thref{th1} 和 \thref{co1}.

\hyperref[th1]{定理 1} 和 \hyperref[co1]{推论 1}

\end{document}

image.png

若要将全文的公式全都靠左,只要使用 fleqn 文档类选项:

\documentclass[fleqn]{article}

若要将单个公式靠左,使用 amsmath 宏包的 flalignflalgin* (无编号)环境:

% \usepackage{amsmath}
普通
\begin{equation}
E^2=m^2c^4+c^2p^2
\end{equation}

首尾各一个 \&
\begin{flalign}
& E^2=m^2c^4+c^2p^2 &
\end{flalign}

尾部两个 \&
\begin{flalign}
E^2=m^2c^4+c^2p^2 & &
\end{flalign}

多行只要最后一行加 \&
\begin{flalign}
& E^2=m^2c^4+c^2p^2 \\
& E=mc^2 &
\end{flalign}

或者都加 \&
\begin{flalign}
& E^2=m^2c^4+c^2p^2 & \\
& E=mc^2 &
\end{flalign}

右在前面加两个 \&
\begin{flalign}
&& E^2=m^2c^4+c^2p^2 \\
&& E=mc^2 
\end{flalign}

无编号
\begin{flalign*}
& E^2=m^2c^4+c^2p^2 \\
& E=mc^2 &
\end{flalign*}

image.png

不能。 至少texlive2020。应该使用更新的版本(texlive2021)。

一个可行的方案见:https://tex.stackexchange.com/questions/520034/fallback-for-harfbuzz-fonts

LuaTeX 下使CJK字符的排版是通过 luatexja 宏包实现的,而 XeTeX 下则是通过 xeCJK 实现。
latexja 是使用 lua (harfbuzz) 直接修改底层代码,xeCJK 通过在宏层面来实现(通过 \xeCJK_glyph_if_exist:N.. 判断每一个字符在当前字体下是否有glyph,若没有则依次在给定的FallBack字体下查找)。和上面的链接原理上是一致的。这个对于没有字体相关知识的人来说还是不要瞎折腾了。

但是呢,ctex 在 LuaTeX 下提供了 AlternateFontCharRange 特性,你可以通过它们来设置字符在 Range 中的字体。

\documentclass{article}
\usepackage{ctex}

\setCJKfamilyfont{simsong}{FZFangSong-Z02S}% 方正仿宋简体
\setCJKfamilyfont{bigsong}{FZFangSong-Z02S}
  [
    AlternateFont={
      {big}{KaiTi}, % 楷体
    }
  ]

\ctexset{
  declarecharrange={
    {big} { "9FA0 -> "9FA5 },
  },
}

\begin{document}
\Huge
\def\testchars{\char"9F99\char"9F9A\char"9F9B\char"9FA0\char"9FA1\char"9FA2\char"9FA5}
{
\CJKfamily{simsong}
\testchars
}
{
\CJKfamily{bigsong}
\testchars
}

\end{document}

image.png

不过这个会将字符 Range 都设为相同的字体,与 FallBack 不同。
但是你可以使用 harfbuzz 的 Face:collect_unicodes() 函数来判断是否存在该字形。

如果在 LaTeX 下,还是老老实实用 XeTeX 吧。
当然,你可以用 ConTeXt,它完全支持 FallBack 特性,也没有断行问题。

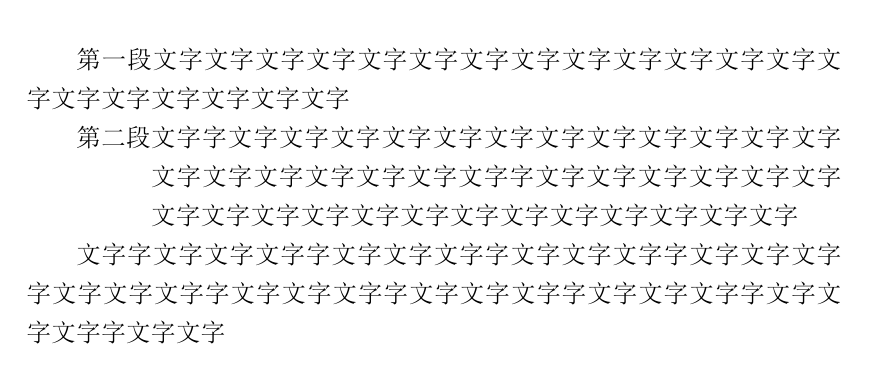
另外再多说一句,你说的“影响断行算法”,不过是影响 xeCJK 插入的glue而导致使用颜色和不使用颜色断行位置的差异。但是这个差异是完全可以很容易消除的。

例如,使用 \raggedright 强制左对齐:

\documentclass{book}
\usepackage{ctex}
\usepackage{xcolor}

\raggedright
\setlength\parindent{2\ccwd}

\newcommand{\book}[1]{#1}
\newcommand{\testtext}{補\sm{史記}的\zm{褚先生}名\sm{少孫},%
是\zm{漢朝}\zm{元}\zm{成}間的一個博士。}

\begin{document}
\Huge

\newcommand{\sm}[1]{\textcolor{red}{#1}}
\newcommand{\zm}[1]{\textcolor{blue}{#1}}
\testtext

\renewcommand{\sm}[1]{#1}
\renewcommand{\zm}[1]{#1}
\testtext

\end{document}

image.png

或者修改 CJKglue

不知道你想干什么,但是你的 \newcommand\createlabel 代码有几处错误,将其修改如下:

\newcommand{\createlabel}[2]{
  \newcounter{#1}
  \expandafter\renewcommand\csname the#1\endcsname{#2} % 应该使用 \csname ...\endcsname
  \expandafter\newcommand\expandafter*\csname #1\endcsname[1]{ % 同上
    \refstepcounter{#1}\csname the#1\endcsname ##1} % 同上
} % 如果不想写这么多 \expandafter,可用 LaTeX3 的 \exp_args:Nc, \exp_args:NNc

看起来 \createlabel 是要接收两个必须参数,应该使用 \newcommand{}[]{} 的形式,而不是 \newcommand{}[][]{} 的形式。

这样就能正常编译了:

\documentclass{ctexart}

\usepackage{hyperref}
\hypersetup{colorlinks=true, linkcolor=red}

%% 错误的代码
%\newcommand{\createlabel}[2][]{
%    \newcounter{#1}
%    \renewcommand\the#1{#2 \arabic{#1}}
%    \newcommand*{\#1}[1][]{\refstepcounter{#1}{\the#1 ##1} }
%}

\newcommand{\createlabel}[2]{
  \newcounter{#1}
  \expandafter\renewcommand\csname the#1\endcsname{#2}
  \expandafter\newcommand\expandafter*\csname #1\endcsname[1]{
    \refstepcounter{#1}\csname the#1\endcsname ##1}
}

\begin{document}

%\newcounter{mingyan}  % 定义“名言”的计数器
%\renewcommand\themingyan{名言\arabic{mingyan}}
%\newcommand*\mingyan[1][]{\refstepcounter{mingyan}{\themingyan #1} }

%% 使用第二个命令
% \createlabel{minyan}{名言}                 % 仅定义前缀
\createlabel{mingyan}{名言\arabic{mingyan}} % 直接定义输出格式,这样最好

\mingyan{敏而好学,不耻下问。——孔子}\label{mingyan:kongzi}  % 记录一个名言,为其增加标签

\ref{mingyan:kongzi}  % 引用标签

\end{document}

image.png

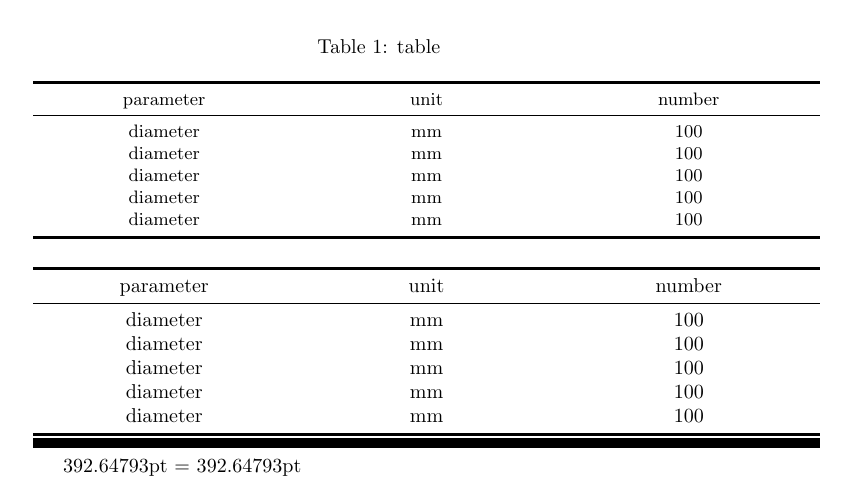
使用原生的 tabular 环境的 t 选项,再加 multirow 也可。列表使用 enumitem

\documentclass{article}
\usepackage{multirow}
\usepackage{enumitem}
\begin{document}

\begin{enumerate}[label=(\roman*)]
\item One
\item \begin{tabular}[t]{@{}cc}
  $ X \cup (Y\cap Z) $ & \multirow{2}*{(distribution)} \\
  $ X \cup (Y\cap Z) $ & \\
  \end{tabular}
\item Three
\end{enumerate}
\end{document}

image.png

当然用 tabularray 宏包也可。

expl3版本的问题,\box_ht_plus_dp:Nexpl3 Released 2021-05-05 版本才引入,你的expl3版本应该低于这个,所以 \box_ht_plus_dp:N 命令并不存在。

解决方法也很简单,在导言区使用:

\ExplSyntaxOn
\cs_if_free:NT \box_ht_plus_dp:N
  {
    \cs_new_protected:Npn \box_ht_plus_dp:N #1
      { \tex_dimexpr:D \box_ht:N #1 + \box_dp:N #1 \scan_stop: }
  }
\ExplSyntaxOff

或者更新 expl3 版本。(可能TeX发行版也需要更新)

感谢反馈!
看来需要照顾下低版本的使用了。

Github 已更新,ctan要下个版本才能更新了。

xpinpin\setpinyin{#1}{#2} 定义是

\NewDocumentCommand \setpinyin { m m }
  { 
    \tl_set:cn
      { c__xpinyin_ \__xpinyin_char_to_unicode:n {#1} _tl }
      { \__xpinyin_pinyin:n {#2} }
  }

实际上就是把 #1 的拼音定义为了 \__xpinyin_pinyin:n {#2}
因此如果用户自行设置了拼音,我们只要得到 \__xpinyin_pinyin:n {#2} 中的 #2
如果没有自行设置,我们直接使用 \tl_use:c { c__xpinyin_ \__xpinyin_char_to_unicode:n {#1} _tl } 即可。

\documentclass{ctexart}
\usepackage{xpinyin}

\begin{document}

\ExplSyntaxOn

\tl_new:N \l_pinyin_tl

\cs_new:Npn \my_get_pinyin:n #1
  {
    \tl_set_eq:Nc \l_tmpa_tl { c__xpinyin_ \__xpinyin_char_to_unicode:n {#1} _tl }
    \exp_args:No \tl_if_head_eq_meaning:nNTF { \l_tmpa_tl } \__xpinyin_pinyin:n
      { 
        \tl_set:Nf \l_pinyin_tl { \exp_after:wN \use_ii:nn \l_tmpa_tl }
        % 不使用 \tl_tail:N 是为了去掉括号
        % \tl_set:Nf \l_pinyin_tl { \tl_tail:N \l_tmpa_tl } % \l_tmpa_tl = {...}
      }
      { \tl_set_eq:NN \l_pinyin_tl \l_tmpa_tl }
  }

\my_get_pinyin:n {好}
\tl_show:N \l_pinyin_tl % = hǎo

\setpinyin{好}{hao4}

\my_get_pinyin:n {好}
\tl_show:N \l_pinyin_tl % = hao4

\ExplSyntaxOff

\end{document}

代码的含义应该是十分明显的。

xpinyin 的拼音的转化、排版是由 \__xpinyin_pinyin:n 完成的,如果其参数包含数字,就将它替换为对应的声调,如果不包含数字,直接输出(当然还包括一些其它的处理)。同时它也是不可扩展的。详细可见其源码。

\pinyin 是由 \NewDocumentCommand 定义的,由它定义的命令是不可扩展的,你这里用 \tl_set:Nx 当然只能得到原本的 \pinyin{...}。它的转化、排版也是由 \__xpinyin_pinyin:n完成的。

不过我不懂为什么要定义 \splitmanulpy 这个命令。

如果要自动获取 \xpinyin 使用的拼音,可以定义一个新命令:

\NewDocumentCommand \myxpinyin { O{} m m } % `*' 是不必要的
  {
    \tl_set:Nn \l_my_curr_char_tl {#2}
    \tl_set:Nn \l_pinyin_tl {#3}
    \xpinyin [#1] {#2} {#3}
  }

更新:

为了从 hao4 得到 hào,只要再将其转化一次,这个功能由 \my_get_pinyin_tone:n 完成。见代码

\documentclass{ctexart}
\usepackage{xpinyin}

\begin{document}

\ExplSyntaxOn

\tl_new:N \l__my_save_tl
\tl_new:N \l_pinyin_tl
\tl_new:N \l__my_pinyin_tl
\clist_const:Nn \c__my_tone_a_clist { a,ā,á,ǎ,à }
\clist_const:Nn \c__my_tone_o_clist { o,ō,ó,ǒ,ò }
\clist_const:Nn \c__my_tone_e_clist { e,ē,é,ě,è }
\clist_const:Nn \c__my_tone_u_clist { u,ū,ú,ǔ,ù }
\clist_const:Nn \c__my_tone_i_clist { i,ī,í,ǐ,ì }
\clist_const:Nn \c__my_tone_v_clist { ü,ǖ,ǘ,ǚ,ǜ }
\cs_new_protected:Npn \__my_pinyin_aux:n #1
  {
    \quark_if_recursion_tail_stop_do:nn {#1}
      {
        \bool_if:NT \l__xpinyin_first_bool
          { \tl_set:NV \l__my_pinyin_tl \l__xpinyin_item_tl } 
      }
    \__xpinyin_if_number:nTF {#1}
      {
        \bool_if:NT \l__xpinyin_first_bool
          { \bool_set_false:N \l__xpinyin_first_bool }
        \tl_put_right:NV \l__my_pinyin_tl \l__xpinyin_pre_tl
        \tl_put_right:Nx \l__my_pinyin_tl 
          { \clist_item:cn { c__my_tone_ \l__xpinyin_tone_tl _clist } {#1+1} }
        \tl_put_right:NV \l__my_pinyin_tl \l__xpinyin_post_tl
        \__xpinyin_pinyin_init:
      }
      {
        \int_compare:nNnTF
          { 0 \cs_if_exist_use:c { c__xpinyin_ \tl_to_str:N \l__xpinyin_tone_tl _tl } } >
          { 0 \cs_if_exist_use:c { c__xpinyin_ \tl_to_str:n {#1} _tl } }
          { \tl_put_right:Nn \l__xpinyin_post_tl {#1} }
          {
            \tl_set:Nn \l__xpinyin_tone_tl {#1}
            \tl_set_eq:NN \l__xpinyin_pre_tl \l__xpinyin_item_tl
            \tl_clear:N \l__xpinyin_post_tl
          }
        \tl_put_right:Nx \l__xpinyin_item_tl { \__xpinyin_replace_v:n {#1} }
      }
    \__my_pinyin_aux:n
  }
\cs_new:Npn \my_get_pinyin_tone:n #1
  {
    \tl_clear:N \l__my_pinyin_tl
    \__xpinyin_pinyin_init:
    \tl_set:Nn \l__my_save_tl {#1}
    \bool_set_true:N \l__xpinyin_first_bool
    \__my_pinyin_aux:n #1 \q_recursion_tail \q_recursion_stop
  }
\cs_new:Npn \my_get_char_pinyin:n #1
  {
    \tl_set_eq:Nc \l_tmpa_tl { c__xpinyin_ \__xpinyin_char_to_unicode:n {#1} _tl }
    \exp_args:No \tl_if_head_eq_meaning:nNTF { \l_tmpa_tl } \__xpinyin_pinyin:n
      { 
        % 不使用 \tl_tail:N 是为了去掉括号
        % \tl_set:Nf \l_pinyin_tl { \tl_tail:N \l_tmpa_tl } % \l_tmpa_tl = {...}
        % 为了得到声调, 只要再调用 \my_get_pinyin_tone:n
        \exp_args:Nf \my_get_pinyin_tone:n { \exp_after:wN \use_ii:nn \l_tmpa_tl }
        \tl_set_eq:NN \l_pinyin_tl \l__my_pinyin_tl
      }
      { \tl_set_eq:NN \l_pinyin_tl \l_tmpa_tl }
  }

\my_get_char_pinyin:n {好}
好: \l_pinyin_tl % = hǎo

\setpinyin{好}{hao4}

\my_get_char_pinyin:n {好}
好: \l_pinyin_tl % = hào

\setpinyin{男}{lan}
\my_get_char_pinyin:n {男}
男: \l_pinyin_tl % = lan

\setpinyin{女}{Lv3}
\my_get_char_pinyin:n {女}
女: \l_pinyin_tl % = Lǚ

\par
\my_get_pinyin_tone:n {hao3}
\l__my_pinyin_tl % = hǎo
\my_get_pinyin_tone:n {hào}
\l__my_pinyin_tl % = hào
\my_get_pinyin_tone:n {mei2shi4}
\l__my_pinyin_tl % = méishì
\ExplSyntaxOff

\end{document}

主要修改了 \__xpinyin_pinyin_aux:n\__xpinyin_pinyin:n 命令,使得它们将标点符号保存到 \l__my_pinyin_tl 中,而不是直接输出。

\c__..._clist 用于保存对应的声调,这样,使用 \clist_item:cn 就能从标声调的字母和数字得到带有声调的字母:a,声调3 --> ǎ。(查 表 法)

声调字母的判断使用了 \__xpinyin_pinyin_aux:n 中的判断方法。

使用 \my_get_char_pinyin:n 可以得到单个字符的拼音,它保存在 \l_pinyin_tl 中。使用 \my_get_pinyin_tone:n 可以得到带声调的拼音,它保存在 \l__my_pinyin_tl 中。因为这两个都是不可扩展的,所以必须使用一个宏来保存。

因为这个定义使用了 ǚǎ 等符号,可能无法在其它编码环境下使用,但是 XeTeX + UTF8 是可以的。

发布
问题